How to Crochet Bead Earrings | Lightweight, Easy to Make

Learn how to make cute crochet earrings using just two beads, super fine yarn, and a 1.5 mm hook. With a string that incorporates a bead, followed by adding a second bead and single crocheting around both strings, it is super easy. A second yarn in a different color is introduced to create decorative slip stitches in the next row, blending the extra yarn seamlessly into the work.
The result is a beautiful pair of earrings created in just minutes. So, for the complete tutorial, follow through with us.

The Crochet Earrings Tutorial
In this tutorial, the creator showcases how to make adorable crochet earrings using two beads, minimal materials, and simple crochet techniques. This step-by-step guide is perfect for beginners who want to explore jewelry crafting and crochet. The tutorial highlights the importance of precision and creativity in crafting beautiful accessories quickly and efficiently.
Materials Needed
- Super fine yarn in two different colors.
- A 1.5 mm crochet hook.
- Two beads.
- Scissors for cutting and finishing.
These materials are affordable and easy to find, making this project a budget-friendly option for anyone interested in trying crochet-based jewelry.
Getting Started
- Begin the project by threading the first bead onto the yarn and creating a chain stitch.
- Pull the yarn through the bead, forming the foundational string for the earring design.
- The two beads act as focal points for the design, creating structure and visual interest.

Building the First Layer
- Using simple crochet techniques, stitches are worked around the string to form a neat, circular pattern around the beads.
- This process defines the shape of the earring while securely incorporating the beads into the design.
- Make sure to tighten and smooth out any loose stitches in this step to create a professional finish.
Adding Contrast with a Second Yarn
- Once the initial layer is complete, a second yarn in a different color is introduced to add contrast and texture to the earrings.
- This yarn is pulled through the loops of the previous row, blending seamlessly into the existing design.
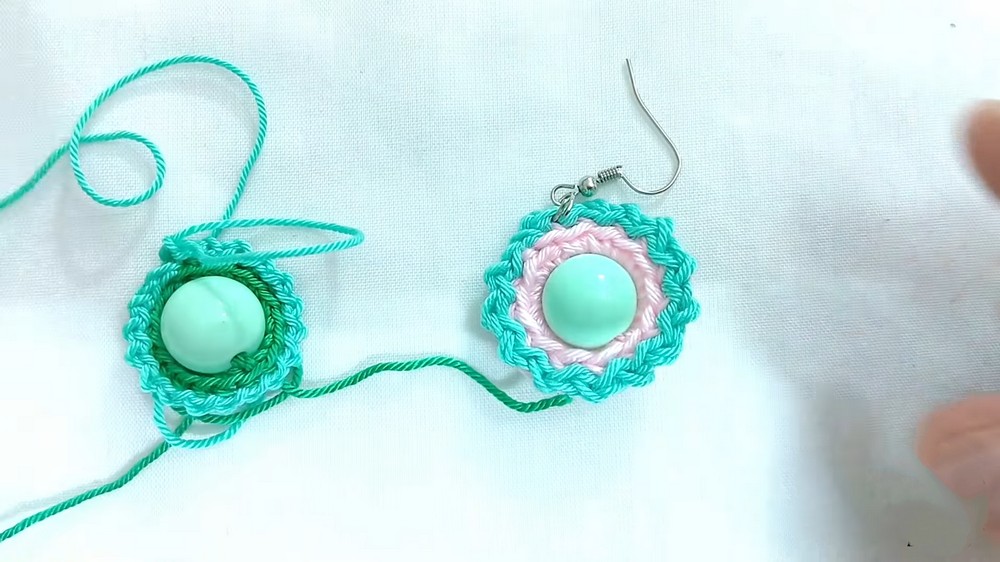
- The tutorial demonstrates how to integrate the extra yarn discreetly so it becomes part of the stitch work without sticking out awkwardly.
Creating Slip Stitches
- Using outer loops from the previous row, slip stitches are worked all around the earring to create a textured and decorative edge.
- This technique is repeated consistently to ensure symmetry and a clean finish.
- The contrasting yarn and slip stitches provide a polished look, enhancing the overall aesthetic of the earrings.

Finishing the Earrings
- After completing all the rows, the tutorial concludes with one final slip stitch to close the design.
- The earrings are now ready, showcasing a beautifully handcrafted accessory created in just a few minutes.
- Ensure all loose ends are secured properly for durability and a flawless appearance.

Final Thoughts
The author highlights how quick and simple it is to create stunning earrings using basic crochet techniques. This project encourages crochet enthusiasts to experiment with colors and materials to suit their personal style. The finished earrings are lightweight, fashionable, and ideal for casual or formal occasions.