How to Crochet Flower Earrings Tutorial | Lightweight, Easy to Make

In this post, you’ll learn how to crochet beautiful fall flower earrings using simple techniques and lace yarn. From adding the double crochets to unfinished double crochet clusters, and slip stitches to form the base flower with six petals, you’ll learn everything. You will also add a second layer with chains and single crochets to enhance the design. For the final row, twisted loops and layered stitches will help you create larger, more detailed petals. Crochet it for a girl or for yourself.
The earrings are finished by attaching closures for wear. This step-by-step guide is beginner-friendly and versatile, allowing you to customize with different yarns or hook sizes.

Crochet Flower Earrings Tutorial
In this detailed tutorial by Bonner, you’ll learn how to create adorable crochet flower earrings using simple methods and techniques. The earring design features intricate layers to give it a complete, elegant look. Below is a structured summary of the tutorial.
Materials Used
- Yarn: Bonner used lace yarn for the sample earrings and fine yarn for the tutorial demonstration.
- Hook Size: A 0.85 mm hook was used for the samples, and a 1.5 mm hook for the tutorial example.
- Additional Supplies: Needle closures for attaching the earrings and sewing any loose ends.
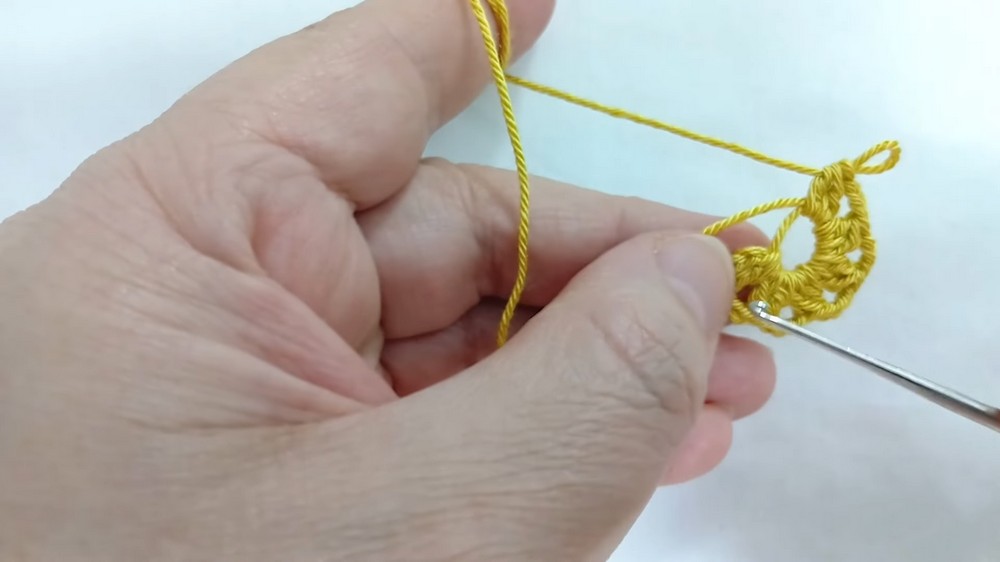
Step 1: Creating the Center of the Flower
The tutorial begins with the creation of the flower’s center using the magic ring technique.
- A magic ring is made, and the first set of double crochet stitches is introduced.
- Unfinished double crochet clusters are worked within the magic ring, joined together to create the petal foundation.
- By working multiple clusters and chaining between them, six distinct petal base shapes are formed.
- The magic ring is tightened to secure the cluster and petal base, and the row is finished with a slip stitch.

Step 2: Adding the First Layer of Petals
Once the petal base is complete, attention shifts to building the first layer of petals.
- Slip stitches are used to transition to the appropriate points for adding petals.
- For each petal, chains and double crochet stitches are worked in the hollow spaces created in the previous row.
- This step is repeated for all six petals, ensuring the layer is even and symmetrical.
- After finishing the row, the yarn is cut, and the next color of yarn is joined to begin the next layer.

Step 3: Forming the Outer Petal Layer
This step introduces more depth and detail to the flower’s design.
- The new yarn is added, and slip stitches are made from the back of the flower to transition between layers.
- Chains are made, and single crochet stitches help form the outer framework for the larger petals.
- The same six-petal framework is created to align with the existing petal layers.

Step 4: Crafting Larger Petals
The final layer of petals adds dimension using looped and twisted stitches.
- Starting with chains, the yarn is twisted multiple times to create loops. These loops are pulled through the designated spots, progressively forming detailed, larger petals.
- This process is repeated for all six petals, completing the flower’s outer layer.
- The delicate twisting technique gives the petals a unique, detailed texture.
Step 5: Finishing and Assembly
To finish the flower earrings:
- Loose threads are sewn onto the back to secure the design.
- Needle closures are attached to transform the finished flower into an earring.