How to Crochet Granny Table Runner for Beginners
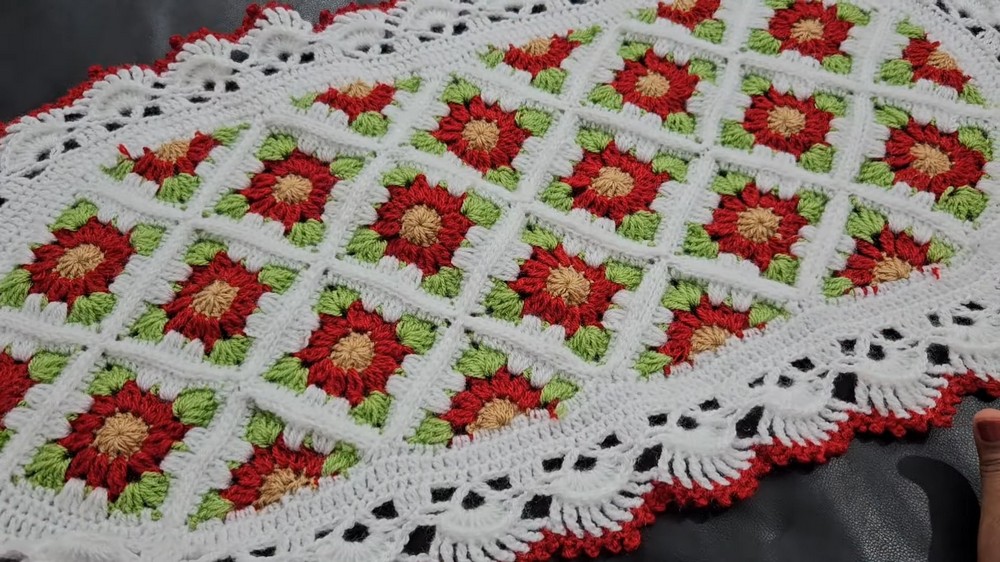
With a step-by-step tutorial, learn how to crochet a colorful granny stitch mat perfect for beginners. It demonstrates how to arrange and join previously made square and triangular pieces. The tutorial then guides through adding multiple border layers using half double crochets and double crochets, with instructions for increases to maintain shape.
Finally, it shows how to create a decorative border with a petal-like design and a picot edging. So, follow through with us for the complete tutorial.

Crocheting the Mat: Joining Pieces and Adding Borders
This video provides a detailed tutorial on crocheting a beautiful mat. The creator, Rimjhim, guides viewers through the process of joining previously made pieces and adding a border to the mat.
Arranging and Joining the Pieces
-
Arranging the Patterns: Rimjhim demonstrates how to arrange the crocheted patterns, which include square and triangular shapes, to form the base of the mat. The arrangement is crucial for the final look of the mat.
-
Joining Technique: She provides a detailed explanation of how to attach the individual crocheted pieces. The technique involves picking up the back loop of the chains for a seamless connection.
-
Connecting Multiple Pieces: The video shows how to join two pieces initially and then how to connect multiple pieces, including the central sections where three pieces meet. This ensures a cohesive and strong base for the mat.
Adding the Border Layers
The tutorial then moves on to creating multiple layers of the border, each adding to the mat’s size and decorative appeal.
-
First Border Layer (Half Double Crochet): This layer involves making half double crochets around the entire edge of the joined mat. Specific instructions are given for handling corners and joining points to ensure a smooth and even finish. This layer helps to square off the mat and prepare it for further embellishments.

-
Second Border Layer (Double Crochet): Rimjhim explains how to add a second layer using double crochets. She highlights where to increase stitches (in the “U” shaped or curved parts) to maintain the mat’s flat shape. This is essential to prevent the mat from curling.
-
Third Border Layer (Half Double Crochet): A third layer of half double crochets is added, with continued increases in the curved sections. This reinforces the border and further ensures that it lays flat and maintains its intended form.

Creating the Decorative Border (Final Layer)
The final border layers are highly decorative, adding intricate details to the mat.
-
Decorative Pattern: The final decorative border involves a repeating pattern. This pattern consists of three double crochets, followed by two chains, then a “triangle” pattern (one double crochet, five chains, one double crochet), and finally two more chains. This sequence is designed to fit within a consistent repeat, creating a symmetrical design.

-
Petal-like Design: Within the “triangle” spaces created in the previous step, a specific number of double crochets are made. This is followed by a single crochet to attach to the center of the three double crochet sets from the previous round, forming a petal-like design element.
-
Picot Edging: The very last round involves creating a picot edging. This is done using back post triple crochets and chains. A distinctive picot is made in the center of each design element, and smaller picots are placed on either side. This intricate edging provides a beautiful finish to the mat.

The video concludes with a final look at the finished mat, showcasing its beautiful and intricate design.