How to Crochet Rose Bouquet Drawstring Bag for Spring
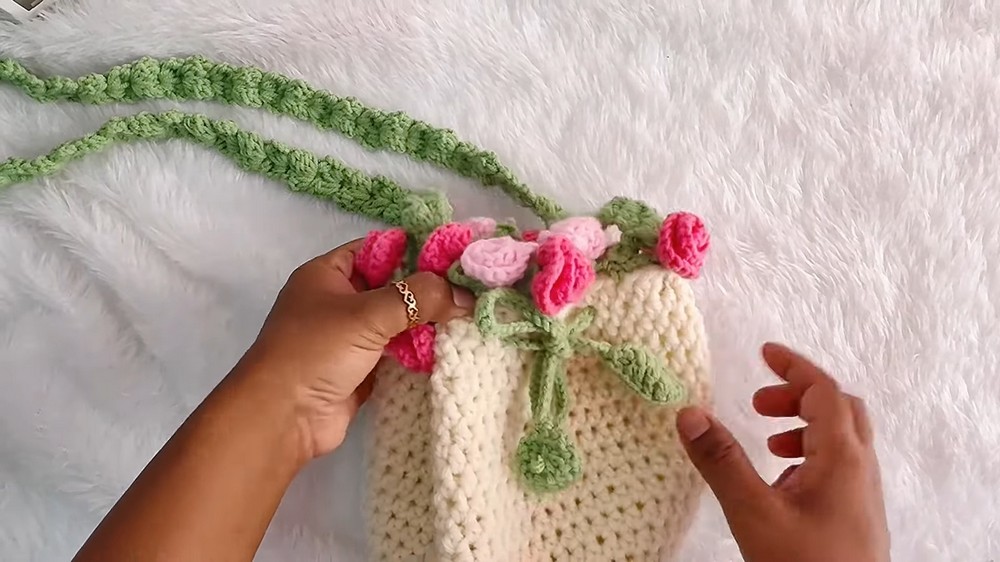
Decorate your large with crocheting a beautiful bouquet-style portable bag, an elegant rosary bag designed for spring. The tutorial covers every detail, including crocheting roses, leaves, and straps, as well as adding finishing touches like a drawstring. The project results in a stunning and functional handmade bag, perfect for gifting or personal use. You can follow through with us for the complete tutorial to crochet this bouquet bag for all skill levels! It is easy and beginner-friendly!

DIY Rose Bouquet Bag Tutorial
The video is a step-by-step tutorial that shows how to create a beautiful and functional portly bag that resembles a bouquet. You can complete crocheting this bag in just an hour, and can also gift it to someone. It is easy and perfect for all skill levels an can be customized in many ways!
Introduction
- She describes the portly bag project as a creative and practical design that looks like a bouquet, with ample space inside for storage.

Materials Used
- Bulky Yarn: 75% premium acrylic and 25% wool (purchased from a hobby store).
- Milk Cotton Yarn: Sourced from Ghana.
- Crochet Hooks: 5.5 mm for the bag, and 3.5 mm for creating tight and neat petals.
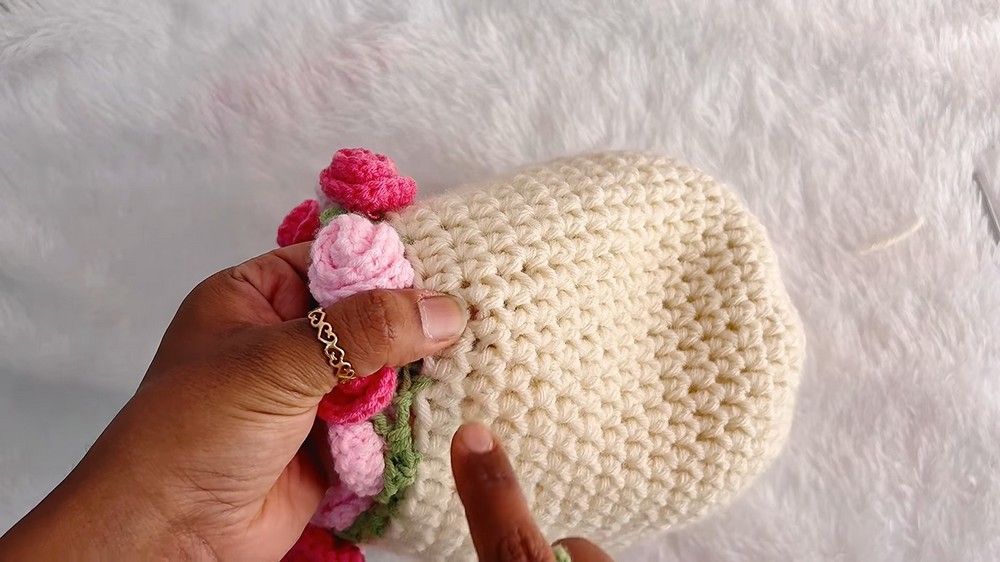
Creating the Bag Base
-
Starting with the Magic Ring
- Demonstrates how to make the magic ring.
- Begins with single crochets as the foundation for the circular base.
-
Increasing Rounds
- Explains the pattern for increasing stitches to expand the base evenly.

-
Forming the Bag Walls
- Starts working only in the back loops after the base is finished to create a defined edge.
- Switches to half double crochets to build up the walls of the pouch.

Adding the Green Border
-
Creating the Leaf Foundation
- Attach the green yarn to start forming the decorative leaf border.
- Uses slip stitches and chaining to create triangular leaf shapes around the pouch.
-
Adding Details to the Leaves
- Further enhances the leaf details with chains, single crochets, and slip stitches.

Making the Roses
-
Forming Each Rose
- Switches to a smaller hook (3.5 mm) for tight and neat petal work.
- Explains how to start each rose between the triangular leaves of the border.
- Uses double crochets to shape the petals and finishes with neat knots to secure the flower.
-
Attaching the Roses
- Attaches the roses meticulously to keep the project tidy and visually appealing.

Creating the Drawstring (Dory)
- Chaining and Slip Stitches
- Demonstrates how to make a long chain and adds slip stitches to form a sturdy drawstring.
- Explains how the drawstring is threaded through the pouch to give it its bouquet-like appearance.
Making the Leaves
- Creates additional leaves to embellish the bag further.
- Explains how to work on both sides of the foundation chain to form symmetrical, detailed leaves.
Crocheting and Attaching the Strap
-
Making the Strap
- Introduces the puff stitch technique to create a textured strap.
- Continues repeating the puff stitch pattern to the desired length.
-
Attaching the Strap to the Bag
- Secures the strap to both sides of the pouch, ensuring it is sturdy and functional.

Final Touches and Conclusion
- Attaches additional decorative elements like leaves or roses to complete the bag.
- Showcases the finished portly bag, emphasizing its beauty and practicality.
This detailed tutorial is ideal for both beginners and experienced crocheters, offering clear instructions and creative design techniques to make a unique and functional bag.
How to Crochet the Puff Stitch?
The puff stitch is a textured crochet technique that adds depth and volume to your projects. To create a puff stitch, yarn over and insert your hook into the desired stitch, yarn over again, and pull up a loop. Repeat this process multiple times (typically 4-5 yarn overs) until you have several loops on your hook. Once the desired number of loops is achieved, yarn over and pull through all the loops, securing the stitch with a chain.