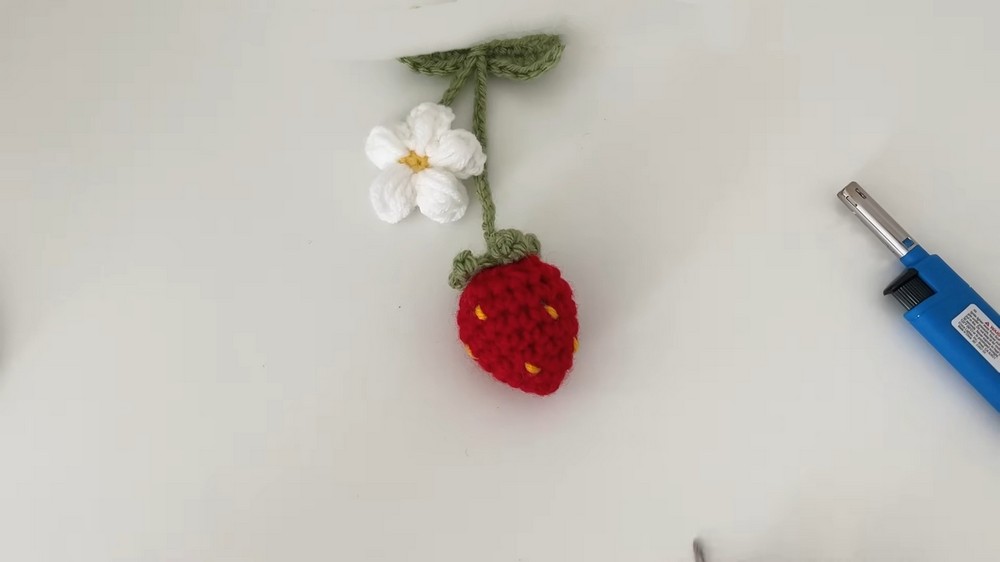
How To Crochet Strawberry Car Hanger for Spring
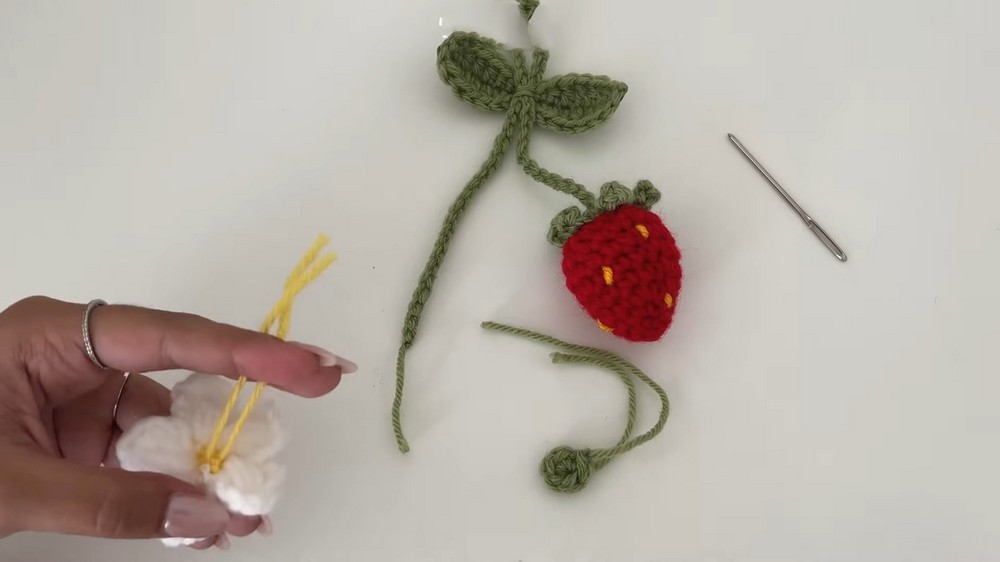
Decorate your car interior in spring with this tutorial on how to crochet an adorable strawberry car hanger with a puff daisy flower and leaves. It guides viewers through each step, including creating a magic circle, stitching the strawberry base, shaping and stuffing it, adding seeds, and assembling the green leaves and flower.
With thorough instructions and a polished finish, the project results in a lovely decorative piece.

The tutorial demonstrates how to create a handmade crochet strawberry car hanger. It guides viewers step-by-step with clear instructions for crafting the strawberry, leaves, flower, and assembling the components. Required materials include a medium crochet hook, yarn (red, green, yellow, white), scissors, a darning needle, stuffing, and a hot glue gun.
Free Crochet Strawberry Car Hanger Pattern
Materials
- Yarn: Medium weight acrylic or cotton in Red (strawberry), Green (leaves & calyx), Yellow (seeds & daisy center), White (daisy petals)
- Crochet hook: Size matching yarn (ex: 3.5-4.0 mm)
- Scissors
- Darning/Embroidery needle
- Polyfiber fill (stuffing)
- Hot glue gun (optional, for additional security)
Key Abbreviations
| Abbreviation | Meaning |
|---|---|
| MR | Magic ring |
| ch | Chain |
| sc | Single crochet |
| hdc | Half double crochet |
| dc | Double crochet |
| sl st | Slip stitch |
| st(s) | Stitch(es) |
| rep | Repeat |
| dec | Decrease (single crochet 2 together) |
| FO | Fasten off |
Special Notes
- Magic Circle/Magic Ring is used to start the strawberry, flower, and leaves.
- Make sure your starting chain and rounds are not too tight for ease in assembly.
- For a firmer, more secure hanger, use a hot glue gun to secure knots and attachment points.
Pattern
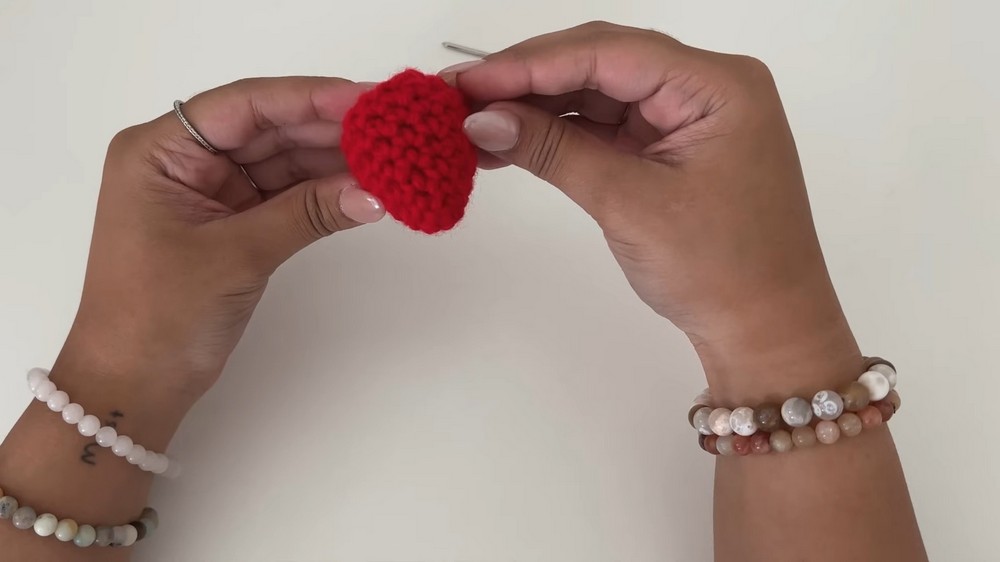
Part 1: Strawberry
With Red Yarn
- MR, ch 1.
- Rnd 1: 4 sc in MR. Pull tight to close. (4 sts)
- Sl st to first st, ch 1.
- Rnd 2: (Inc) 2 sc in next st; sc in next st — repeat around. (6 sts)
- Sl st to first st, ch 1.
- Rnd 3: (2 sc in next st, sc in next 2 sts) — repeat around. (8 sts)
- Sl st to first st, ch 1.
- Rnd 4: (2 sc in next st, sc in next 3 sts) — repeat around. (10 sts)
- Sl st to first st, ch 1.
Basic Strawberry Body Row:
- Repeat, following a pattern of (increase, [sc] x N), with N increasing by 1 each round, until the strawberry is the size you desire, then:
- Rows 5–7: 3 rounds of sc evenly all around (no increases), sl st and ch 1 at end of each round.
Decrease for Shaping:
11. Next round: (2 sc, sc2tog) — repeat around. (reduce to 8)

- Sl st to first st, ch 1.
- Next round: (sc, sc2tog) — repeat around. (reduce to 5–6 sts)
- Sl st to first st, ch 1.
- FO leaving long tail.
- Stuff with polyfiber filling.
- With darning needle, weave yarn through the front loops of all remaining sts, pull tight to close. Secure and FO.
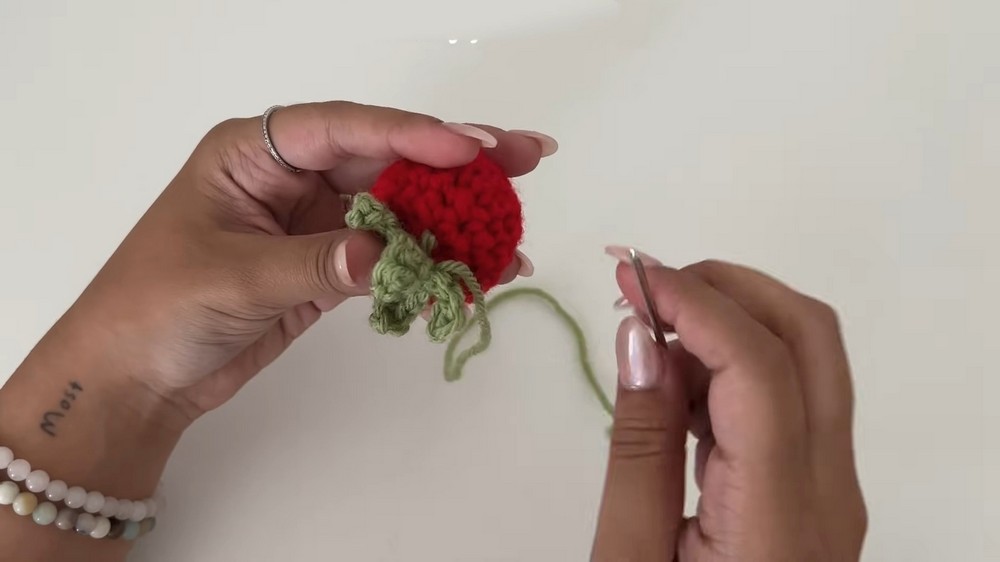
Part 2: Strawberry Top (Calyx)
With Green Yarn
- MR, ch 1.
- 5 sc in MR. Pull to close. (5 sts)
- Sl st to first st, ch 1.
- Petal: ch 4; sc in 2nd ch from hook, sc in next 2 ch (3 sc).
Sl st in next st of MR.
Repeat from * a total of 5 petals around. - Sl st to base, FO leaving long tail to sew.
Part 3: Strawberry Seeds
With Yellow Yarn
- Cut a length. Embroider small stitches (“seeds”) over strawberry using darning needle. Secure and hide ends inside berry.
Part 4: Daisy Flower
Center (Yellow):
- MR, 5 sc in ring, sl st to join. (5 sts)
- FO.
Petals (White):
- Join white to any st, ch 1.
- Ch 4, yarn over, insert into same st, yarn over pull up (as puff st); repeat for 4 puff loops. Yarn over, pull through all but last 2 loops; yarn over, pull through last 2. Ch 3, sl st in same st.
Sl st in next st, repeat Petal in each st around. - Make 5 petals.
- FO and weave in ends.
Part 5: Flower Base & Hanging Chain
Base:
- With green yarn: MR, 5 sc, sl st to join. FO.
(This is the back of your daisy.)
Chain:
- With green, ch 60. Leave a long tail at both ends. FO.
Part 6: Leaves (Make 2)
- Ch 16
- In 2nd ch from hook: sc
- In next ch: hdc
- Next 3 ch: dc in each
- Next ch: hdc
- Next ch: sc
- (Continue pattern on the other side of foundation ch)
- Mirror the stitch sequence: sc, hdc, 3 dc, hdc, sc.
- Sl st to end of leaf, ch 1, FO.
- Flatten and shape leaves, weaving in any ends.

Part 7: Assembly
- Sew calyx to top of strawberry.
- Attach chain and leaves: Sew leaves near calyx/top; use hot glue for extra firmness if desired.
- Attach chain to green base of daisy flower and the strawberry by sewing through both center holes with long tails.
- Sew or glue flower and base together, but leave a small gap for inserting the chain if necessary.
- Weave in all loose ends, securing knots with hot glue if desired.
- Shape all pieces as you like; gently pull on the flower petals and leaves for shaping.
Conclusion
Your delightful crochet strawberry car hanger is finished! This pattern combines amigurumi, embroidery, and classic crochet techniques to create a playful, functional charm for your car, bag, or home. Personalize with colors and bead accents as you wish.
Pattern Corrections & Tips
- Tension: Keep stitches medium-firm, especially with amigurumi parts, to prevent stuffing from showing.
- Chain Length: Adjust hanging chain for personal vehicle or bag size.
- Assembly: Use a hot glue gun to reinforce knots and stitches for durability, especially if the charm will be in a high-movement space, like a car.
- Stuffed Section: Shape the strawberry carefully while stuffing for the best rounded effect.
- Leaves: Stiffen leaves with a light spray of fabric stiffener if desired.