Free Mask Connector Pattern for Everyday Use

Simplify mask comfort instantly with this Free Crochet Mask Connector Pattern that offers a secure fit and reduces ear strain throughout daily wear.
Keeping your face mask comfortable during long wear is very important. The Free Crochet Mask Connector Pattern helps you make a handy tool that fits behind your head and holds your mask straps. This small connector relieves pressure from your ears, making wearing a mask easier and nicer all day.
The finished mask connector looks like a tiny, curved bar with holes at each end. It is slim and light, yet strong enough to hold your mask just right. Its crochet texture adds a soft and pretty look, with neat stitches that give it a gentle charm. You can choose any color you like, from bright and cheerful to calm and simple. This connector is perfect for school, work, or busy outings when you need to wear a mask for a long time.

Classic Mask Connector Crochet Pattern for Beginners
This lovely pattern was designed by a talented crocheter on the Rajutan Whita YouTube channel. The step-by-step video shows exactly how to crochet the connector with easy instructions anyone can follow. It’s a fun and quick project, perfect even for beginners.
People will enjoy using their crochet mask connector because it makes wearing masks more comfortable. It is small enough to carry anywhere and stylish enough to match your mask or outfit. Plus, the handmade touch makes it a thoughtful gift for family and friends, helping them stay comfy while staying safe.

In short, the Free Crochet Mask Connector Pattern is a smart and sweet project. Your finished piece will bring comfort, style, and care to every mask-wearing moment. It’s a simple way to add a bit of handmade happiness to your daily routine!
Mask Connector Crochet Pattern Tutorial
This step-by-step tutorial demonstrates how to create a beautiful, functional mask connector using Poly Cherry thread and a 2.0 mm crochet hook. The mask connector helps keep a mask securely in place around the head, offering comfort and style. Made from durable polyester thread, it is designed to be worn outside the hijab without contacting the skin directly, ensuring safety and durability. The tutorial walks through foundational chain making, half double crochets (HDC), single crochets (SC), slip stitches, picot edging, and decorative finishing touches.
Pattern Highlights
- Durable, easy-to-find Poly Cherry hypoallergenic polyester yarn
- Used 2.0 mm hook size for fine stitches and delicate finish
- Finished connector measures approximately 16 cm in length
- Combination of Half Double Crochet (HDC), Single Crochet (SC) stitches, and Picot edging
- Decorative pearl beads and coconut shell buttons for enhanced aesthetics
- Designed specifically as an external mask holder compatible with hijab wear
- Stepwise construction from base chain through to corner shaping and decorative edges
Notes
- Poly Cherry thread is recommended due to its wide availability and suitability for wearing externally without skin irritation.
- A 2.0 mm (size 3) crochet hook delivers the tight, refined stitches necessary for durability and neatness.
- Use slip stitches to join rounds for a smooth finish and to preserve the shape.
- Picot decorative edges add a lovely ornamental touch and stability to the opening edges.
- Pearls and buttons will be secured at the end for expanded visual appeal, but optional.
- Ensure neat weaving in of ends and careful trimming and sealing for lasting quality.
Skill Level
Intermediate
Recommended for those with experience in:
- Basic stitch knowledge: chain, HDC, SC, and slip stitch
- Working in rows with stitch counting and joins
- Creating picot edging and decorative detail
- Adding sewn embellishments
Materials
- Poly Cherry yarn (polyester thread)
- Crochet hook size 2.0 mm (number three)
- Scissors
- Needle for sewing beads/buttons
- Decorative pearl beads (optional)
- Coconut shell or other decorative buttons (optional)
Measurements / Sizing
- The final mask connector measures approximately 16 cm in length.
- Stitch counts and chain lengths create a moderately narrow, flexible band suitable for comfortably holding masks.
Gauge and Stitch Pattern
- Gauge is not critical, but maintain consistent tension for uniformity.
- Stitches include:
- Half Double Crochet (HDC) for robust band structure
- Single Crochet (SC) for edging and decoration
- Picot for ornamental trim
- Slip stitches provide neat joins between rounds and smooth turn transitions.
Stitch Abbreviations
| Abbreviation | Meaning |
|---|---|
| ch | Chain |
| hdc | Half Double Crochet |
| sc | Single Crochet |
| slst | Slip Stitch |
| picot | Chain 3, slip stitch in first ch (commonly) |
Special Stitches
Picot
- Chain 3, then slip stitch into the first chain to form a small point or loop.
Slip Stitch (slst) Join
- Insert hook into stitch, yarn over and pull through both stitch and loop on hook. Used to join rounds or finish edges cleanly.
The Step-by-Step Pattern
Step 1: Foundation Chain
- Chain 40 stitches.
- Ensure stitches are even by gently pulling and spacing chains.
Step 2: Half Double Crochet Foundation Row
- Starting at the 3rd chain from the hook, work 4 HDCs into the same stitch.
- Then work 1 HDC in each chain across the row up to the last chain.
- At the last stitch, work 5 HDCs into that single chain to round the edge.
- Continue back with 1 HDC in each chain to complete the rectangular foundation with rounded edges.

Step 3: Join and Turn
- Slip stitch into the second chain to substitute for 1 SC and finish joining the round.
Step 4: Single Crochet Row with Picot Accents
- Chain 1, work 1 SC in each stitch across the row.
- Where there are 5 HDC clusters, work 5 SCs correspondingly.
- Work 3 SC directly, then chain 2 spaces and continue to build the pattern.
- Continue by working SC stitches and 3-chain spaces to form picot placement.
- Repeat until the end of the row, ending with 5 chains and appropriate SC finishes.
- Slip stitch into the beginning SC to finish this round.

Step 5: Corner Construction
- Fill corners with 4 HDC, 2 chains, and 1 HDC, forming rounded edges.
- Repeat this corner shaping along all four corners to maintain shape.
Step 6: Picot Decoration on Sides
- Fill side spaces with 7 picots, where each picot consists of a chain followed by slip stitch.
- Work 7 picots in sequence along the side for embellished texture.

Step 7: Continue with Half Double Crochet
- Work HDC in the next chain holes to maintain the band’s shape.
- Continue to alternate 7 DC + 7 picot sets down the side until reaching the edge.
Step 8: Final Round
- Corner and side repeats of HDC, chains, and picots finish the overall border design.
- Slip stitch back to the starting point to close the piece.
Step 9: Finishing
- Cut and tidy the yarn ends neatly.
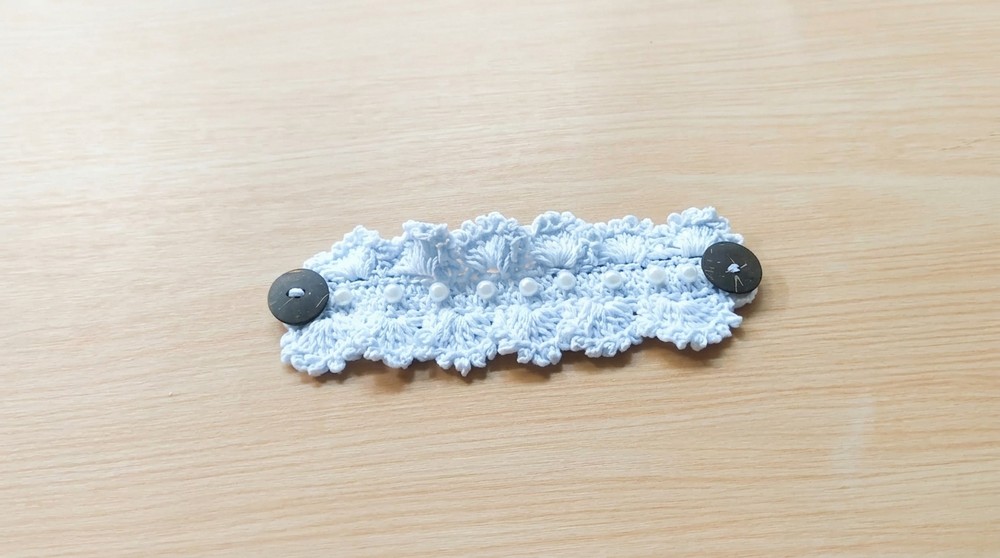
- Decorate by sewing pearl beads and buttons for an enhanced aesthetic appearance.
- The final dimensions measure about 16 cm in length.
Assembly & Finished Size
- After decorative beads and buttons are sewn securely, weave all ends and trim neatly.
- The finished mask connector measures approximately 16 cm in length offering the perfect balance between flexibility and secure mask fit.
Conclusion
This beautifully crafted mask connector blends practical utility with elegant hand crochets using Poly Cherry yarn and a fine 2.0 mm hook. The combination of a solid Half Double Crochet base with delicate picot edging presents a stylish and durable accessory perfect for securing masks comfortably. The addition of pearl beads and decorative buttons elevates the look for personal flair or gifting. With approximately 16 cm in length, it strikes an ideal size for ease of wearing, especially over the hijab. Follow these detailed instructions to create your own mask connector that is both functional and attractive, enhancing safety and fashion simultaneously.