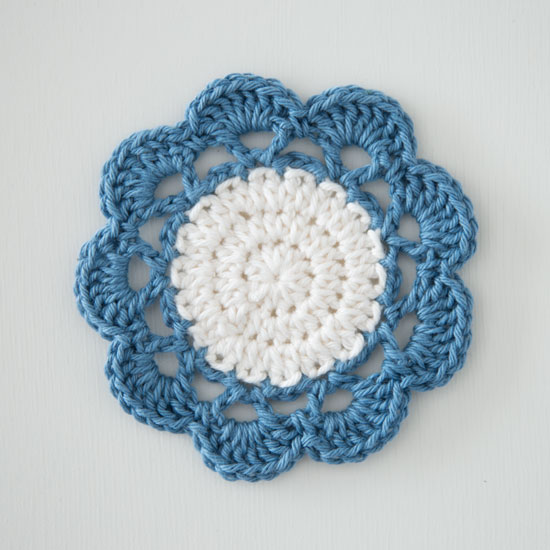
How to Crochet Classic Daisy Granny Square for Spring

Learn how to crochet a daisy granny square with classic granny stitch following a step-by-step tutorial for beginners and experts. The pattern works up quickly and can be customized with different colors for versatile projects. Clear instructions ensure viewers can crochet along and create beautiful squares perfect for spring to crochet blankets and even scarves, and bags. Let’s get started!

The video tutorial is hosted by Janila, who introduces herself and welcomes viewers to her channel. It is a beginner-friendly tutorial on how to crochet the daisy granny square. Janila highlights that the project is quick to complete and versatile for various applications. She uses three colors of 100% acrylic worsted weight yarn (yellow, white, and green) and a 5mm crochet hook. Other required tools include scissors and a yarn needle.
Free Crochet Daisy Granny Square Pattern
Materials
- Yarn: Worsted weight, 100% acrylic in three colors:
- Yellow (center)
- White (petals)
- Green (background)
You may use any yarn you like, and as many/few colors as desired.
- Crochet Hook: 5 mm (H-8) or size recommended for your yarn
- Yarn Needle: For weaving in ends
- Scissors
Abbreviations (US terminology)
- ch: chain
- sl st: slip stitch
- sc: single crochet
- dc: double crochet
- tr: treble crochet (yarn over twice)
- st(s): stitch(es)
- sp(s): space(s)
Special Notes
- Pattern is written in joined rounds.
- The magic circle method is used, but you may substitute with a chain ring if preferred.
- Blocking the finished square is recommended for a neat appearance.
Pattern
CENTER (Round 1 — Yellow)
- Begin with a magic circle, or**
- Ch 4, sl st into the first ch to form a ring.
- Ch 2 (counts as first dc).
- Work 11 dc into the ring (for a total of 12 dc including ch 2).
- Join with sl st to the top of the beginning ch-2.
- Fasten off yellow. Pull magic circle tail tight to close the center.

PETALS (Round 2 — White)
- Join white yarn in any dc with a sl st.
- Ch 3 (counts as first part of a 3-tr cluster).
- Make a 3-tr cluster in the same stitch:
- [Yarn over twice, insert hook in st, yarn over, pull up a loop, (yarn over, pull through 2 loops) twice] ×3 (You will have four loops on your hook.)
- Yarn over, pull through all 4 loops.
- Ch 3 (petal separator).
- In next st, work a 4-tr cluster:
- [Yarn over twice, insert into the st, yarn over, pull up a loop, (yarn over, pull through 2) twice] ×4 (You will have 5 loops on your hook.)
- Yarn over, pull through all 5 loops.
- Ch 3 after each petal.
- Repeat step 5/6 around. You should have 1 starting 3-tr cluster and 11 4-tr clusters, total 12 petals.
- Sl st into the top of the first cluster to join.
- Fasten off white. Do not worry if it curls at this point; it will flatten in the next round.

SQUARING & BACKGROUND (Round 3 — Green)
- Join green yarn in any ch-3 space between petals with a sl st.
- Ch 3 (counts as dc). 2 dc in same sp.
- Ch 3 (corner), then 3 dc in same sp.
- Ch 1 (side space).
- In next ch-3 sp: 3 dc, ch 1.
- In next ch-3 sp: 3 dc, ch 1.
- In next ch-3 sp (corner): 3 dc, ch 3, 3 dc, ch 1.
- Repeat steps 5–7 around to form 4 corners and 4 sides (each side has 3 ch-1 spaces).
- Join with sl st to the top of starting ch-3.

FINAL ROUND (Round 4 — Green; continue with same yarn)
- Sl st into the next 2 dc and into the ch-3 corner space.
- Ch 3, 2 dc in same corner space.
- Ch 3 (corner), 3 dc in same corner space, ch 1.
- Next three ch-1 spaces along the side:
- 3 dc in each ch-1 space, ch 1 after each.
- Work (3 dc, ch 3, 3 dc, ch 1) in each corner ch-3 space.
- Repeat steps 4 & 5 for all sides/corners.
- After the last side, join with sl st to the top of the starting ch-3.
- Fasten off and weave in all ends.

Finishing
- Weave in all yarn tails with a yarn needle, taking care to secure the magic ring tightly and weave in all ends on the wrong side.
- Block your square for best results.

Conclusion
The Daisy Granny Square is a vibrant, beginner-friendly motif that is perfect for blankets, pillows, bags, or other crafty projects. Each round uses simple stitches, but the result is a sophisticated floral look. Experiment with different color combinations to suit your style!
Pattern Correction
- In Round 2, the first petal starts as a 3-tr cluster with beginning ch-3; subsequent petals are 4-tr clusters.
- Be consistent in your corners with (3 dc, ch 3, 3 dc, ch 1) to keep the square shape.
Tips
- If your square curls or buckles, block it gently.
- Pull the magic ring tight to prevent a hole in the center.
- Use a stitch marker at the start of rounds if you have trouble finding the top of your beginning chain.
- Weave in ends after each color change to keep your work neat.