How to Crochet New Year Sleighs from Cord for Beginners
Learn how to crochet charming New Year’s sleighs using caramel cord and fluffy ming yarn for a festive gift basket or decorative piece. By combining techniques like single crochet stitching, rounding, and seamless pattern connections, the video provides detailed guidance on constructing and embellishing the sleighs.
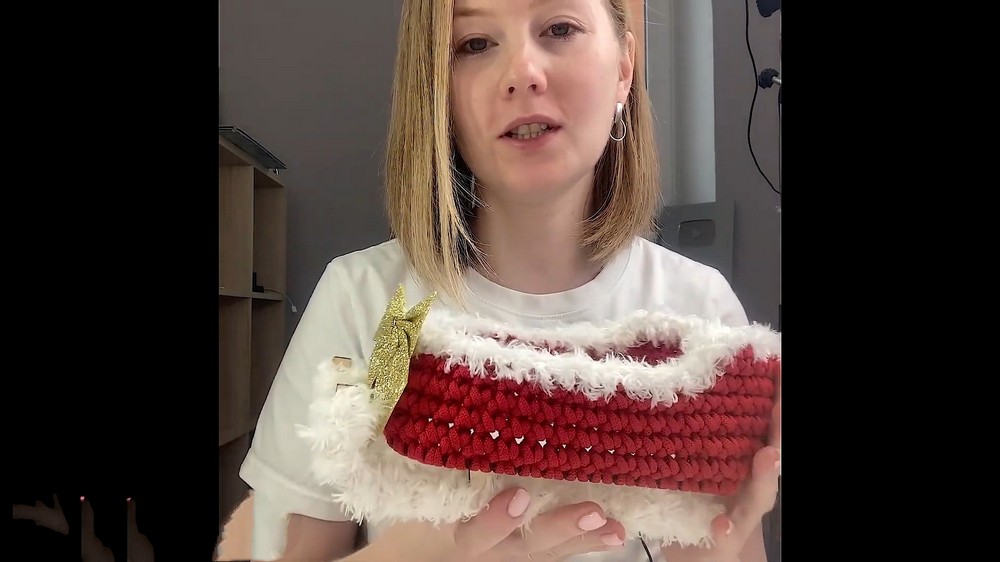
These stunning handmade sleighs, adorned with fluffy yarn resembling snow, can be filled with sweets or small gifts, making them the perfect personalized and creative holiday wrapping idea. So, follow through with us for the complete tutorial.

This video is a detailed masterclass on crocheting festive New Year’s sleighs, which can be used as a unique gift package. Anna Sakhno guides viewers through the entire process, from selecting materials to adding final decorative touches.
Materials Needed
-
Sleigh Base: A pre-made base for the sleigh.
-
Cord: “Caramel” cord is recommended for its excellent shape retention, specifically the red color for this project.
-
Yarn for Decoration:
-
Fluffy “Ming” yarn, which is thin and doesn’t hold shape well on its own.
-
“Caramel Plombir” yarn (off-white) to combine with the “Ming” yarn for better shape retention and a fluffy texture.
-
Alternative color combinations include blue shades with creamy white, or dusty mint (bluish-green) with white for a winter theme.
-
-
Crochet Hook: A 4.5 mm hook.
-
Decorations: “Handmade” tag, New Year’s decor like clothespins, twigs, and satin ribbons.
Crocheting the Sleigh Base
-
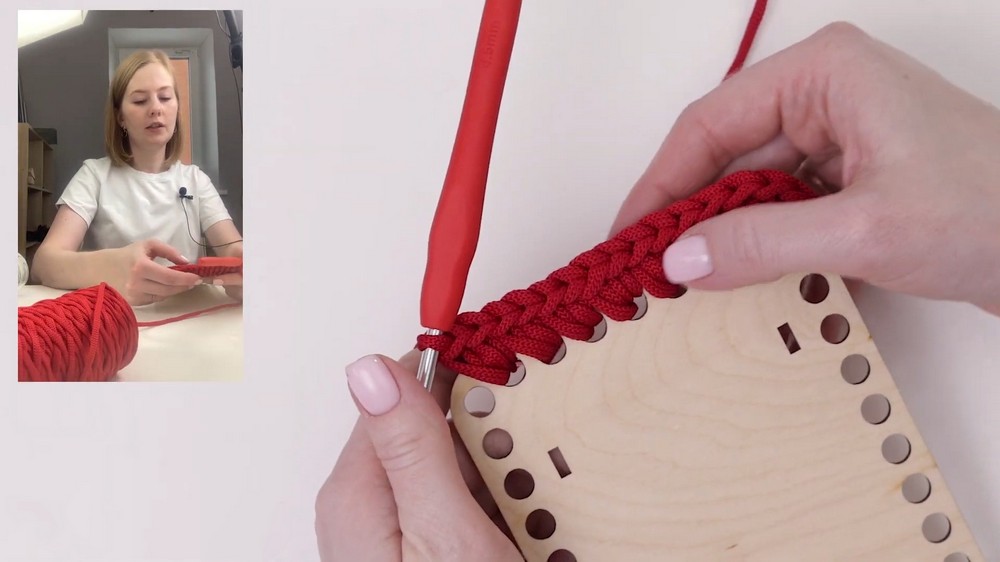
Starting the Base: Begin by identifying the two sides of the sleigh base: one with rounded corners and one with sharper angles [03:05]. Start crocheting from the sharper-angled side [03:12].

-
First Row – Straight Edge:
-
Insert the hook into the very first hole and pull up the red cord, leaving a tail on the wrong side to be hidden later [03:34].
-
Single crochet into each of the holes along this straight edge. Make sure to hide the tail of the cord within the stitches as you go [04:47]. This creates an “excess” of stitches to help the sleigh’s back flare out later [05:54].
-
-
First Row – Side Edge: Crochet single crochets into each of the holes until you reach the rounded section [06:23].
-
First Row – Rounded Section: Alternate between two single crochets and one single crochet in each hole. For example, two single crochets in the 12th hole, then one in the next, then two, and so on, symmetrically reaching the other side of the rounded section [06:50]. As you crochet, gently turn the sides of the sleigh outwards to establish the correct shape [07:36].
-
First Row – Remaining Straight Edge: Continue by single crocheting into each hole until you reach the end of the row [08:07].
-
Joining the Row: Seamlessly connect the end and beginning of the row by pulling the last loop, inserting the hook into the first stitch from back to front, pulling the loop through, and then making a slip knot to create a clean join [08:15].
Crocheting the Sleigh Walls
-
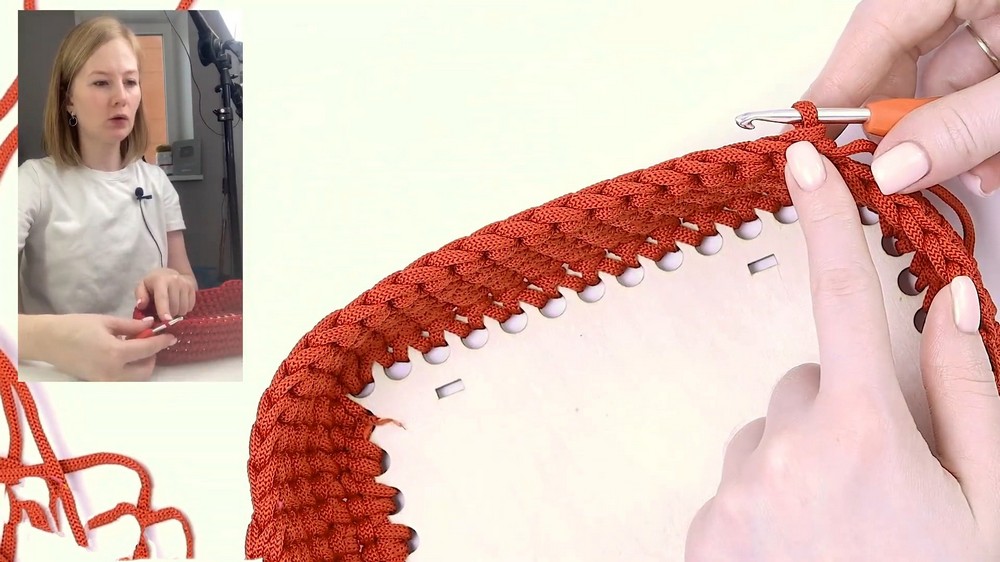
Rows 2-4: For the next three rows, simply single crochet into each stitch around the entire sleigh [09:34]. Continue to turn the walls outwards as you crochet for easier handling [10:34].
-
Row 5 – Shaping the Nose:

Crocheting the Sleigh Back (Symmetric Design)
-
Row 6 – Back Panel:
-
Begin the sixth row from the side that will form the sleigh’s back, as it will be slightly angled backward [13:31].
-
Single crochet symmetrically from the start of the row to the desired end point of the back [13:49].
-
At the end of this partial row, make a turning chain [14:15].
-
Turn the sleigh to crochet in the opposite direction (turning row) [14:26], working only across the back panel.
-
Single crochet into each stitch along the back panel [14:32].
-
After the last stitch, cut the yarn and weave in the tail [14:50].
-
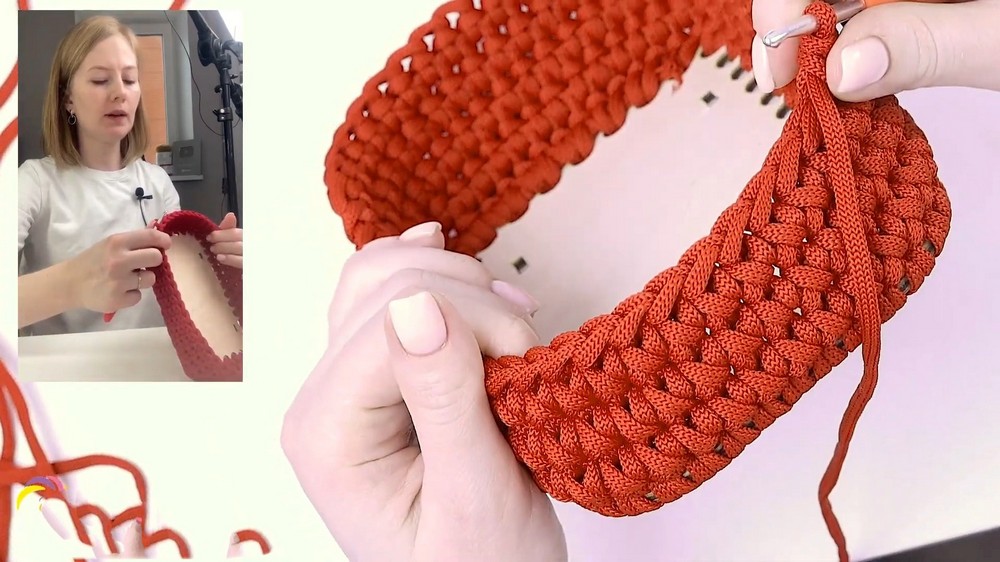
Final Touches and Decoration
-
Border Edging:
-
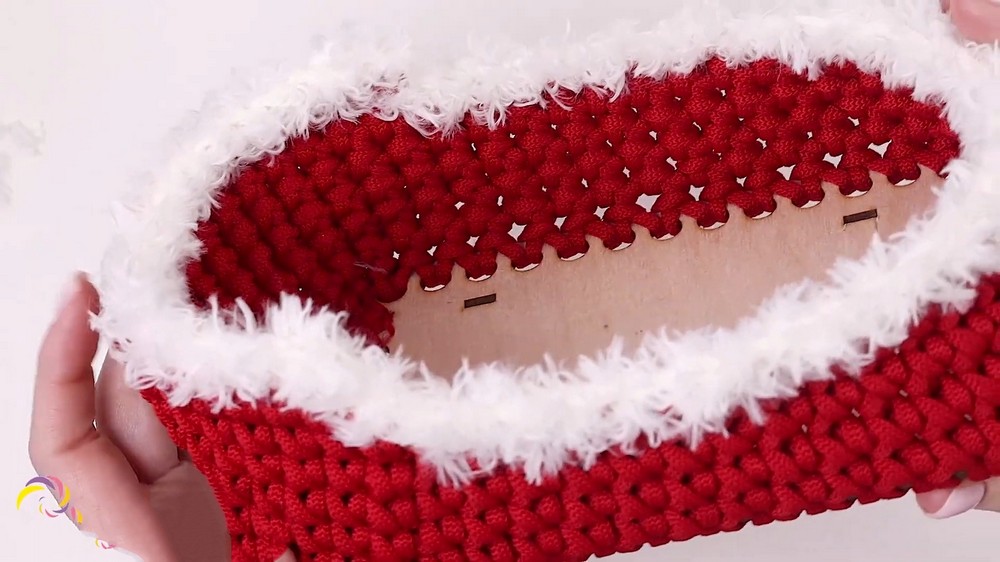
Use two strands of the fluffy “Ming” yarn to create a border around the entire top edge of the sleigh [15:44].
-
Single crochet around the entire edge [16:09].
-
Side Edges of the Back: When reaching the side edges of the back panel, single crochet into the side stitches [17:03].
-
Corners: For the corners, make two single crochets into the corner stitch to soften the angle [17:15].
-
Seamless Join: Use a seamless joining method to finish the last row [18:31].
-
-
Runners Edging:
-
To make the runners look like they are covered in snow, crochet around them using the fluffy “Ming” yarn [18:58].
-
The technique involves creating a slip knot, placing it in front of the runner, pulling the working yarn through from behind, and then single crocheting around the runner, ensuring the working yarn is always behind [19:28].
-
As you crochet, push the stitches together to cover the top part of the runner [20:50].
-
Cut and hide the yarn tail at the end [21:09].
-
-
Decoration: Add a decorative bow or other festive elements to complete the sleigh [21:19].
The finished sleigh can be used to hold gift wrap and small treats.
Video Guide