
How to Crochet Granny Square Join Method
This tutorial teaches a stylish lattice-style join-as-you-go (JAYG) method for connecting granny squares with a step-by-step tutorial. The technique uses chains and double crochets to create a lacy, reversible join. It includes tips on edging preparation, corner stitch math, and color choices. Perfect for all types of granny squares, this method keeps your joins neat and elegant while offering flexibility in layout and customization. A must-try for anyone assembling a beautiful crochet blanket!

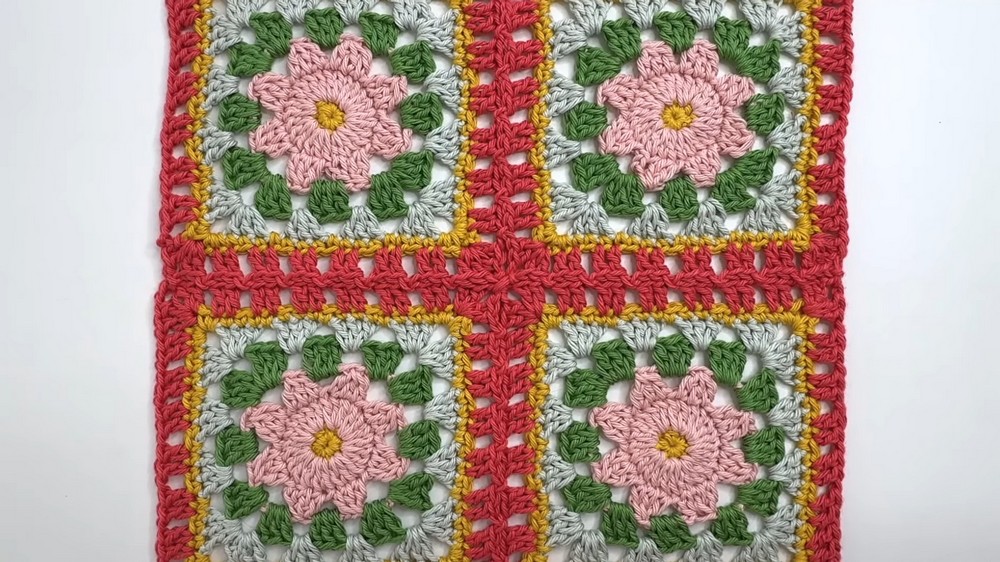
The video demonstrates a Join-as-you-go (JAYGO) technique for joining granny squares. This method uses a combination of chains and double crochets, creating a lacy effect.
- It works equally well on both sides of the project, which is ideal for creating neat, reversible finishes.
- The host uses a worsted weight cotton yarn and a 4 mm crochet hook.
Free Crochet Granny Square Join Method
Materials List
- Yarn: Worsted weight cotton yarn (or fiber of your choice for squares and join)
- Hook: 4.0 mm (G/6) crochet hook (or size needed for your yarn/gauge)
- Scissors
- Tapestry needle (for weaving in ends)
- Measuring tape or ruler (optional, for checking square size)
- Stitch markers (optional, for marking corners)
Key Abbreviations (US Terms)
| Abbreviation | Term |
|---|---|
| ch | chain |
| sl st | slip stitch |
| sc | single crochet |
| dc | double crochet |
| st(s) | stitch(es) |
| sp | space |
| rep | repeat |
| JAYG | join as you go |
Special Notes
- Edging Count: Each square’s edge must be a multiple of 3 + 1 stitches, not counting corners. Adjust the side count by adding or skipping a stitch if necessary.
- Corners: Corners are worked as (sc, ch 2, sc) for 3-stitch corners or (2 sc, ch 2, 2 sc) for 5-stitch corners per your preference. Chains count as a stitch. Maintain an odd number in corners for symmetry.
- Edging Color: You may use the same color as your join or a contrasting color for highlight.
- This join looks equally beautiful on front and back.
Step-by-Step Pattern
1. Prepare All Squares
- Make all your granny squares using any style you like.
- Edge each square with single crochets as follows:
- On each side: Work sc evenly so that each side contains a multiple of 3 + 1 sc.
- Corners: For each corner, work either:
- (sc, ch 2, sc) for a 3-stitch corner or
- (2 sc, ch 2, 2 sc) for a 5-stitch corner
(Example: If you have 4 granny clusters per side, that’s 12 sts + 3 chain-1 spaces = 15. With a 5-stitch corner, that’s 19 sts per side.)

2. Join-As-You-Go (JAYG)
Square 1 (Starting Square)
- Attach Join Yarn/Color:
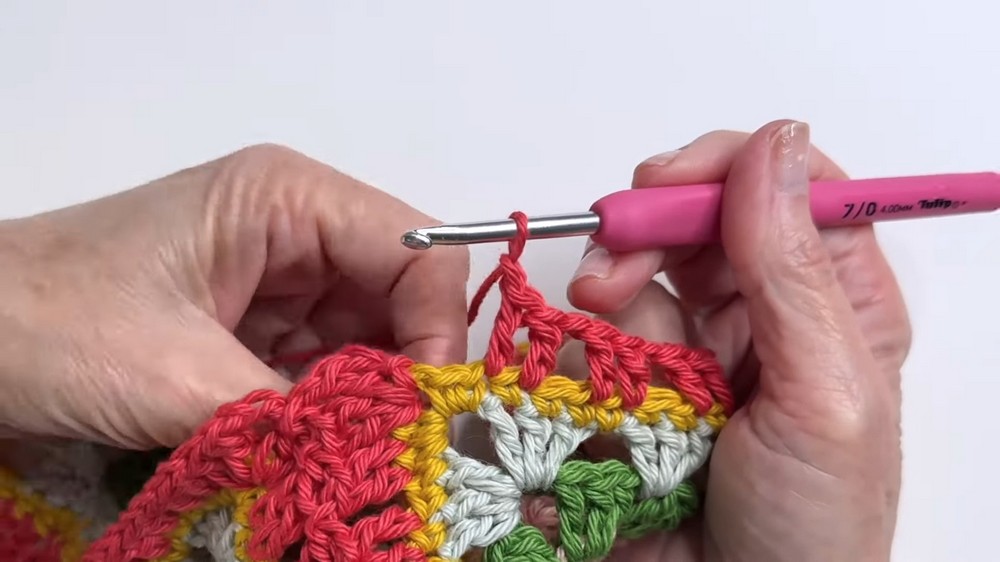
Join yarn in any corner. - Corner: In corner, (dc, dc, ch 2, dc, dc).
- Side Sequence:
- [Ch 1, skip 1, dc in next 2 sts] – repeat across to next corner.
- Corner: (dc, dc, ch 2, dc, dc) in corners.
- Continue: Repeat Side Sequence and corners all around.
- Join: After last side, finish round and fasten off.
(Do NOT edge all remaining squares—see ‘Important Note’ below.)
Square 2 (Joining Next Square)
- Position: Place completed Square 1 above, new square below.
- Join in Corner:
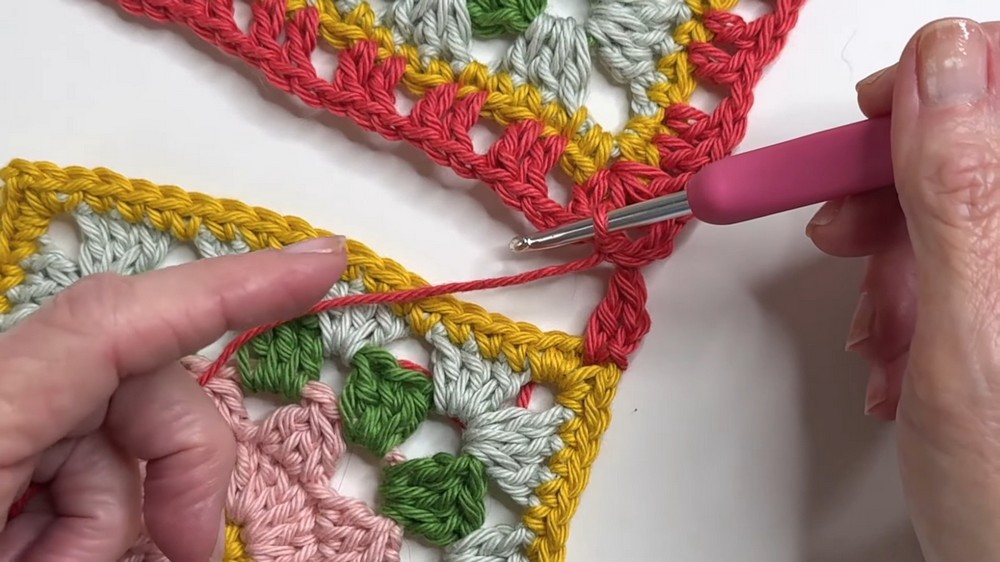
Attach yarn in the corner. (Start with dc, dc) - Join: Ch 1, sl st into the corner ch-space of the joined square above (method 1: insert hook, pull up a loop for sl st; method 2: pull yarn through from behind).
- Ch 1, finish corner (dc, dc).
- Side Joining Sequence:
- [Before every ch 1, sl st into the next space of the joined square above, ch 1, skip 1, dc in next 2 sts]; repeat to the next corner.
- Corners: At corners, join to the adjacent corner as in step 3 before completing the corner.
- Continue: Work around, returning to starting corner; fasten off and weave in ends.
Joining Subsequent Squares (3rd, 4th, etc.)
- Position: Place the group with joined squares above; the new square below.
- Attach join color in corner as before (dc, dc, ch 1), slip stitch join to adjacent square’s corner, ch 1, (dc, dc) to finish corner.
- Side Sequences: As before, sl st to space, ch 1, skip 1, dc in next 2.
- At Corners/Intersections:
- Join at crisscross/intersection by slip stitching through both adjacent corners for solid, neat join.
- Continue as for prior squares.
- After last corner, finish round, fasten off, and weave in all ends.

3. Edging (Optional)
- If you wish, after all squares are joined, work a final border:
- sc evenly along sides,
- odd number of sc in each corner (e.g., (sc, ch 2, sc) or (2 sc, ch 2, 2 sc)).
Pattern Correction
- Only work join-around on the first square!
Do not edge/join over all squares individually—they are joined as you attach. - Adjust sc count on edges so all sides are a multiple of 3 + 1 for a smooth and even join.
Tips
- Always join corners with an odd number of sc and ch spaces for symmetry.
- Slip stitch joins may look slightly different depending on method; choose your favorite and keep consistent throughout your project.
- Make sure you push completed stitches to the side to avoid skipping or repeating stitches.
- For a lacy look, use colors with high contrast between squares and joining yarn; for a subtle look, use the same color.
- Weave in ends as you go for a neat finish.
Conclusion
This Join-As-You-Go (JAYG) lacy granny square joining technique provides a beautiful, reversible, and seamless way to assemble any arrangement of squares. By prepping each square with the correct sc edging and following the joining sequences, you’ll achieve professional results perfect for blankets, cushions, or wearable projects. The join is as beautiful on the back as on the front, and can be adapted with your color and style preferences.
Video Guide
https://youtu.be/rSWjmgEssoA


