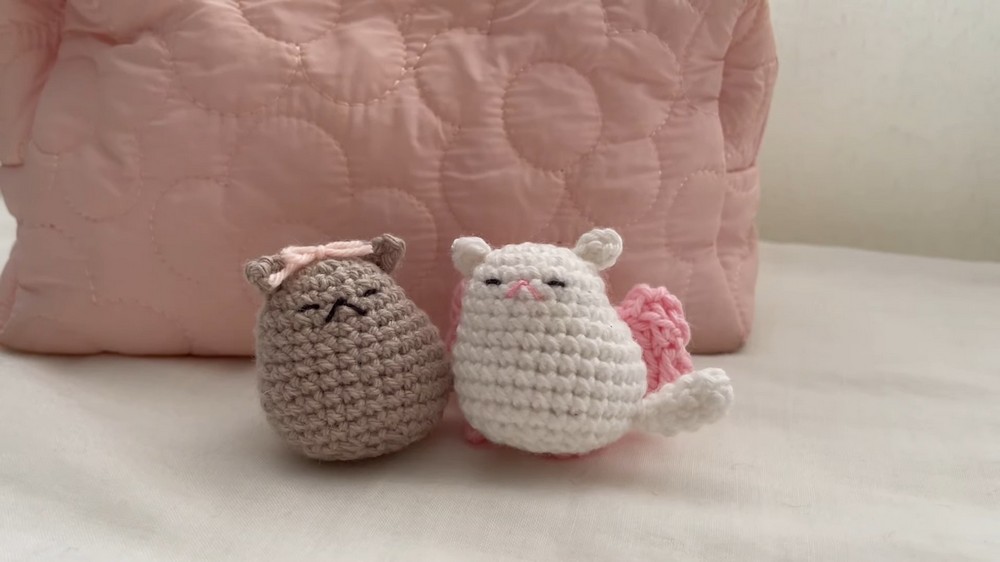
How to Crochet Mini Cats – Easy Beginners Tutorial
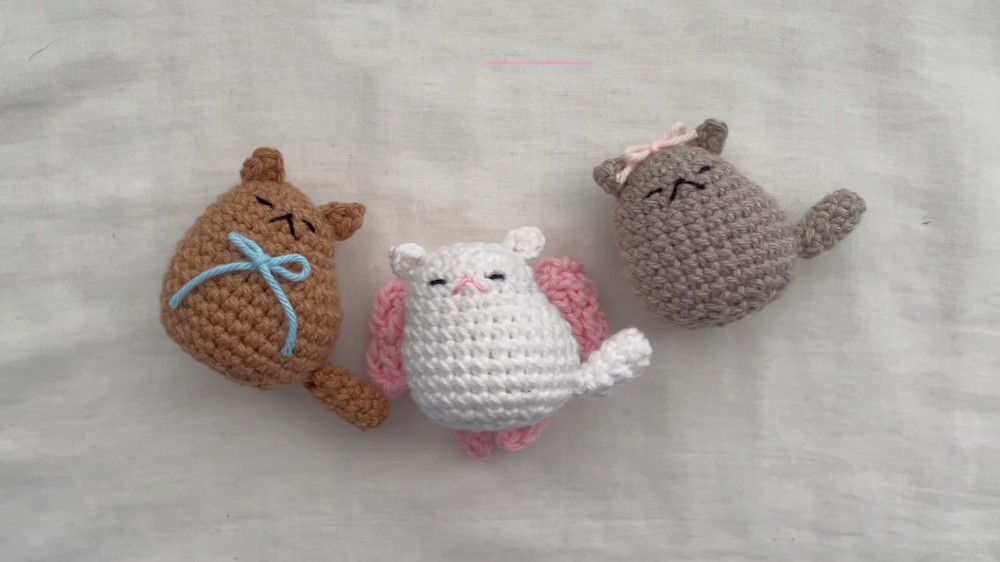
Learn how to crochet adorable, cute mini cats in any color, which are quick and easy to make with a step-by-step tutorial. The tutorial emphasizes creativity, allowing viewers to personalize their designs with different colors, faces, or accessories. It’s perfect for beginners and crochet enthusiasts alike! Follow through with us for the complete tutorial to crochet these mini cats!
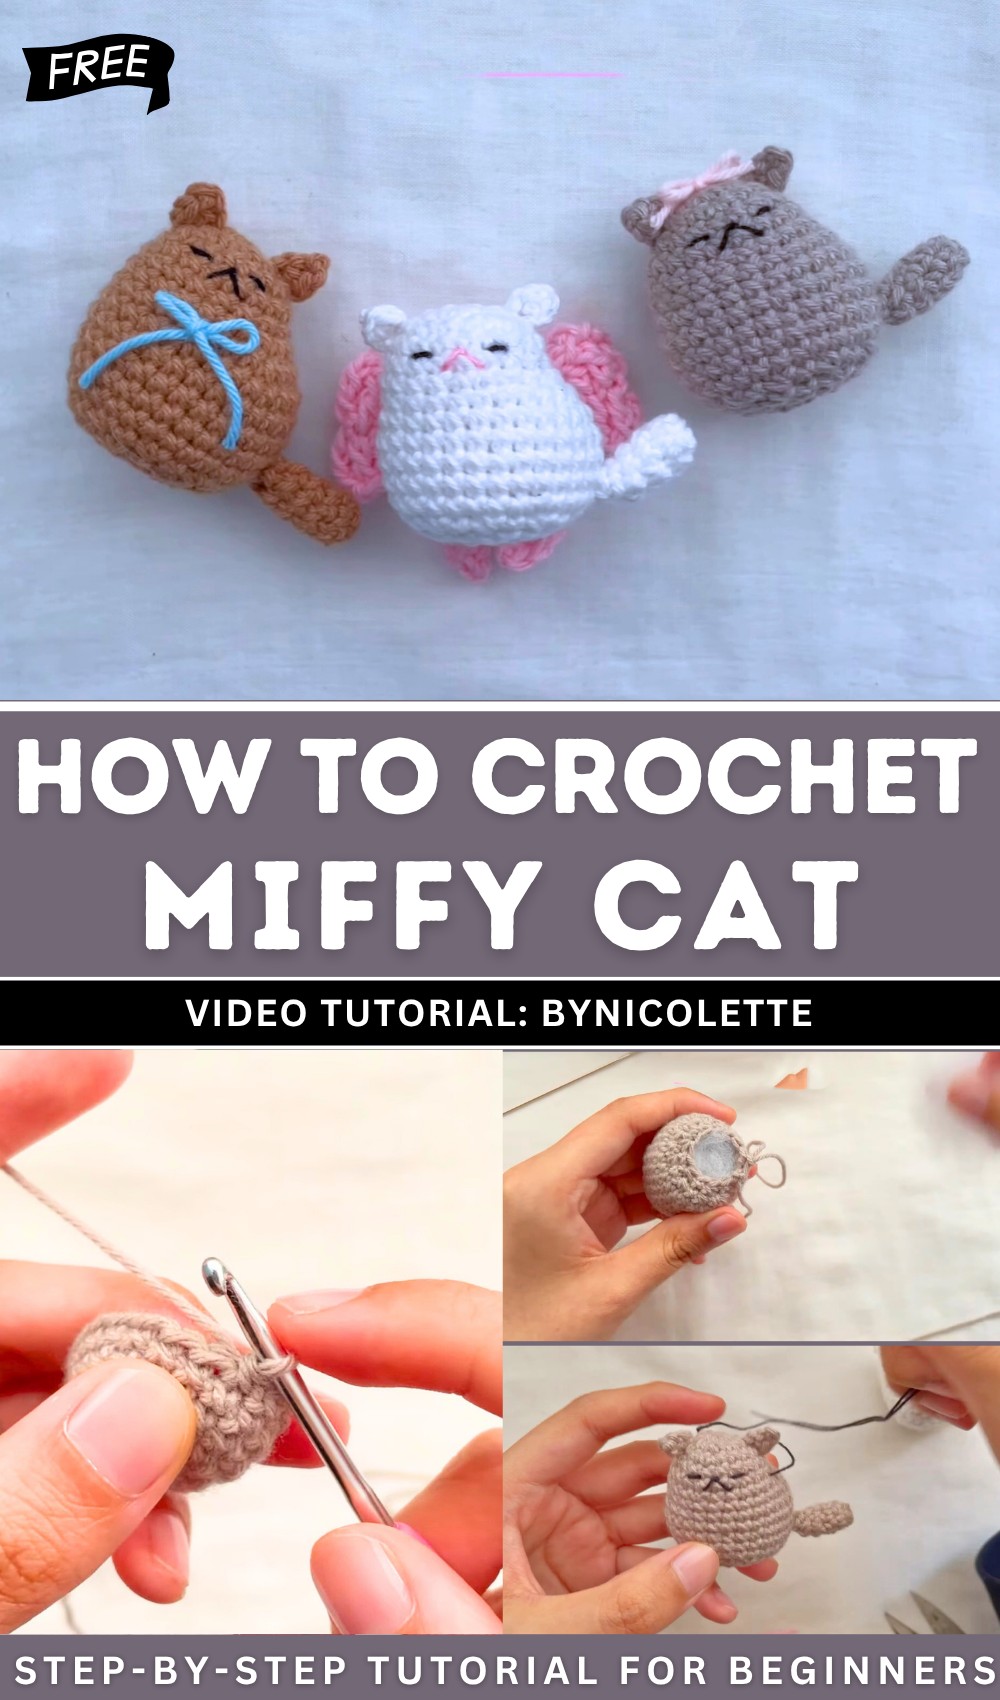
Crochet Mini Cats Tutorial
This tutorial begins with crocheting the body of mini cats using basic crochet techniques, followed by creating and attaching the ears, tail, and facial details. Instructions are also provided for making a bow and small accessories to customize the cats.
Little Free Crochet Cat Plushie
Materials List
- Yarn: Medium weight (worsted/4) yarn in colors of your choice (body, bow, face embroidery, etc.)
- Hook: 3.0 mm for body & tail; 3.5 mm for bow
- Scissors
- Tapestry needle (for sewing and weaving ends)
- Stuffing (polyester fiberfill)
- Stitch markers (optional, recommended for marking rounds)
- Black embroidery thread (for face)
- Measuring tape (optional)
Key Abbreviations (US Terms)
| Abbreviation | Term |
|---|---|
| MR | Magic Ring |
| ch | Chain |
| sc | Single Crochet |
| sl st | Slip Stitch |
| hdc | Half Double Crochet |
| dc | Double Crochet |
| tr | Treble Crochet |
| inc | Increase (2 sc in same st) |
| dec | Decrease (sc2tog) |
| rep | Repeat |
Special Notes
- Work in rounds for a seamless body and tail.
- Use stitch markers in the first stitch of each round to track progress.
- All increases are 2 sc in the same stitch, all decreases are single crochet 2 together.
- For bows and face, customize colors and placement as you wish.
- For plushies, keep stitches tight for a neat finish.
- Stuff lightly for a soft plush or more firmly for a shape-retaining keychain.
Pattern
Body
Hook: 3.0 mm
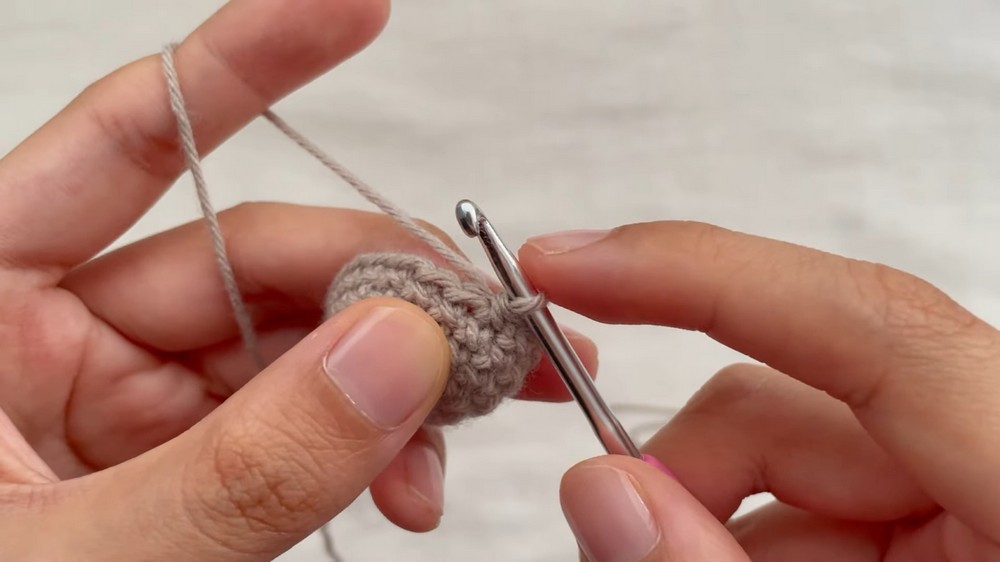
1. Body Base
- Begin with a Magic Ring.
- Round 1: Work 8 sc into MR. Pull ring tight to close. (8 sts)
- Round 2: Work 8 increases (2 sc in each st around). (16 sts)
- Round 3: [Sc in next 3 sts, inc] around. (20 sts)
- Rounds 4-5: Sc in each st around. (20 sts each round)
- Round 6: Sc in next st, inc in next st x 4, then 8 sc. (24 sts)
- Round 7: Sc in next 9 sts, [sc, inc] x 3, 8 sc, inc in last st. (29 sts)
- Round 8: Inc in first st, sc in next 28 sts. (30 sts)
- Rounds 9-12: Sc in each st around. (30 sts each round)
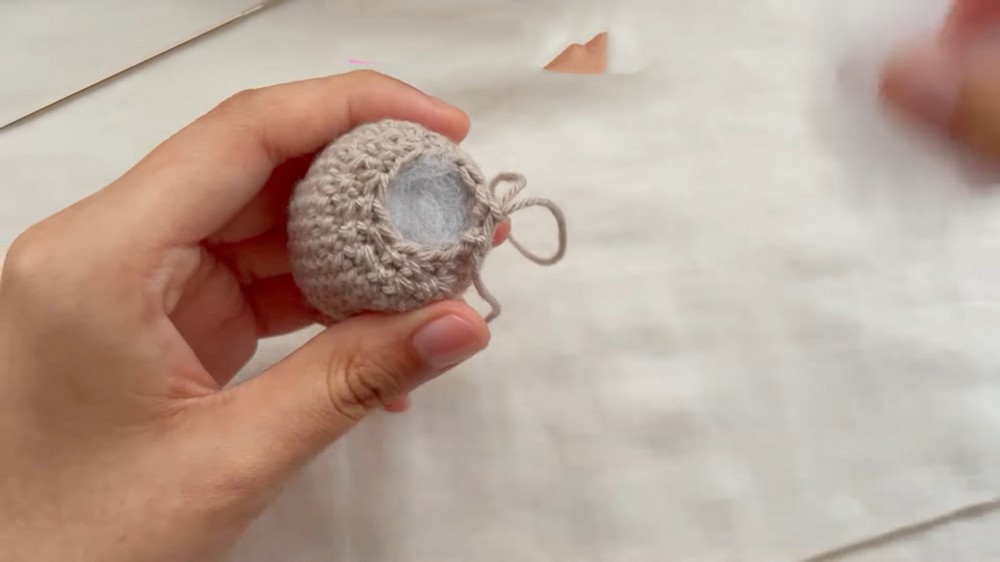
2. Body Decreases
- Round 13: Dec, sc in next st; repeat to end. (20 sts)
- Round 14: Sc in next st, dec; repeat to last st, sc in last st. (14 sts)
- Begin stuffing the cat body with fiberfill.
- Round 15: Sc in next st, dec; repeat to last st, sc in last st. (10 sts)
- Round 16: Sl st in next st, fasten off, leaving a long tail for sewing.
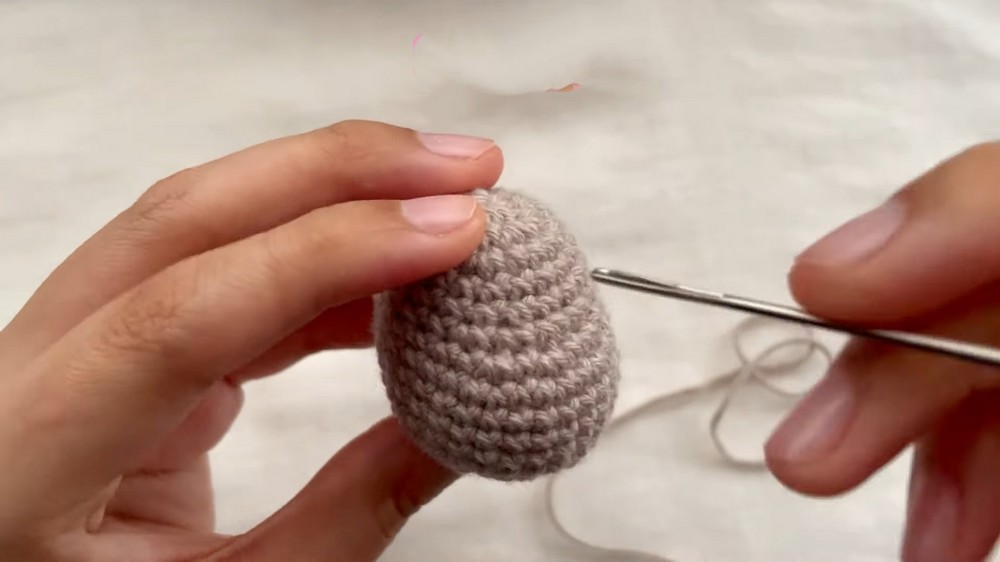
3. Close Body Top
- With needle and yarn tail, pick up the front loop only of the last 8 stitches.
- Pull tight to close the hole.
- Weave in end securely.
Ears (Make 2)
Hook: 3.0 mm
Leave a medium tail at start and end for sewing.
- Make a slip knot and chain 3.
- Row 1: Skip 1 ch, sl st in next ch, hdc in next ch.
- Ch 1, fasten off, leaving a tail.
- Make 2.
Tail
Hook: 3.0 mm
- Magic Ring, work 6 sc into MR.
- Pull tight to close.
- Rounds 2-4: Sc in each st around. (6 sts each round)
- Round 5: Sc in next 4 sts, dec. (5 sts)
- Sl st in next st, fasten off, leaving a long tail for sewing.
Assembly
Attach Ears
- Sew ears atop head, between rounds 2 and 3.
- Secure using yarn tails and needle, hide ends inside body.
Attach Tail
- Sew tail at back, between rounds 11 and 12, centered to match ear height.
- Hide ends inside.
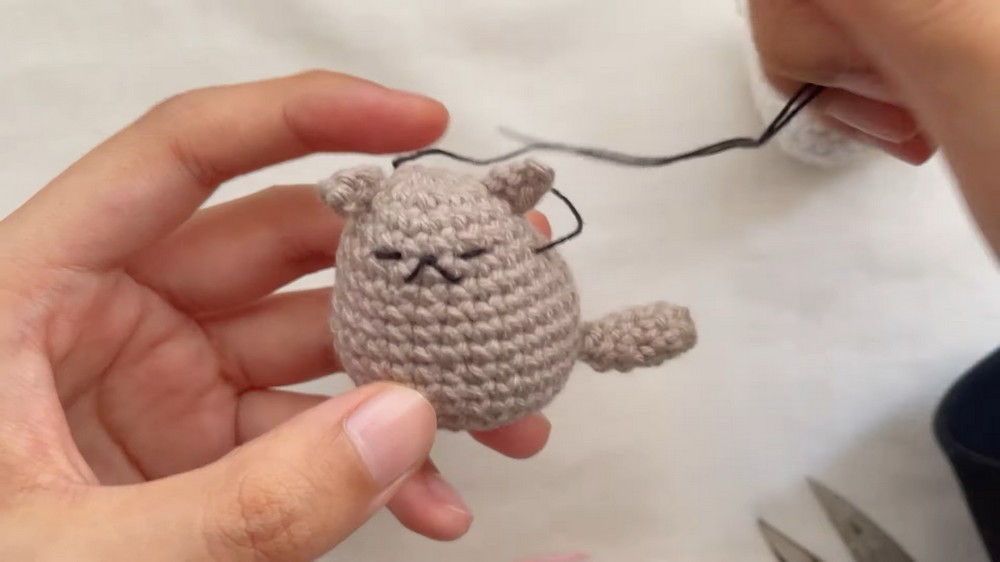
Face Embroidery
Use black or colored thread.
- Mouth:
- Choose 3 stitches for the mouth and embroider an “m” shape:
- Pass yarn through one side, skip middle, pass through next, go through above middle for center, complete “m”.
- Choose 3 stitches for the mouth and embroider an “m” shape:
- Eyes:
- Place eyes 2 stitches to each side of mouth.
- Pass yarn through stitch, work small horizontals or verticals for cute eyes.
Tips: Experiment with other face styles for expression!
Bow
Hook: 3.5 mm (for larger bow)
Big Bow
- Slip knot, ch 25.
- Row 1:
- Skip 1 ch, sc in next,
- 2 hdc in next 2 sts,
- 2 dc in next 2 sts,
- 2 tr in next 2 sts,
- 2 dc in next 2 sts,
- 2 hdc in next 2 sts,
- 2 sc in next 2 sts.
- Turn:
- Repeat the above pattern on the other side of chain (mirror image).
- In last st, work 3 sc.
- Finish:
- Sl st to first sc, fasten off, leave a very long tail.
Small Bow Center
- Slip knot, ch 15
- Row 1:
- Skip 1 ch, sc in next,
- hdc in next,
- dc in next,
- tr in next,
- dc in next,
- hdc in next,
- 2 sl st in next 2 sts.
- Mirror pattern on other side of chain.
- In last st, sc. Ch 1 and fasten off.
Bow Assembly
- Place the center piece over the middle of bow and wrap big tail around tightly several times to secure.
- Hide yarn tails inside with needle.
Quick Finger Bow
- Cut medium yarn, make two loops, cross them, pull ends through center, tighten.
- Trim as needed.
- Secure to ears, tail, head, or anywhere you like.
Final Assembly
- Sew bows to head, body, tail, or ears as desired.
- Weave in remaining ends for a neat finish.
Pattern Correction
- Counts: Always mark first stitch of each round and check your counts. Body should have 8, 16, 20, then 29, and finally 30 stitches at various points.
- Decreases: If decrease rounds end with one extra stitch, simply sc in last st.
- Bow Pattern: Work stitches in mirror pattern on both sides of chain for symmetry.
Tips
- Use tightly spun yarn and small hook for best amigurumi fabric.
- Keep stitches tight so stuffing does not show through.
- Mark round starts and use stitch markers to avoid losing place.
- Customization: Try different colors for bow, ears, tail, or face details.
- Use safety eyes for easier placement if preferred.
- For beginner embroiders, try simple dots or lines for a cute face.
Conclusion
These adorable little crochet cats are perfect as plushies, keychains, decor, or personalized gifts! Simple construction, clear techniques, and customizable features ensure you can make them uniquely your own. Enjoy the process and have fun adding bows, face styles, and creative colors.