How to Crochet Plumeria Floral Granny Square for Beginners

This tutorial teaches how to crochet a Plumeria Floral Granny Square, combining a 3D flower centerpiece with a sturdy square base. The step-by-step instructions guide you through creating petals, shaping the square, and adding decorative rounds. Techniques include slip knots, single and double crochets, chaining, and creating corners. The final pattern features intricate petals framed by a square, making it perfect for blankets, cushions, or other home décor projects. It’s an ideal design for crocheters!

Crochet Plumeria Floral Granny Square Tutorial
Overview of the Tutorial
- The video tutorial demonstrates how to crochet a Plumeria Floral Granny Square, combining the elegance of a floral design with the structure of a granny square.
- This design is suitable for various projects, such as blankets, pillow covers, or even standalone decorative pieces.
- The tutorial includes clear, step-by-step instructions for crocheting the flower, shaping it into a square, and finishing off the edges for a polished look.
Round 1: Forming the Circle
- Start by creating a slip knot, followed by chaining to create a small circle.
- Single crochet stitches are worked into the circle to lay the foundation for the design.
- The round is completed by connecting the stitches to form a closed loop.
Round 2: Creating the Base for Petals
- Single crochet stitches are combined with chain spaces, creating small loops between stitches.
- These loops serve as the base for forming the flower’s petals in the next round.
- The round ends with a slip stitch to secure the structure.

Round 3: Making the 3D Petals
- Begin the petals by working a combination of double crochets into the chain spaces created in Round 2.
- Each petal is shaped within its dedicated chain space, forming a raised 3D floral design.
- Continue this process for all chain spaces, resulting in a flower with five distinct petals.
Round 4: Transitioning to the Square Base
- To start shaping the square, work into the single crochets located between the petals.
- Chains and single crochet stitches outline the initial framework of the square.
- This round provides the foundation for the square’s structure, while still highlighting the flower’s floral design.

Round 5–6: Strengthening the Square Base
- The chain spaces are further filled with single crochet stitches to solidify the square’s edges and structure.
- Additional chain spaces are introduced, which will be used in later rounds to define corners and sides of the square.
- These rounds continue transitioning the floral design into a more geometric, square shape.
Round 7–9: Establishing the Granny Square Structure
- Corners are created using double crochets and chain spaces, defining the traditional granny square layout.
- The sides of the square are filled with consistent patterns of double crochets and chain spaces, ensuring symmetry.
- These rounds form a complete square while maintaining the 3D flower at the center.

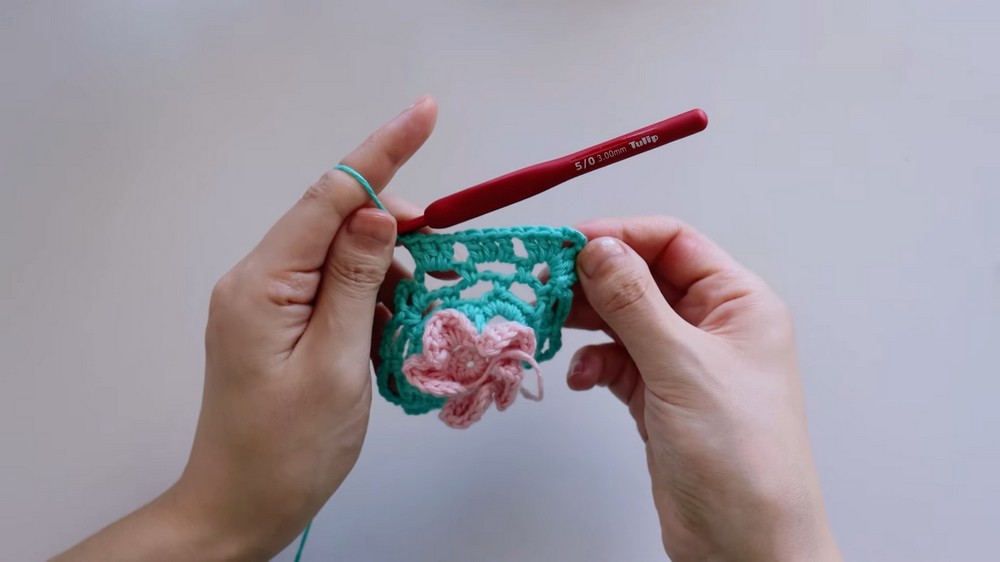
Final Touch: Enhancing the Petals
- The tutorial circles back to the flower’s petals, adding depth and detail through slip stitches, half double crochets, and treble crochets.
- A decorative picot stitch is added at the tip of each petal to enhance its visual appeal.
- These finishing touches ensure the flower stands out prominently against the square background.
Framing the Square
- The square is framed with single crochet rounds around its edges to add a clean and polished finish.

- In corners, additional single crochet stitches are worked to retain the square shape and prevent curling.
- This step ensures the granny square is ready for use in larger projects or as a standalone unit.

Conclusion
- The completed Plumeria Floral Granny Square blends a detailed, textured flower with a sturdy and symmetrical square base.
- This design is versatile and can be adapted for a wide range of creative crochet projects.
- The step-by-step instructions in the video make it beginner-friendly while delivering professional results.