How to Crochet Quick and Easy Granny Square Pouch
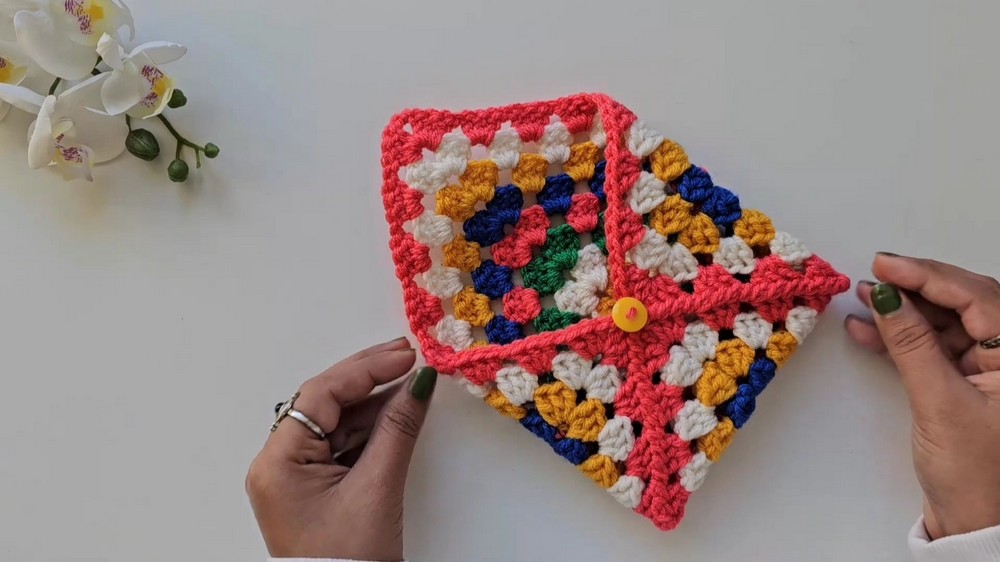
In this post, you’ll learn how to make a cute crochet pouch using a traditional granny square pattern for beginners and experts. The tutorial begins with creating a magic circle and offers detailed instructions for each step, including double crochet clusters, color changes, and expanding the square over multiple rounds.
Once the square is complete, the sides are folded and joined to form the pouch, with a button added for closure. This easy and vibrant project is perfect for crochet enthusiasts. So, follow through with us for the complete tutorial.

How to Make a Cute Crochet Pouch
This tutorial by Rinku Handcrafts teaches viewers how to create a colorful and functional crochet pouch using a single granny square. Below is a detailed summary of the steps covered in the video:
Introduction
- The creator introduces the project: a quick and fun crochet pouch made from a single granny square.
- The tutorial is beginner-friendly and results in a vibrant, handmade accessory.

Creating the Magic Circle and First Round
- The tutorial begins with instructions on creating a magic circle:
- The yarn is twisted to form a cross, and a loop is pulled through to complete the base.
- The first round is constructed:
- A granny square structure is created with clusters of double crochet stitches, separated by chains.
- Slip stitches and chains are used to complete the round and secure the square’s shape.
- The magic circle is tightened, marking the completion of the first square.
Changing Yarn Colors
- The yarn color is changed after the first round, and the creator explains how to attach a new color:
- The end of the previous color is secured, and a new yarn is joined in the corner loops.
- The creator recommends using multiple colors to add vibrancy to the pouch.

Building the Granny Square
- The next rounds of the granny square build on the same repetitive pattern:
- Each corner receives two clusters of double crochet stitches separated by chains.
- Middle loops between corners receive a single cluster of double crochet stitches.

- Chains are added between clusters to maintain the growing pattern.
- The creator emphasizes that the granny square consists of simple stitches (double crochets, chains, and slip stitches), making it ideal for beginners.
- The process is repeated for each new round, with the square growing in size automatically.

Completing the Granny Square
- The final granny square for the pouch consists of eight rounds.
- The creator explains that consistency in the basic pattern ensures a neat and clean design.
- Viewers are encouraged to play with color combinations to customize their pouch.

Assembling the Pouch
- Once the granny square is complete:
- The square is folded into a pouch shape, joining three sides with slip stitches or other joining techniques.
- A flap is left at the top to close the pouch.

Adding the Button
- A button is attached to secure the pouch flap:
- The flap can easily be tucked into the button for functionality and style.
- The creator showcases the finished pouch, highlighting its utility and cute design.
Closing Remarks
- The creator thanks viewers and encourages them to try the project.
- Tips include experimenting with different colors and making larger or smaller pouches by increasing or reducing the rounds.