How to Crochet Rose Bouquet Into Cup Coaster for Beginners

With a step-by-step tutorial for spring, learn how to crochet a beautiful pink rosette cup coaster. Starting with a magic ring, the process involves crocheting multiple rounds of double crochets with gradual increases, followed by adding a leaf pattern using green yarn. The video also demonstrates crocheting pink roses from chains and double crochets, which are shaped into flowers and fixed onto the coaster using glue.
The finished product is a charming and functional handmade piece, perfect for home decor or gifting. The tutorial is beginner-friendly, offering clear instructions to inspire creativity and enhance crocheting skills.

Pink Rosette Cup Coaster with Leaves and Roses
In this step-by-step tutorial, viewers are guided on how to crochet a beautiful Pink Rosette Cup Coaster, complete with green leaves and pink roses. This project is ideal for home decor or as a thoughtful handmade gift. Below is a structured summary of the tutorial based on the crafting process.
Introduction
The video begins with a brief introduction to the project and its uses. The coaster is described as a unique and stylish item that protects surfaces while reflecting personal style. The tutorial encourages viewers to follow along carefully for best results.
Steps to Make the Pink Rosette Cup Coaster
1. Creating the Rosette Base
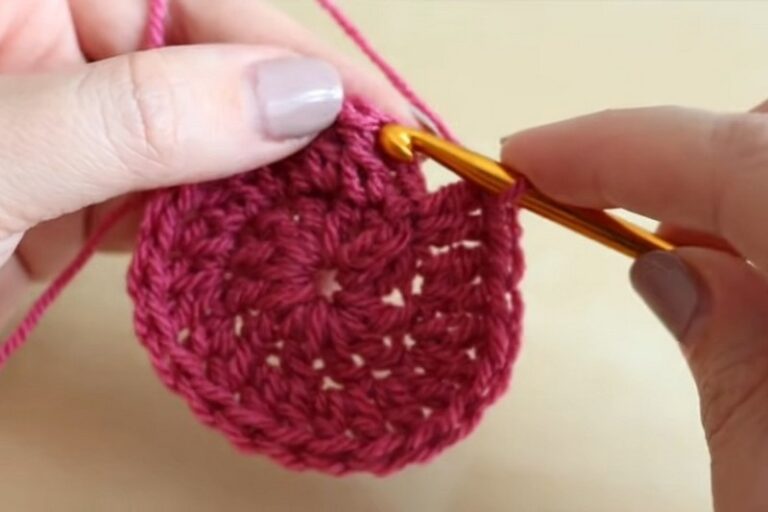
- Foundation: The process starts with a magic ring. From there, multiple rounds of double crochets are created to form the round base of the coaster.
- Increasing Stitches: Each new round involves an increase in the number of double crochets to ensure the coaster’s base grows evenly.
- Chain Spaces: Chains are added between stitch sets to create decorative gaps, giving the coaster a lacy and delicate appearance.
- Rounding Out: After completing each round, stitches are joined with slip stitches to maintain the circular shape. The last round is finished by cutting and securing the thread before moving to the next step.

2. Adding the Leaf Edge
- Slip Knot and Attachment: A slip knot is made with green yarn, and the new color is attached to the edge of the completed rosette base.
- First Round of Leaves: Chain spaces are created around the rosette by making single crochets followed by chains. These chains serve as the foundation for the upcoming leaf details.
- Second Round of Leaves: On the existing chain spaces, detailed leaves are formed. This involves single crochets, chains, and slip stitches to create a layered, textured design.
- Securing the Edges: Once the leaves are completed, the yarn is cut and secured, finalizing the green leaf border around the base.

3. Crocheting the Roses
- Foundation Chains: To make the roses, a slip knot is created with pink yarn, followed by a set of foundation chains.
- Building the Petals: Each chain is worked into with clusters of double crochet stitches, creating rounded petals. This process continues until all flowers are complete.
- Forming the Roses: The petals are rolled into a spiral shape by applying glue at the base, resulting in delicate rosette flowers.
4. Attaching Roses to the Coaster
- Spacing and Arrangement: The roses are arranged at equal distances along the edge of the green leaves, leaving two gaps between each flower.
- Fixing with Glue: A glue gun or fabric glue is used to secure each rose to the base, ensuring they stay in place.
5. Optional: Turning the Coaster into a Mini Bouquet
- Shaping the Bouquet: The finished coaster can be bent into a bouquet shape by arranging the flowers and tying the center with a ribbon or yarn.
Conclusion
The completed Pink Rosette Cup Coaster, with its elegant combination of green leaves and pink flowers, is a beautiful decorative item. The tutorial concludes by inviting viewers to like, share, and subscribe for more DIY crafting ideas. The project is a creative way to add handmade charm to your home or gift someone special.