Crochet Shell Stitch Baby Blanket Free Pattern + Tips

Decorate your nursery with this free crochet shell baby blanket pattern that add softness & joy to every special moment with your little one.
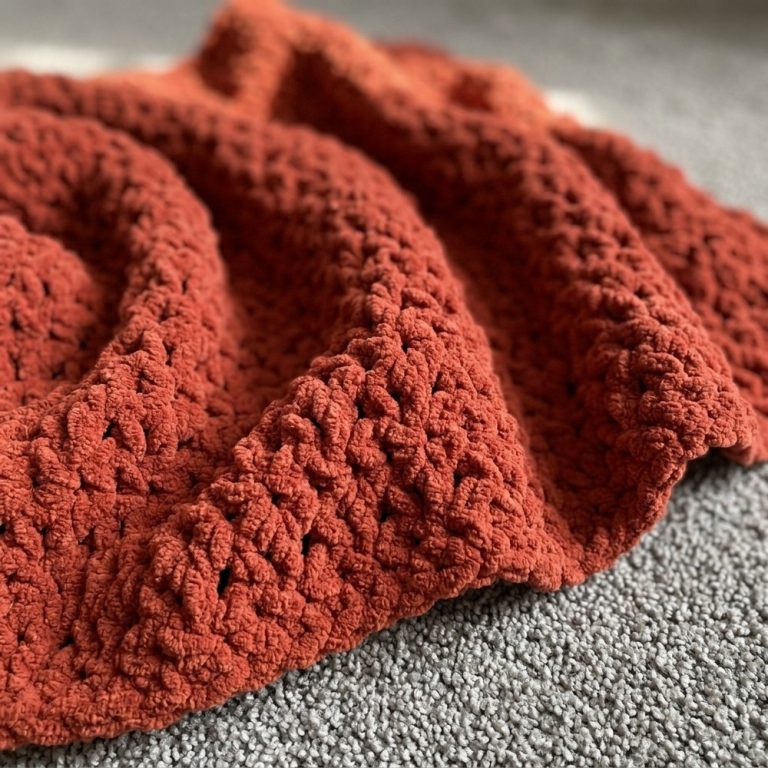
Soft waves shape a blanket that feels like a gentle hug for little ones making comfort come alive in every thread. Using the Crochet Shell Baby Blanket pattern transforms simple yarn into a cozy treasure, while the shell shapes form a beautiful design that looks like tiny layers stacked together. This blanket stands out with its delicate details, making it perfect for swaddling a baby, laying on the floor during playtime, or tucking around a stroller on a cool day.
Adorable Free Shell Stitch Blanket Pattern for Little Ones

Friendly for beginners, the pattern offers easy stitches and a soothing rhythm that invites anyone to create special memories. With every completed row, the blanket grows more inviting, adding a touch of handmade love to any nursery. Sharing or gifting this blanket is a joyful way to care for the youngest family members, ensuring warmth, security, and a timeless touch of beauty.

Crochet Shells Baby Blanket Pattern
Materials
- Yarn: Worsted weight yarn (Category 4) – approximately 900-1200 yds for a baby blanket (adjust for desired size)
- Hook: US H-8 (5.0 mm) or size needed to obtain gauge
- Tapestry needle for weaving in ends
- Scissors
- Optional: Stitch markers (helpful for marking corners)
Key Abbreviations (US Terms)
| Abbreviation | Meaning |
|---|---|
| ch | chain |
| sl st | slip stitch |
| sc | single crochet |
| dc | double crochet |
| sp | space |
| st(s) | stitch(es) |
| rep | repeat |
| V-stitch | (dc, ch 1, dc) in same st or sp |
| shell | 7 dc in same st or sp |
Special Notes
- Blanket is worked in the round from the center out, forming a square.
- Corners grow via V-stitches separated by ch-3 in the corners.
- Shell rounds (with 7 dc “shells”) alternate with V-stitch rounds.
- The blanket can be increased to any size by continuing to add more rounds in the established pattern.
Pattern
Center Ring
- Make a slip knot.
- Ch 4.
- Join with sl st into the first ch to form a ring.

Round 1: Setup V-Stitches
- Ch 4 (counts as first dc, ch 1).
- (Dc, ch 1) 7 times into the ring. (You will have 8 dc and 8 ch-1 spaces, including the chain at the start.)
- Sl st in the 3rd ch of the starting ch-4 to join. (8 dc and 8 ch-1 spaces)

Round 2: Shells
- Ch 3 (counts as first dc).
- Work 6 dc in the first ch-1 sp (to complete a shell; 7 dc total).
- Sc in the next ch-1 sp. 7 dc in following ch-1 sp — rep from * to * around, ending with a sc in the last ch-1 sp.
- Sl st in the 3rd ch of beg ch-3 to join.
Round 3: Corners and Sides
- Ch 4 (counts as dc, ch 1).
- In the same sc: dc (V-stitch made).
- Ch 3 (corner), then in same sc: **(dc, ch 1, dc) (second V-stitch in corner)*.
- Ch 5, skip the next shell, in next sc: (dc, ch 1, dc), ch 3, (dc, ch 1, dc), (corner).
- Rep [ch 5, skip shell, corner V-st in next sc] 2 more times (until you have 4 corners).
- End with ch 5, sl st in 3rd ch of beg ch-4.

Round 4: Shells and Anchors
- Ch 3 (counts as dc).
- In first V-st: 6 dc (7 dc total = shell).
- In next ch-3 sp (corner): sc.
- In next V-st: 7 dc (shell).
- In the 4th dc of next shell from the previous shell round (Round 2): sc — this “anchors” the chain spaces. (Insert hook directly into the 4th dc, under the ch-5, yarn over and complete the sc.)
- In the next V-st: 7 dc (shell), then sc in next ch-3 sp (corner), shell in next V-st.
- Rep steps 5-6 around, alternating shells and anchored sc.
- After final shell, sc into middle (4th dc) of last shell.
- Sl st in 3rd ch of beg ch-3 to join.
Round 5: V-Stitch Framework
- Ch 4 (counts as dc, ch 1).
- In the same sc: dc (V-stitch made).
- Ch 5, skip next shell, (in next sc: [dc, ch 1, dc], ch 3, [dc, ch 1, dc]) (corner).
- Ch 5, skip next shell, V-stitch in next sc.
- Repeat steps 3-4 around (work corners in sc; sides as V-stitch in sc, ch 5, skip shell).
- Finish with ch 5, sl st to 3rd ch of beg ch-4.
Round 6: Shells and Anchors
- Ch 3 (counts as dc).
- In first V-st: 6 dc (shell).
- Sc into the middle (4th dc) of shell below (from previous shell round).
- 7 dc into the next V-st (shell).
- In next ch-3 (corner): sc.
- Shell in next V-st, sc in middle of next shell, shell in next V-st, sc in next corner ch-3, etc.
- Continue this pattern of shell, anchor, shell, corner around.
- Sl st to 3rd ch of beg ch-3 to join.

Repeat Rounds
- Continue alternating V-stitch framework rounds and shell rounds to grow your blanket.
- Odd Rounds: V-stitch round: Sides get 1 V-stitch in each sc, corners get 2 V-stitches separated by ch-3, all separated by ch-5 between V-stitches.
- Even Rounds: Shell round: Shell (7 dc) in each V-stitch, sc in corners (ch-3), sc in middle of previous shell to anchor ch-5.
Finishing
- When desired size is reached, fasten off.
- Weave in all ends with a tapestry needle.
- Block blanket if desired for crisp edges and drape.
Pattern Correction & Tips
- Correction: In each shell round, always sc in the correct place to anchor the chain (in the 4th dc of the shell), not in the chain space.
- Corner Growth: Corners should always be 2 V-stitches separated by ch-3 worked into the same sc from previous round.
- Tip: Mark all four corners with stitch markers so you don’t lose your corner places as your blanket grows.
- Tip: Count your stitches after each round for even expansion and square shape.
Conclusion
This shells and V-stitch baby blanket is a beautiful and customizable project suitable for beginner to intermediate crocheters. Simply repeat the pattern rounds until your blanket reaches the desired size. The combination of V-stitch framework and shell rounds creates a lacy yet cozy texture—perfect for baby gifts or elegant throws.