Free Star Stitch Blanket Pattern for Crochet Lovers

Fill your home with this free crochet star stitch blanket pattern that creates a cozy haven and lovely accent for any room in your house.
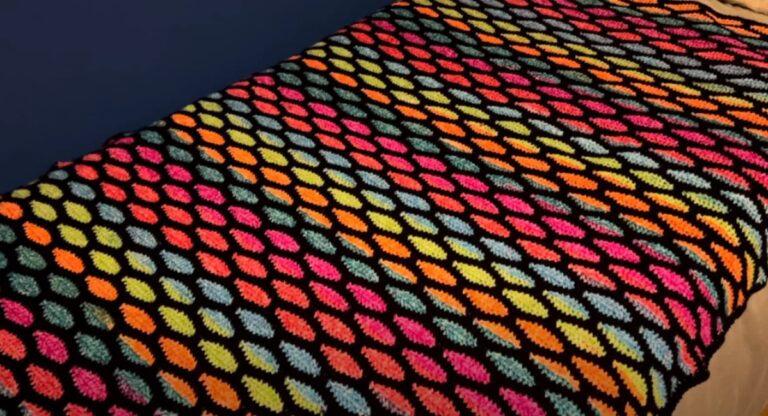
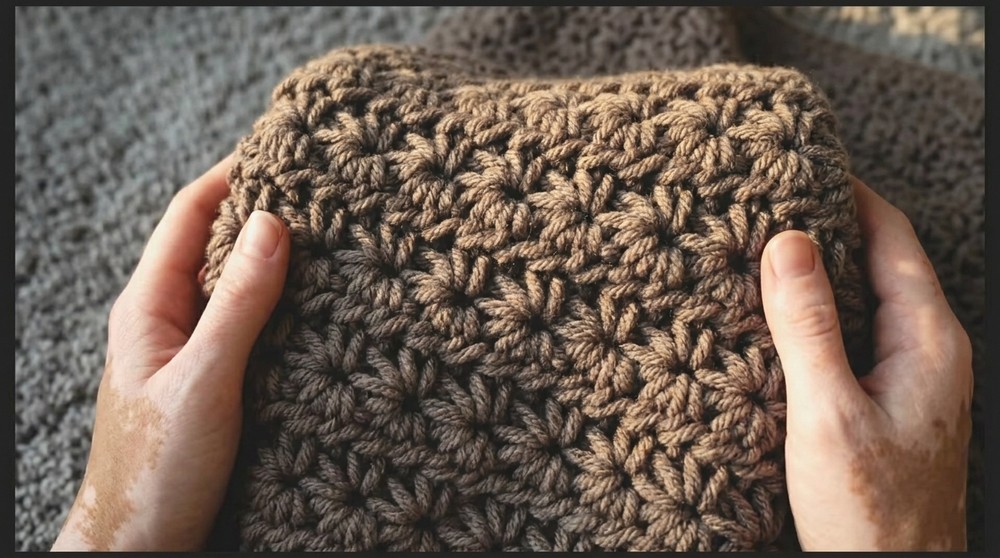
Curling up under a soft and beautiful blanket with gentle patterns that look just like tiny shining stars glowing in the night sky. The special thing about the crochet star stitch blanket pattern is how each little stitch comes together to form a lovely design that feels both magical and comforting. Friends and family will notice how every part of the blanket shows off the twinkling shape of stars making your space feel special and full of warmth.
Crochet Star Stitch Blanket Pattern with Free Guide

People use this pattern for decorating living rooms adding bright color on beds or as a delightful gift for babies and loved ones. The soft texture feels like a hug bringing joy and peace to everyone who wraps themselves in it. This special style is not just nice to look at but also keeps everyone cozy during cool nights turning any moment into a comforting memory with the softness and charm of a crochet star stitch blanket pattern.
Easy Star Stitch Blanket with Decorative Border
Materials
- Yarn:
- Body: Premier Basic Chunky Yarn (size 5, bulky), 100% acrylic
- Sample color: Brown
- Yardage: As needed for desired size (estimate 5–7 skeins for a large throw/blanket)
- Border (optional): Premier Anti-Pilling (size 4, worsted), same or coordinating color
- Body: Premier Basic Chunky Yarn (size 5, bulky), 100% acrylic
- Crochet Hook:
- US Size L (8.0 mm) for blanket and border
- Notions:
- Scissors
- Yarn needle (for weaving in ends)
- Stitch markers (to mark corners; optional)
Key Abbreviations (US Terms)
| Abbreviation | Meaning |
|---|---|
| ch | chain |
| sc | single crochet |
| hdc | half double crochet |
| sl st | slip stitch |
| st(s) | stitch(es) |
| rep | repeat |
| sk | skip |
Special Notes
- Foundation Chain Multiple:
- Multiple of 2 + 3 (Ex: sample uses ch 123)
- Star Stitch:
- A two-row repeat pattern; the first row forms the open star, the next row (hdc) closes it.
- Blanket can be made any size by adjusting starting chain length.
- Border can be worked in the same yarn or a lighter yarn for more definition.
Pattern
Foundation
- Ch a multiple of 2 + 3.
- Example swatch in video: ch 13.
- Full blanket sample: ch 123.
Row 1 – Star Stitch Base
Star Stitch Setup:
- Insert hook into 2nd ch from hook, yarn over and pull up a loop (leave on hook).
- Pull up a loop in each of next 4 chs. (6 loops on hook)
- Yarn over, pull through all 6 loops.
- Ch 1 (forms the “eye” of the star).
- Next Star:
- Insert hook into “eye” (ch-1 just made), pull up a loop.
- Insert hook under last star “leg” (the last loop from previous star), pull up a loop.
- Insert hook into the same base ch as that “leg,” pull up a loop.
- Pull up a loop in each of next 2 chs. (6 loops on hook)
- Yarn over, pull through all 6 loops.
- Ch 1.
- Repeat step 5 until you reach the last ch. At the end, you will not have enough chs for a full star—this last “half star” is correct.
- At row end, ch 1.

Row 2 – Half Double Crochet Row
- Turn.
- In first star “eye” (at row edge): hdc once.
- In each star “eye” across: work 2 hdc in each eye (open center of the star).
- At the row end, insert hdc into edge “leg” of last star.
- Ch 3, turn.

Repeat Rows
Star Stitch Row:
- Working from RIGHT to LEFT, insert hook into 2nd ch from hook (when starting a new row), pull up a loop.
- Pull up a loop in next ch, then in each of the next 4 star “legs” or sts to make 6 loops.
- Yarn over, pull through all loops, ch 1.
- For each subsequent star, repeat as in foundation row, always ensuring 6 loops on hook for a full star.
For the last (edge) star, there will only be 5 loops. - Ch 1 at row end.
Hdc Row:
- As in Row 2 above, always 1 hdc in first eye, 2 hdc in each eye, 1 hdc in last edge “leg”.
Repeat these two rows (Star Stitch row, Hdc row) until blanket is desired length.
Joining Yarn
- At the end of a skein, tie the new skein securely to the old end, then work stitches over the tails for extra security. Trim ends when finished.
Border
(Switch to lighter yarn if desired, or continue with main yarn.)
Step 1: Hdc Base Border (2 rounds)
- Do not fasten off.
- At blanket edge, ch 1, turn, hdc evenly across the edge.
- At each corner, work 3 hdc in one st (mark the middle st of the three with a stitch marker).
- For sides without obvious stitches (row ends), work evenly into the eyes and legs of the stars.
- When you return to first corner, sl st to join.
- Repeat, working a second round of hdc around the entire blanket, always working 3 hdc in the middle corner st (move marker as you go).

Step 2: Decorative Scallop Edge
- At any stitch, sl st and ch 1.
- (Sc, ch 4, sc) in the same st, sk next st; rep from * around.
- Always skip 1 stitch between “scallop” groups.
- In corners, sc, ch 4, sc in the marked center stitch.
- Sl st to first sc to join, fasten off, and weave in all ends.

Pattern Correction & Tips
- Correction: The last star of each star row will be a “half star” with just 5 loops on hook; this is correct.
- Tip: When starting a new row, always ch 3 and turn before beginning next star row for neat edges.
- Tip: Mark corners with stitch markers for easier, symmetrical borders.
- Tip: To join a new skein, tie a tight knot, stitch over ends, and trim for the most seamless finish.
- Tip: For best border look, work stitches evenly (not too loose or tight) along all edges.
Conclusion
This beautiful star stitch blanket is both modern and classic, perfect for beginners seeking a project that looks intricate but is remarkably accessible. The clearly defined border brings polish and structure, creating a finished heirloom-quality piece. The instructions are detailed so even first-time crocheters can find success and joy. Simply alternate star stitch and hdc rows, finish with a customizable border, and enjoy a plush, squishy blanket ready for gifting or personal use.