How to Crochet Spring Tulips for Beginners
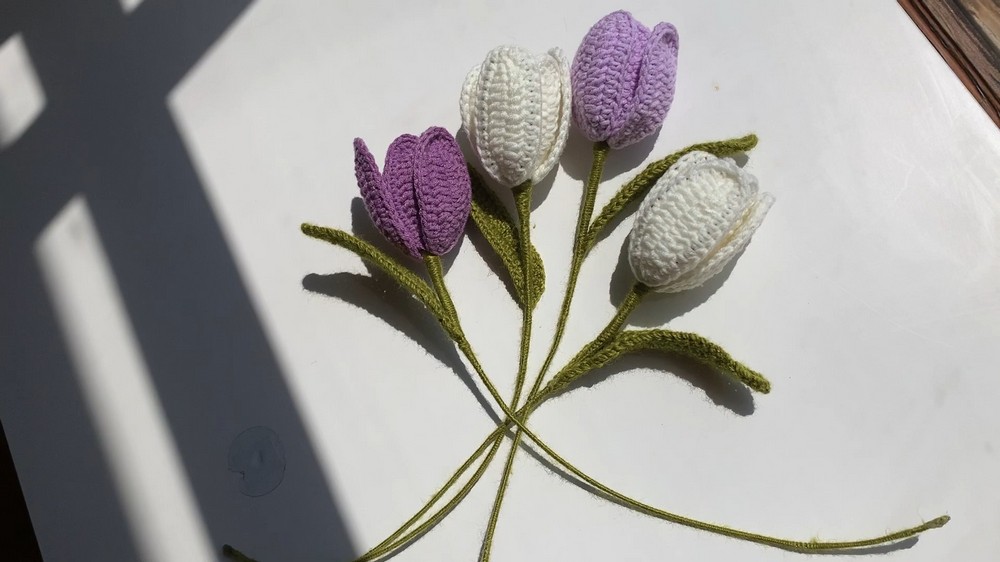
Learn how to crochet beautiful spring tulips following a beginner-friendly tutorial for all skill levels. The creator demonstrates how to make small and large petals, a leaf, and the flower’s stem using simple crochet techniques, wires, and yarn. Each step is explained clearly, making it suitable for beginners. Tips are shared on maintaining shape and hiding yarn tails for a polished look.
By the end of the tutorial, you’ll have a stunning tulip that’s perfect for decoration or gifting. Follow through with us for the complete tutorial!

Introduction
The video introduces a tutorial on crocheting spring tulips step-by-step. The project involves creating one tulip, which consists of three small petals, three large petals, one leaf, and a floral stem.
Materials Needed
- Yarn for the petals, leaf, and stem.
- A crochet hook (specific size not mentioned in the provided transcription).
- Wires of varying lengths (e.g., 20 cm, 25 cm, and 40 cm) for structural support.
- Scissors for trimming excess yarn.
Crocheting Small Petals
- The process begins by creating a slip knot and chains to form the base.
- The first row includes working single crochets, half-double crochets, and double crochets to shape the petal.
- On one side of the petal, the creator works specific stitches, turns the work, and repeats the process on the other side to create symmetry.
- A 20 cm wire is inserted for stability and shape.
- The edges are secured by wrapping yarn around the wire, and any leftover tail is trimmed.
- The small petal is completed using a slip stitch.

Crocheting Large Petals
- The process for large petals is similar to small petals, with slight modifications:
- More chains are created as the base, making the petals larger in size.
- Double crochets are increased to adjust the dimensions.
- A 25 cm wire is used for added support due to the larger size.
- The edges are wrapped securely with yarn around the wire to ensure a neat finish, and any excess yarn is trimmed.

Creating the Leaf
- Begin the leaf with a slip knot and chains to create the base of the design.
- A 40 cm wire is added for flexible support, allowing the leaf to hold its shape.
- Stitches include single crochets, half-double crochets, and double crochets to give the leaf an elongated shape.
- The design is mirrored on the other side of the chain to create symmetry.
- At the end, the yarn is wrapped around the wire, and any extra yarn is neatly trimmed.

Assembling the Tulip
- Once all small petals, large petals, and the leaf are crocheted, they are assembled to form the tulip.
- The leaf is added near the stem to give the flower a realistic look.
- Wire ensures that each part of the tulip maintains its shape and holds together securely.

Conclusion
- The creator thanks viewers and encourages them to comment on what tutorials they would like to see next.
- The finished product is displayed, showcasing a realistic, handmade crochet tulip that is perfect for decoration or gifting.
Video Guide
https://youtu.be/RmDhGqX9yZQ