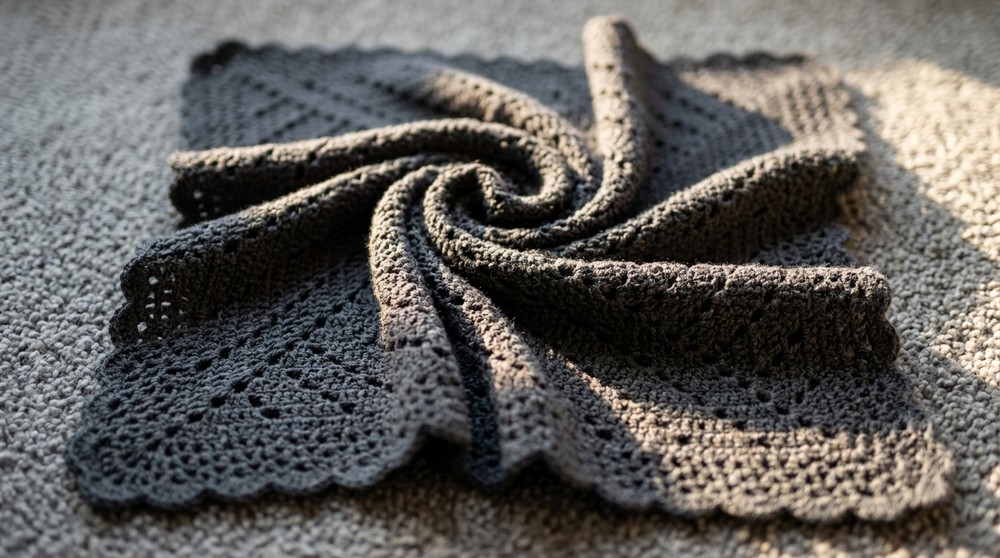
Free Baby Blanket Pattern Ultra-Soft for Sensitive Skin

Enjoy relaxing moments with free crochet blanket pattern for easy and stunning results that add warmth style and charm to your home for all.
Feeling cold at home or wishing for something extra cozy often leads people to search for warmth and beauty in simple things. A crochet blanket pattern brings this comfort right to your fingertips, offering lovely designs that brighten up any room with cheerful colors and playful textures. This wonderful blanket serve as more than just covers—it become delightful decorations, thoughtful gifts for family, or comforting wraps for restful naps.
Easy Free Blanket Pattern for Cozy Evenings

Using a crochet blanket pattern, anyone can make their own unique piece by choosing favorite colors and easy stitches, making the project feel truly special. Even beginners can join in the enjoyment, as following clear steps allows each person to finish something they’re proud of. With each finished blanket, your space glows with extra warmth and your heart feels a little more joyful, knowing you’ve made something beautiful for yourself or someone you care about.
Crochet Blanket Pattern Step-By-Step
Materials
- Yarn: DK (Double Knitting) weight yarn
- Sample blankets in “Ashy grey” were shown
- Crochet Hook: Size G/6 (4.0 mm)
- Sample blanket used 4.0 mm, but 3.5 mm (E/4) can be used for a tighter look
- Tapestry Needle: For weaving in ends
- Scissors
- Stitch Markers or Scrap Yarn: Optional, for marking corners
Abbreviations (US Terms):
- ch = chain
- sl st = slip stitch
- sc = single crochet
- dc = double crochet (UK treble crochet)
- st(s) = stitch(es)
- sp = space
- rep = repeat
Special Notes
- This blanket is constructed in rounds, starting with a magic ring.
- The pattern consists of a simple, 2-row repeat which creates offset “filet” blocks.
- US double crochet is used (UK treble crochet), unless otherwise stated.
- Chain spaces create the “fillet” or mesh look.
- Corners are consistently worked as (2 dc, ch 3, 2 dc).
- As your blanket grows, the number of sets of six dc increases.
- Feel free to pause and mark corners for easier navigation.
Pattern
Center & Set-Up
1. Magic Ring and Set-Up Round (Round 1):
- Make a magic ring.
- Ch 5 (counts as dc + ch-2 corner sp).
- [2 dc, ch 3] into ring; rep 3x (you will have ch 5, 2 dc, ch 3, 2 dc, ch 3, 2 dc, ch 3, 1 dc).
- Pull ring tight.
- Sl st into 3rd ch of initial ch-5 to join. (You should have a square with 4 chain-3 corner sps).

Round 2: Establishing Blocks
- Sl st into the next ch-3 sp.
- Begin each round: Start with ch 5 (counts as dc + ch-2), unless instructed otherwise.
- In the same ch-3 sp: work 2 dc.
- Dc in each of the next 2 dc.
- In next ch-3 sp (corner): [2 dc, ch 3, 2 dc].
- Dc in next 2 dc.
- In next ch-3 sp: [2 dc, ch 3, 2 dc].
- Dc in next 2 dc.
- In next ch-3 sp: work 2 dc, sl st to 3rd ch of starting ch-5.
- Sl st into next ch-3 sp to begin next round.
You will now have 6-dc blocks on each side, separated by corners.
2-Row Repeat (Rounds 3+):
Row A: (Increase/Offset Row)
Creates fillet holes and moves blocks “any which way.”
- Ch 5, 2 dc in the same corner sp.
- [Ch 2, skip next 2 dc, dc in each of the next 4 dc, 2 dc in the next corner sp]* rep around.
- At each corner: [ch 3, 2 dc in corner sp]
- At the end of round, sl st to 3rd ch of beg ch-5, sl st into corner sp to begin next round.
Row B: (Solid Block Row)
- Ch 5, 2 dc in the same corner sp.
- Dc in each dc across to the next ch-2 sp (how many depends on your blanket’s size).
- In ch-2 sp: 2 dc.
- Ch 2, skip next 2 dc.
- Continue dc in each dc, 2 dc in each ch-2 sp, working (2 dc, ch 3, 2 dc) in each corner.
- End round by sl st to 3rd ch of beg ch-5, sl st into corner sp to begin next round.
Continue repeating Row A and Row B, working (2 dc, ch 3, 2 dc) in every corner.
- As blanket grows, each side will gain pairs of six-dc blocks.
- Every repeat of Row A places ch-2, skip 2 dc—a “fillet” space—which shifts the blocks for the “Any Which Way” effect.

Blanket Border
You may stop after any Row B, when the blanket is the size you want, or add the border below.
1. (Optional) Solid Border Round
- Ch 3 (counts as dc), dc in same sp, dc in every dc and 2 dc in each ch-2 space to corner.
- (At corners: 2 dc, ch 3, 2 dc in corner sp)
- Join with sl st to top ch-3.
2. V-Stitch Border
- Ch 3 (counts as dc), dc in same st (first v-st).
- Skip 2 sts, v-st (2 dc) in next st—rep across to corner.
- In corners: (2 dc, ch 3, 2 dc), all in same corner sp.
- Continue around.
- Join with sl st to first ch-3.

3. Shell Edge
- (In each v-st stitch): 5 dc.
- (Between shells): sc in next v-st.
- (At corner v-st): 7 dc
- Continue: Shell, sc, shell, sc, etc.
- At corners always place shell of 7 dc.

Pattern Correction
- Correction: Video mistakenly says chain 5 at the start of every round, including solid block rounds; chain 3 is usually sufficient when starting with dc blocks only.
- Tip: Always count your stitches—each block of 6 shouldn’t change except where fillet holes are being increased; ends should always land at a corner.
- Use stitch markers in your corners if blanket begins to warp, or if it’s hard to see where each round begins.
Conclusion
This vintage-inspired “Any Which Way” blanket builds from the center using a straightforward, 2-row repeat. It alternates classic blocks of six double crochets with strategic chain spaces, creating a lively, offset mesh effect. A solid or decorative border may be added. The blanket can be made as large or small as desired, and the motif can be adapted for squares to join into larger projects.
Tips
- Rewind/Review: If unsure, go back and review previous rows/corners.
- Blocking: Gently block your blanket on completion to relax any curling or skewing.
- Markers: Use removable stitch markers (or scrap yarn) to keep track of corners as rounds grow.
- Gauge: Use a close gauge if you want the mesh effect to remain neat; adjust your hook size and number of border stitches to avoid ruffling.