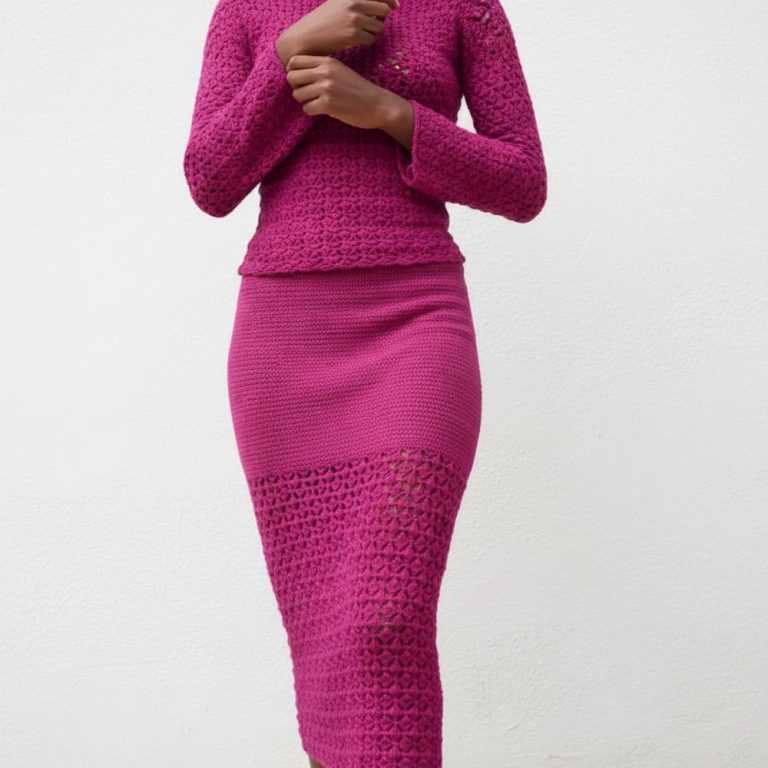
Free Crochet Top-down short-sleeved Pattern to Relax in Style

Style your wardrobe with this free crochet top-down short-sleeved pattern for a comfortable look that’s perfect for sunny days or layering.
Ever wondered how to turn yarn into a soft, stylish shirt that fits just right? Using the Crochet Top-down short-sleeved pattern, anyone can make a cozy top that shows off bright colors or gentle shades, depending on what you like. This pattern starts at the neck and goes down, so you can shape your shirt as you crochet, making sure it’s comfortable and fits you well.
Free Crochet Top-down short-sleeved Pattern for Perfect Everyday Wear

People enjoy how easy it is to follow, even for beginners, and how adding small details like buttons or lace makes every top special. The shirt is perfect for warm sunny days, and you can wear it over other clothes when it’s cooler. Creating your own top with this pattern lets you show your style and creativity, giving you something unique to wear for outings, work, or relaxing at home. Every stitch brings happiness and a sense of pride in handmade fashion.

Crochet Top-down short-sleeved Pattern
Materials
- Yarn: Cotton Core (as used by Moony), 7 balls (~50g each; adjust as needed for size)
- Hook: 3.0 mm crochet hook
- Other Notions:
- Scissors
- Stitch markers
- Yarn/tapestry needle (for weaving ends)
- Soft measuring tape
Key Abbreviations (US Terms)
| Abbreviation | Meaning |
|---|---|
| ch | chain |
| sc | single crochet |
| dc | double crochet |
| hdc | half double crochet |
| dc3,4tog | double crochet 3 or 4 together (cluster) |
| sl st | slip stitch |
| rep | repeat |
| st(s) | stitch(es) |
Special Notes
- Sizing:
- This garment is fully adjustable to any bust size.
- Approximate formula for starting yoke (neck circumference):
- Back: 30% of neck circumference
- Sleeves: 20% each
- Front: 30%
- Pattern multiples:
- All panels should be started with (multiple of 8) + 3 stitches.
- Try-On as You Go:
- The yoke is worked in the round and can be tested for fit as you work.
- For smaller/larger sizes:
- Follow Moony’s formula for dividing stitches, or use the provided calculations.
Pattern Instructions
1. Foundation Chains & Initial Setup
- Measure neckline (recommend 65cm for M/L).
- Make a chain about 75cm long (no need to count precisely yet).
- Lay the chain flat and divide it as follows:
- Sleeves: Each 20% of neckline (e.g., ~13cm)
- Back: 30% of neckline (e.g., ~19.5cm–20cm)
- Front: 30% of neckline (e.g., ~19.5cm–20cm)
- Adjust chain count: For each section, make sure stitch counts are (multiple of 8) + 3. If not, remove/add chains as needed.
- Mark where each panel section division is (different sleeves, back, and front).

Example (as in video tutorial):
- Sleeves: 35 chain each (+3 for increase)
- Back: 59 chain (+3 for increase)
- Front: 59 chain (+3 for increase)

2. Yoke Setup
Sleeves (x2):
- Ch3, dc in 5th chain from hook, and continue with dc in each chain until sleeve section is ~13cm or desired width.
- Make sure it is a multiple of 8 + 3. Adjust as needed (add extra dcs if needed).

Back and Front:
- At each end of sleeves: Ch2, dc in same chain (mark this st). This is the turning/increase point.
- For back section, work dc across ~20 cm or needed width. Same for front.
- Repeat Ch2, dc in same st (mark this st) at each dividing point.
Connect in the Round:
- Take care not to twist your work.
- Slip stitch to join into a round.
- Mark V-neck position: This will help you create the deep V cut.
- On the V-neck section, ensure the hook ends in the center of the V before continuing.
3. Establishing the Yoke Pattern
Cluster Row (Row 2, repeats throughout):
- For V-neck:
- “Dc3,4tog” (double crochet 3 or 4 together cluster) at start and end of rows for symmetry.
- Repeat sections:
- (Ch3, dc3,4tog, ch3, dc in 3rd stitch) across to section division.
- At divisions/corners (underarm increases):
- Work (ch3, dc1, ch2, dc1) (creates V with ch2 space).
- Row ends:
- Always finish with “dc3,4tog” at the V position for symmetry.
- Continue this pattern for yoke depth and width (usually 8 rounds for average size).
- On “return rounds,” add (ch3, dc1) pairs as seen in the pattern.

4. Body & Sleeves Shaping
- After reaching the depth from neckline to underarm, separate body and sleeves (try on for fit and mark underarms).
- Work body in the round with established stitch pattern.
- Underarm: Add ch3 or ch4 rings for ease if necessary.
Body
- Continue in established lace or mesh pattern.
- Adjust for bust/hip as needed—check for (multiple of 8) through each section.
- When row counts do not add up to a multiple of 8 after increases, occasionally skip/adjust a dc as described in the video.
- For final rows, work fewer increases to ensure even hem.
Sleeves
- Join yarn at underarm and work down in the round or joined rows, continuing with established lace pattern.
- Adjust sleeve length as desired; work decrease rounds if a tapered sleeve is preferred.
5. Edging
- Hem: Work a round of sc, ch3, sc into spaces as in video, or desired border.
- Neckline: Join at center of V, work a round of sc evenly around, inserting hook between dc stitches for sturdiness. Fasten off, weave ends.
- Sleeve edges: As for hem; add sc or your preferred decorative finish.

Conclusion
This is a top-down, size-adjustable pullover featuring an airy lace yoke. The flexibility in stitch counts and panels allows customization for virtually any size. This version corrects prior limitations by letting you adjust both neckline and body for a perfect fit. Try on as you go for best results.
Pattern Corrections
- Counting: Consistently check for multiples of 8 (+3) for each section.
- Fit: Don’t neglect to try on after the yoke and before joining the body; adjust stitch counts as needed.
- V-neck Shaping: Ensure the “V” is centered and deepen/shallow as preferred by increasing or decreasing V-neck rows.
Tips
- Measuring: Take time to measure your neck and bust and adjust ch counts in the foundation.
- Marking: Use stitch markers for section boundaries (front, back, sleeves, V-neck).
- Trying on: Try the yoke on after every 2-3 rows to ensure a good fit.
- Edging: For a neat finish, block your garment before and after adding neck and hem edgings.
- Troubleshooting: If stitch counts are off, fudge with an extra decrease or increase on the next plain (dc) row.