How to Crochet Heart Place Mat Doily & Pot Holder

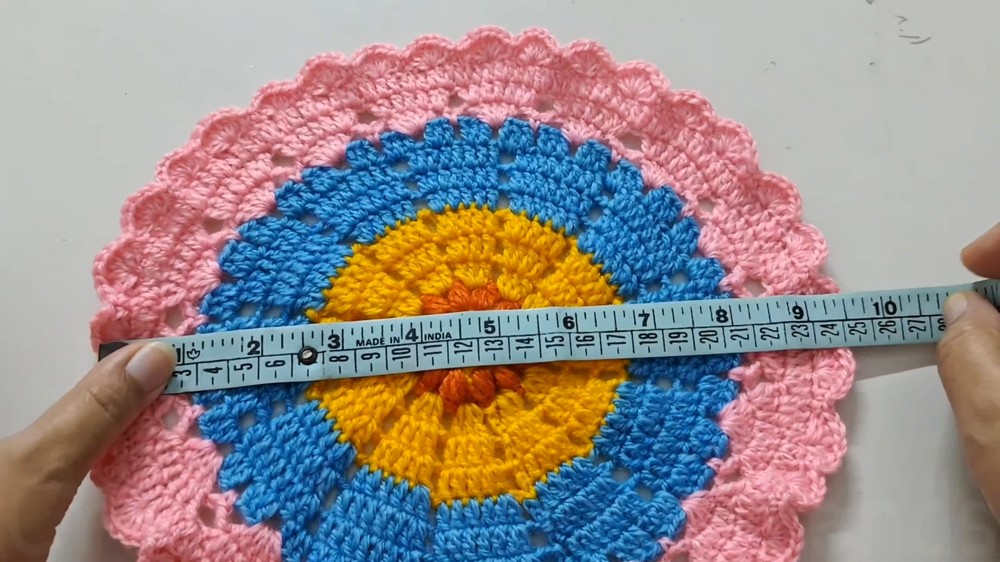
With a step-by-step tutorial, learn how to crochet a stunning and colorful crocheted doily or placemat using four colors of faux acrylic yarn and a 2.5 mm hook. Beginning with a slip knot and chain stitch, the project progresses through multiple rounds that involve double crochets, puff petals, chain spaces, and color changes to create intricate patterns. The finished doily, measuring approximately 25 cm in diameter, serves as a versatile creation — perfect as a table centerpiece, mat, pot holder, or a thoughtful handmade gift.
The detailed tutorial ensures clarity at each stage, empowering viewers to craft a beautiful and functional piece with ease. So, follow through with us for the complete tutorial.

Doily/Placemat Tutorial
The provided tutorial walks viewers through the process of creating a beautiful crocheted doily or placemat using four colors of acrylic faux ply yarn and a 2.5 mm crochet hook. Below is a detailed breakdown of the steps and techniques covered in the video.
Materials Used
- Four colors of acrylic faux ply yarn (referred to as color A, B, C, and D).
- Crochet hook (2.5 mm).
Base Formation
- Begin with a slip knot using yarn color A.
- Create a ring by chaining stitches and securing it with a slip stitch.
- Form the initial round of double crochets within the ring.
Adding Puff Petals (Color B)
- Switch to yarn color B for the second round.
- Create puff petals in the round using chain spaces to separate each petal.
- Complete a total set of puff petals, ensuring even placement across the round.

Expanding with Clusters
- Switch back to yarn color A for the next round.
- Work in chain spaces to form clusters of double crochets, separated by chain spaces.
- Gradually expand the design by increasing the number of double crochets in each cluster with new rounds.
Color Transition and Detail Enhancement
- Introduce yarn color C for further rounds.
- Build clusters with an increasing number of double crochets, maintaining chain spaces between clusters.
- Continue creating larger clusters as the design grows outward, forming radial symmetry.

Final Expansion (Color D)
- Switch to yarn color D for the outer layers of the doily.
- Add intricate details to the border by combining double crochets, chain spaces, and single crochets.
- Create a decorative edge that enhances the overall design and adds texture.

Adjustments for Outer Rounds
- Use cluster techniques to form a rounded edge.
- Skip stitches strategically to create a consistent pattern throughout the border.
- Ensure symmetry in the placement and styling of decorative elements.

Finishing Touch
- Complete the doily with final chain and slip stitches.
- Cut and secure all yarn ends neatly.
- The finished mat has a 25 cm diameter and serves multiple purposes.
Applications
- Can be used as a table centerpiece, placemat, or pot holder.
- Create sets of four or six for decor or practical use.
- A versatile and thoughtful gifting option for friends and family.

This tutorial provides clear step-by-step instructions, making it easy for viewers, regardless of skill level, to craft a visually appealing and functional crocheted doily. By focusing on incremental rounds, color changes, and detailed finishing techniques, the pattern becomes achievable for beginners and delightful for experienced crocheters.