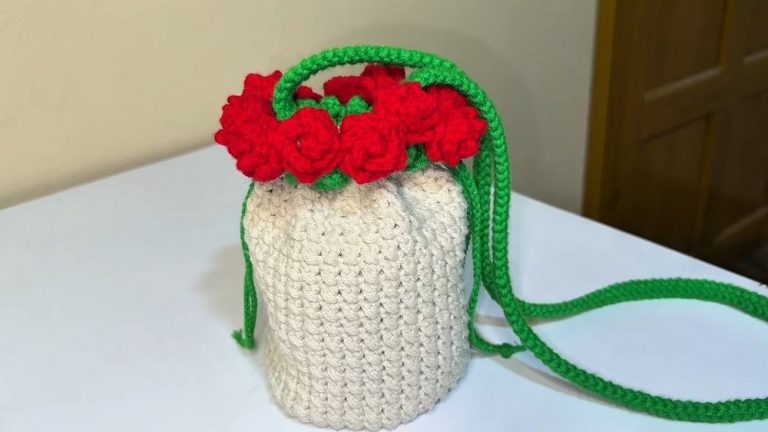
Beautiful Crochet Sling Bag Pattern You’ll Fall in Love With

There’s something special about carrying a bag that feels unique and personal, and sling bags make it even better with their effortless style. A crochet sling bag pattern takes this charm to the next level, combining handmade beauty with practicality. This bags has a relaxed and trendy appearance, making it perfect for casual outings or daily errands. With its slim, easy-to-carry strap and roomy interior, sling bag is loved for its convenience, keeping your essentials close without feeling bulky or overstuffed.

Stunning Crochet Sling Bag Pattern That Turns Heads
Crochet sling bag stand out with intricate designs, soft textures, and the ability to customize colors to match your personality or outfit. Whether you’re going for a stroll, grabbing groceries, or heading to a meetup, this lightweight and elegant bag effortlessly blend beauty and function. Perfect for all ages, it offer the joy of fashion with the feeling of something handmade and truly yours. Enjoy style and ease in one crochet creation.

Materials Needed
- Yarn:
- Onit Political Yarn: Lightweight yarn with a thread length of approximately 140 meters and 100 grams per skein.
- Colors used: Milk Chocolate for alternating motifs and Lilac/Light Purple for the main body (adjust to personal preferences).
- Crochet Hook:
- Sizes 5 mm and 6 mm (Tulip brand recommended, adjust hook size to match yarn type).
- Additional Accessories:
- Drawstring: Custom-made or ready-made drawstring, with optional wooden beads.
- Two Round Rings: Used for attaching the straps.
- Scissors: For trimming yarn ends.
- Measuring Tape: To ensure the bag dimensions match your design.
- Tapestry Needle: For weaving in loose ends and attaching final elements.
Special Techniques
- Slip Knot: The foundation for chain creation.
- Single Crochet (SC): Yarn over, insert hook into the stitch, YO, pull through the loop, YO again, and pull through both loops.
- Double Crochet (DC): Yarn over, insert the hook into the stitch, YO again, pull through, YO, pull through two loops, YO, pull through the remaining two loops.
- Granny Motif: A cluster of three DC stitches repeated in alternating rows.
- Slip Stitch (SS): Used to neatly join rounds or move positions.
- Drawstring Application: A practical finishing touch creating an adjustable top layer.
Step-by-Step Instructions
Step 1: Foundation
- Start with a slip knot, chain 42 chains.
- Adjust the length as desired, ensuring the chain count is a multiple of three.
- Add 1 chain to the foundation (total 43 chains).
- Begin working single crochets (SC):
- Insert the hook into the second chain from the hook and create 1 SC.
- Continue creating SCs across all chain holes for the first row.
- At the end of each row, chain 1 before turning your work.
- Repeat SC stitches for 18 rows, maintaining consistency in adding 1 chain at the end of each row.
- This forms the rectangular base of the bag.


Step 2: Increment and Foundation
- Assess the width to confirm it is an even multiple of three:
- If necessary, adjust the stitch count by adding/reducing SC rows.
- Example in transcription: 120 SC stitches confirmed as divisible by three.
- Work the first round of the foundation:
- In each edge hole, increase by working 2 SC stitches to form smooth corners.
- Along the longer sides of the rectangle, work 1 SC into each hole.
- At the opposite long side of the rectangle, repeat the method for adding edges.
- Join with a slip stitch (SS) to finish the first round.
- For the second round: SC in each hole around the base without any increases.

Step 3: Granny Motif Rows
- Begin the granny motif:
- Slip stitch (SS) into the first hole.
- Make 3 chains, considered as the first DC.
- In the same hole, work 2 DC stitches (total: cluster of 3 DC stitches).
- Skip two holes, then work another cluster of 3 DC stitches into the next hole.
- Repeat the granny motif (skip two holes, work 3 DCs) until reaching the end of the row. Join with a slip stitch (SS) to the first three chains of the row.
- For subsequent rows:
- Slip stitch into the middle DC of the previous row cluster, and slip stitch again into the third DC hole.
- Change yarn color.
- Work 3 chains, followed by 2 DC stitches in the same hole to form the granny cluster.
- Continue creating the granny motif (3 DC stitches) in holes between clusters of the previous row.
- Alternate yarn colors every row for more visual contrast. Repeat the granny motif method row by row until reaching row 16.

Step 4: Lilac Rows for the Main Body
- From row 17 to row 27, use Lilac/Light Purple yarn:
- Continue working the granny motif (same method as above) without alternating colors.
- Ensure the height of the bag matches your preferred dimensions.
Step 5: Drawstring Application
- Fold the bag edges inward and attach the drawstring:
- Place the drawstring around row 3 from the top.
- Push the drawstring through the holes between granny motifs.
- Adjust the tightness of the drawstring according to personal preference. Optional: Add wooden beads for additional detail.

Step 6: Handle and Strap Installation
- Attach two round rings to the second row from the top of the bag body using yarn and tapestry needle.
- Thread and attach the bag handles:
- The handles can be used for various purposes:
- Tote Bag: Attach handles symmetrically.
- Sling Bag: Adjust the attachment for a longer strap.
- Backpack: Attach one ring on the back of the bag and secure hooks left and right on the lower back edge.
- The handles can be used for various purposes:
Step 7: Finishing Touches
- Secure all loose yarn ends on the inside using a tapestry needle.
- Steam block the finished bag lightly (if necessary) to refine the edges.
- Inspect the final piece to ensure the drawstring, rings, and handles are securely fastened.

Final Points
Congratulations! Your granny motif drawstring bag is complete. This versatile design allows you to switch functionalities and carry styles. Whether used as a tote, sling, or backpack, the bag offers a beautiful aesthetic with practical use.
Tips for Success
- Multiples of Three:
- Ensure all rows, stitches, and motifs are aligned with the original count for consistent design.
- Yarn Changes:
- Pull threads tight while alternating yarn colors to maintain a clean finish.
- Handle Placement:
- Test handle positions beforehand to ensure straps work seamlessly based on intended usage.
- Bead Addition:
- Wooden beads on the drawstring enhance the design’s appeal and provide weight for the opening.