Best Free Crochet Summer Top Pattern for Casual Days

Feel cool and stylish all summer long with a free crochet summer top pattern for breezy outfits that keep you comfortable and looking fresh.
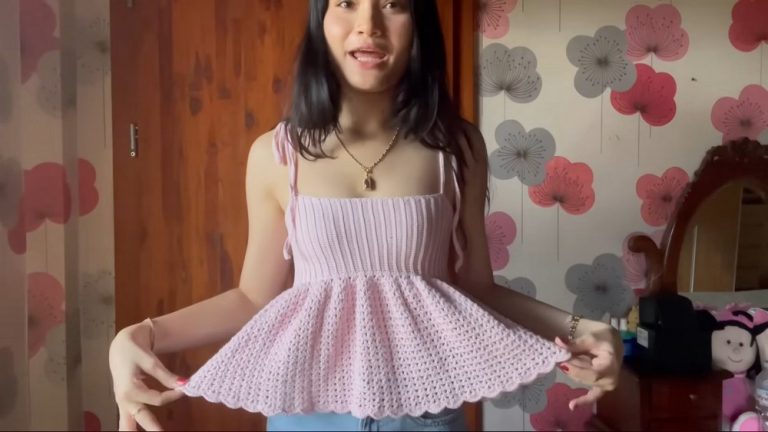
No one likes feeling hot and uncomfortable during summer days, so finding a lovely shirt matters a lot. The Crochet Summer Top pattern is a wonderful way to create a cool and relaxed blouse that looks beautiful and feels soft on the skin. Its open stitches let air flow easily and help you stay fresh when the sun shines bright. The top’s loose shape is easy for anyone to wear and lets you move freely all day.
Free Crochet Summer Top Pattern Step by Step Guide

You can match it with pants, shorts or skirts for family outings, daily work or special gatherings. Making it is simple if you follow the clear steps and fast stitches. With the Crochet Summer Top pattern you can choose bright or gentle colors, show your style and gain praise for your handiwork. This shirt keeps you comfortable and makes you look smart, so everyone enjoys wearing their own special creation.

Lacy Adjustable Summer Top
Materials
- Yarn: Lightweight cotton, bamboo, or blended yarn (Category 2/fingering or Category 3/DK recommended)
- Sample gauge: 90cm bust circumference → subtract 10cm for negative ease, divide result in half for each cup.
- Hook: Size to match yarn (commonly 4.0 mm)
- Notions:
- Yarn/tapestry needle
- Stitch markers
- Scissors
- Measuring tape
- Optional: Decorative beads for ties
Key Abbreviations
- ch – chain
- sc – single crochet
- dc – double crochet
- hdc – half double crochet
- sl st – slip stitch
- tr – treble crochet
- sk – skip
- rep – repeat
- picot – ch 3, sl st to first ch
Special Notes
- Negative ease: Subtract 10cm from your bust measurement before making your initial chain, this helps the top fit snugly.
- Work two identical front triangles (or cups), then join them and crochet the lower edge in rounds.
- Stitch count for the base chain/rows and number of rows depends on your individual measurement.
- All measurements refer to your unstretched garment; cotton and lace work typically stretch.
Pattern Instructions
1. Cup Foundations (Make 2)
Preparation & Measurements
- Measure bust. Subtract 10cm. Divide by 2: this is the width (in cm) for each cup.
- E.g., bust 90cm → 80cm after -10cm; each cup base is 40cm.
- Make a starting chain that equals your calculated cup width (e.g., 40cm).
Foundation Row
- Ch the required amount for your measurement (for sample: enough to reach 40cm).
- Row 1: Dc in the 4th ch from hook and in each ch across.
- Turn.

Lacy Mesh Row Pattern
- Row 2:
- Ch 4 (counts as dc + ch 1), sk next st, dc in next st.
- Ch 1, sk next st, dc in next st, rep across to end.
- Turn.
- Row 3:
- Ch 4 (counts as dc + ch 1), dc in next dc from previous row
- Ch 1, dc in next dc, rep; End row with dc in 3rd ch of turning ch.
- Turn.
- Repeat Row 3 until piece measures from your underarm to slightly below bust (approximately 12–13 cm or as desired).
- On final row, count number of dc st to mark center for shaping.

2. Shaping the Cups: Decreases
- Divide stitches in half to mark two even cups. If there’s an extra stitch, leave it in the center.

Start Decreasing for Each Cup (Work both sides separately)
- Attach yarn at outer edge of first cup.
Decrease Row (Begin forming triangle):
- Ch 3, turn. Dc in next dc, ch 1, sk next ch sp, dc in next dc, rep as established.
- At end: when 2 sts remain, work a dc2tog (half-finished dc in next two dc, then pull through all loops together).
- Next and all subsequent rows: Repeat decreases (begin each row by skipping first dc, and end by working dc2tog in the last two dc).
- Continue until only 4 dc are left (including turning chs).
Strap
- When shaping is complete, continue working strap in pattern (4-dc wide mesh strip) until approx. 40cm long (or desired length to fit over shoulder to back), then fasten off.
- Repeat shaping/strap for second cup.
3. Back Band
- Repeat mesh row pattern (as cups) to desired width (wraps around back, typically same as front segment before decreases).
- Optional: Work back band as a single rectangle, or as two pieces attached to the ends of front cups for a more fitted look.
4. Joining the Pieces
- Seam Sides:
- With top inside out, use a Zig Zag slip stitch join:
- Insert hook through “corner” dc of each cup/back band, ch 2, sl st, then move to next pair of stitches, and repeat.
- Try on garment for fit before fastening off. Adjust join (with more/fewer chs between join points) if too tight/loose.
- With top inside out, use a Zig Zag slip stitch join:
- Attach Straps:
- Cross straps over shoulders and attach evenly at upper back band. Adjust to your best fit (undo/redo length as needed).

5. Lower Edge in Rounds
- With RS facing, join yarn at side under one cup.
First Round: Mesh
- Ch 3 (counts as dc), dc and mesh as in cup—work in round, mesh pattern (dc, ch 1, sk 1) all the way around underbust and back.
- When at center front/back where there are no dc to anchor, work dc in the center below the cups for balance.
- Join with sl st to 3rd ch of start.
- Repeat same mesh rounds until piece measures slightly above waist, or desired peplum length. Try on as you work.
6. Bottom Decorative Motif
Start at middle of the back.
- 1st Motif Row:
- Ch 3, tr (triple/treble crochet) in 3rd dc over, ch 3, tr in next, rep 2+ times.
- Form shells/clusters as described: (ch 3, 3 tr in same space, ch 3) for clusters, ending with picot (ch 3, sl st in 1st ch).
- Continue motif sequence all the way around; adjust end for even finish (add chains, or sc in last stitch as needed).
Picot Edging (Optional)
- Sc in one stitch, sc in next, ch 3, sl st in 1st ch for picot, sc in same st—rep this sequence around hem, sleeves, and neckline.

7. Finishing Touches
- Weave in all ends.
- Block garment for shape if cotton or other natural fiber is used.
- Add a lacy chain or i-cord through hem or underbust for additional shaping/adjustability if desired.
Conclusion
This lacy summer top is fully adjustable using your own measurements. The garment features customizable cups, stretchy mesh, and pretty picot, shell, and cluster details around the hem and edges. It is flattering and breathable for warm seasons.
Pattern Corrections & Tips
- Correction: Remember, stitch numbers may vary—focus on measurement rather than stitch count. If you have uneven stitch numbers at center front, it’s okay to leave one stitch unworked for symmetry.
- Tip: If garment is too snug or too loose after joining, adjust by working more or fewer chains in the join, or by redoing the side seams.
- If you wish, further embellish with beads on straps or extra rows of lacy edging.