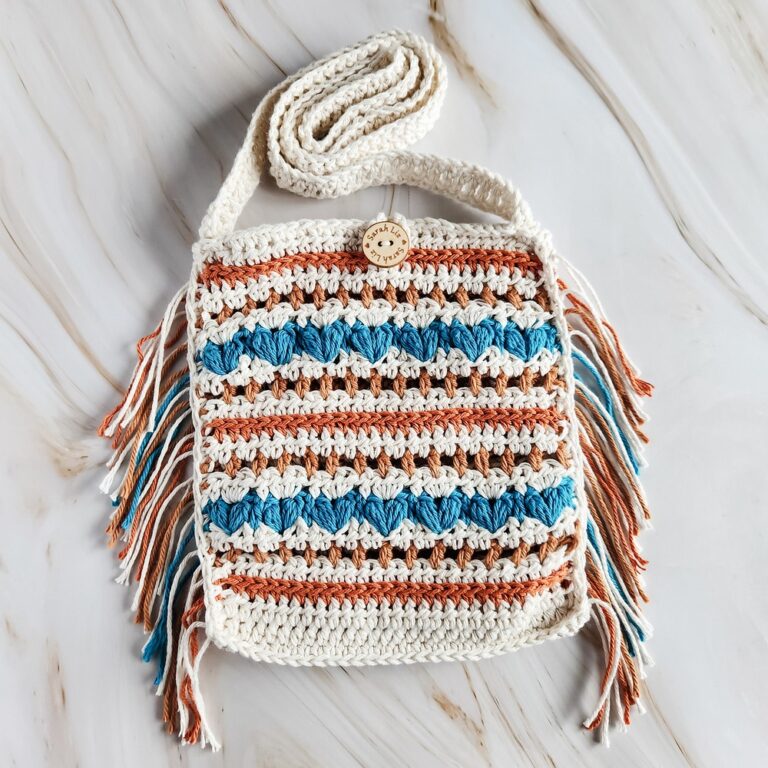
Cozy Crochet Bow Bag Pattern For Comfortable to Carry

Brighten your day by making a cute accessory with this Free Crochet Bow Bag Pattern that’s perfect way to add a sweet and add trendy touch.

Handmade Crochet Bow Bag Perfect for Thoughtful Gifts
Bringing a sweet and pretty look to your daily outfit is easy when you carry a handmade bag with a large, soft knot. A Crochet Bow Bag Pattern helps you make a lovely purse that looks both playful and high-end. This style is very popular right now because the big bow makes the bag look unique and special. It is the perfect size to hold your phone, keys, and money when you go out for a fun lunch or a walk in the park.

One great benefit is that the thick yarn makes the bag strong and keeps your things safe inside. The soft texture feels nice to hold, and you can pick any color to match your favorite clothes. This bag adds a fancy touch to a simple dress or even a pair of jeans. It is a wonderful way to own a custom item that nobody else has.
Special Features
- Distinct bow-shaped design
- Lightweight, uses little yarn
- Versatile closure (button, loop, clasp)
- Optional adjustable strap (crochet, chain, leather)
- Detailed texture from relief stitches
- Compact but roomy interior (approx. 28cm x 15cm)
Level of Difficulty
Beginner-Friendly:
Basic knowledge of chain, single crochet, double crochet, and relief stitches is helpful. The assembly is straightforward and includes easy finishing techniques.
Materials Needed
- Yarn (Size 6 recommended; adjust to preference)
- Crochet hook (size corresponding to chosen yarn)
- Scissors
- Yarn needle for sewing and weaving in ends
- Buttons or clasps (as preferred)
- Small rings for attaching the strap (1cm recommended)
- Optional: leather or chain strap for handle, glue for securing ends
Step-by-Step Pattern
1. Main Body (Rectangular Panel)
- Foundation:
- Make a slip knot, chain 16 (15 for stitching, plus 1 to turn).
- Rows 1–45:
- Skip first chain, single crochet into each chain across (15 single crochets).
- Chain 1, turn.
- Repeat for 45 rows (approx. 26.5cm). Adjust row count for your yarn/size.

2. Border
- Border Row:
- Chain 1, turn.
- Work single crochets all around the panel’s edge—1 sc per row or stitch.
- In each corner, add 2 or 3 single crochets (to prevent curling).
- Slip stitch to join at the end.

3. Side Panels (Textured Section)
- Panel Setup:
- With the panel horizontally, attach yarn to one long side.
- Repeat the next steps for both sides.
- Textured Rows (8 Rows Each Side):
- Row 1: V-stitch pattern
- Chain 2 (for dc height), skip 2 stitches, (dc, ch 2, dc) in next stitch (forms “V”), repeat to end.
- Row 2 (Wrong Side):
- 3 ch to turn.
- Alternate relief double crochet (back post) in the “legs” of each V-stitch.
- In V spaces, work (dc, ch 1, dc).
- Row 3 (Right Side):
- 3 ch, front post reliefs on raised stitches; V-stitch in ch-1 spaces.
- Continue alternating rows until there are 8 rows per side.
- Row 1: V-stitch pattern
4. Shaping & Assembly
- Shape the Bow:
- Fold the two textured sides towards the center so ends meet, creating a bow.
- Seaming:
- Turn bag inside out.
- Use single crochets to join long edges, working through both layers and corresponding stitches (relief, V, etc.).
- Use chain and slip stitch to finish, weave in ends.

5. Top Opening & Rings
- Adding Rings for Straps:
- Work single crochets along the top opening, adding a ring at each marked position (first row of textured sections).
- Place rings approximately 7 stitches from each edge on both front and back.
- For extra security, work two sc around each ring space.
6. Adding Button Closure
- Create Button Flap:
- Mark out three stitches in the center of the top opening.
- Attach yarn before marked stitches, work three single crochets, turn.
- Continue for 6cm, or desired length.
- Attach Button:
- Secure button/clasp at flap’s tip and corresponding loop position.
7. Straps/Handles
- Simple Crochet Strap:
- Attach yarn to one ring, chain 3, work elongated double crochet in ring space.
- (Ch 3, elongated double crochet) repeat for desired length (42 segments = ~85cm).
- Attach securely to second ring; weave in ends.
- Alternatively, use a leather or chain strap.

8. Finishing
- Secure all ends.
- Check symmetry and adjust folds for crisp bow shape.
- If using glue, apply lightly to inside of strap joins to prevent unraveling.

Tutor’s Suggestions
- Customize your bag by mixing colors or using variegated yarn for a lively effect.
- Handle choice: Crochet, chain, or leather straps each deliver a unique look.
- Button placement: Take care to align and mark stitches before sewing to ensure symmetry.
Uses
- Perfect as a playful evening clutch
- Suitable for holding daily essentials
- Great handmade gift idea
- Fashion accessory for all ages
Pro Tip
For a plush bow effect, use relief stitches tightly and block your finished bag for perfect shape before assembling.
Conclusion
Congratulations on creating a lovely bow-shaped crochet bag! This cheerful, textured design lets you experiment with color, straps, and closures while remaining practical and eye-catching. Take your time to align the parts for the best finish, and enjoy carrying or gifting your new accessory.