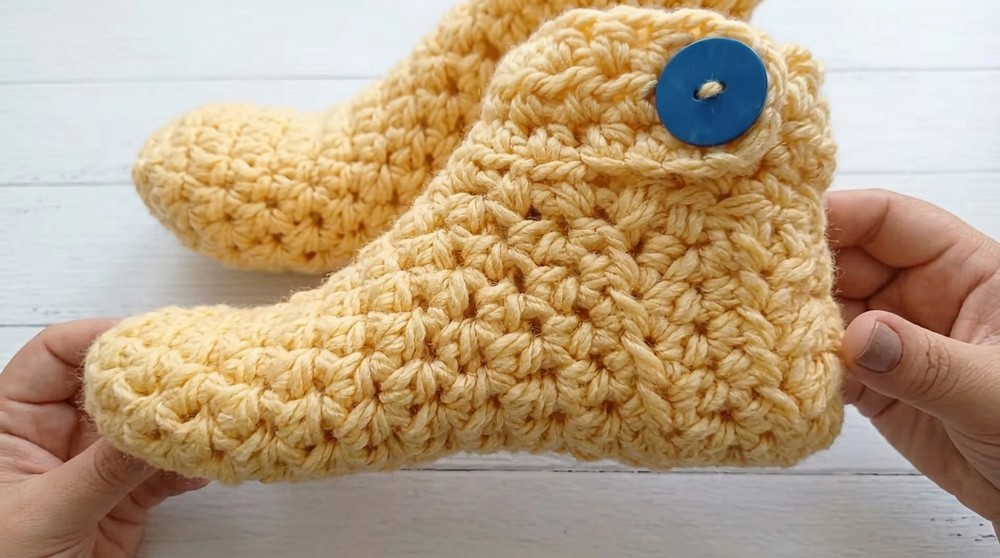
Cozy Free Crochet Slippers For Adults Pattern for Snug Feet
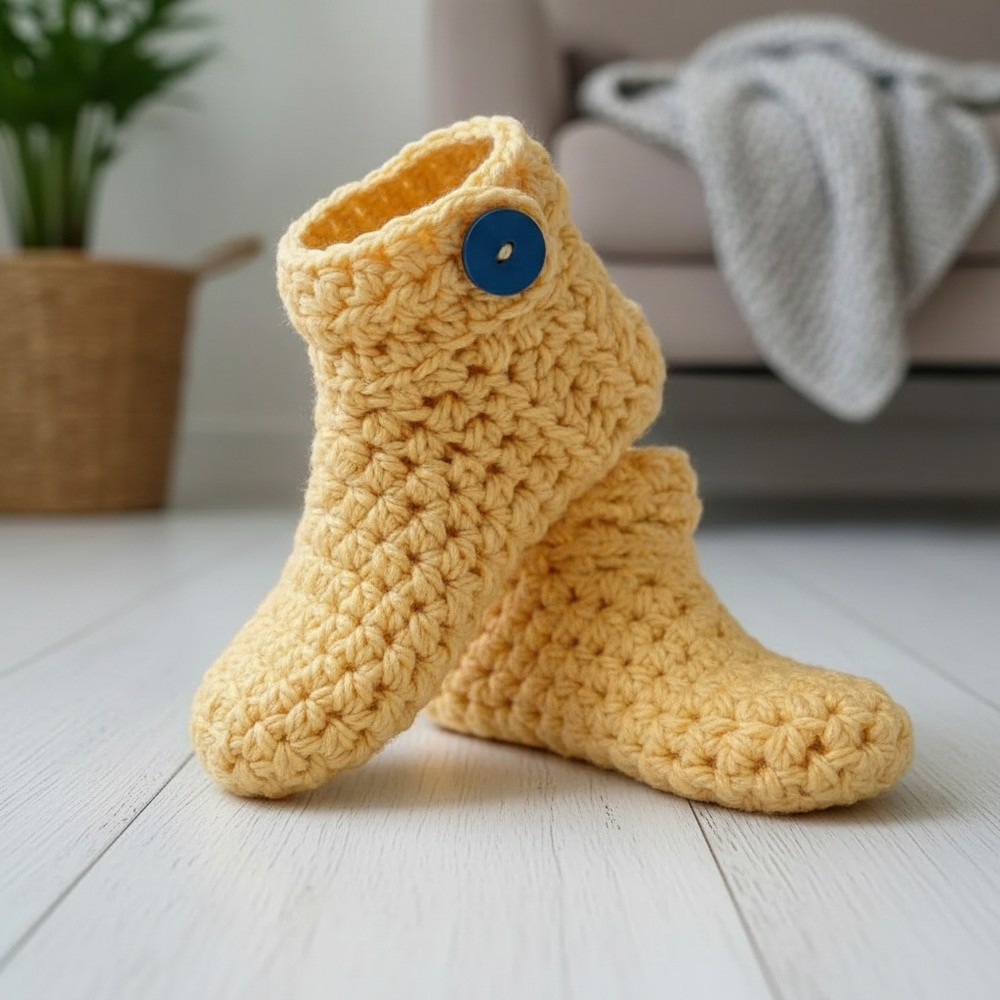
Soft comfort awaits with Free Crochet Slippers For Adults Pattern giving your feet a gentle touch and a stylish look for cozy moment at home.
Cozy shoes made by hand bring warmth to your feet like a gentle hug on a chilly day. With bright colors or simple styles you can match them to any mood or outfit. You will love how stretchy fabric fits every foot just right and feels soft against your skin. Crochet Slippers For Adults pattern offers an easy way to make these shoes at home for yourself or to give as special gifts.
Quick Free Crochet Slippers For Adults Pattern for Cozy Evenings
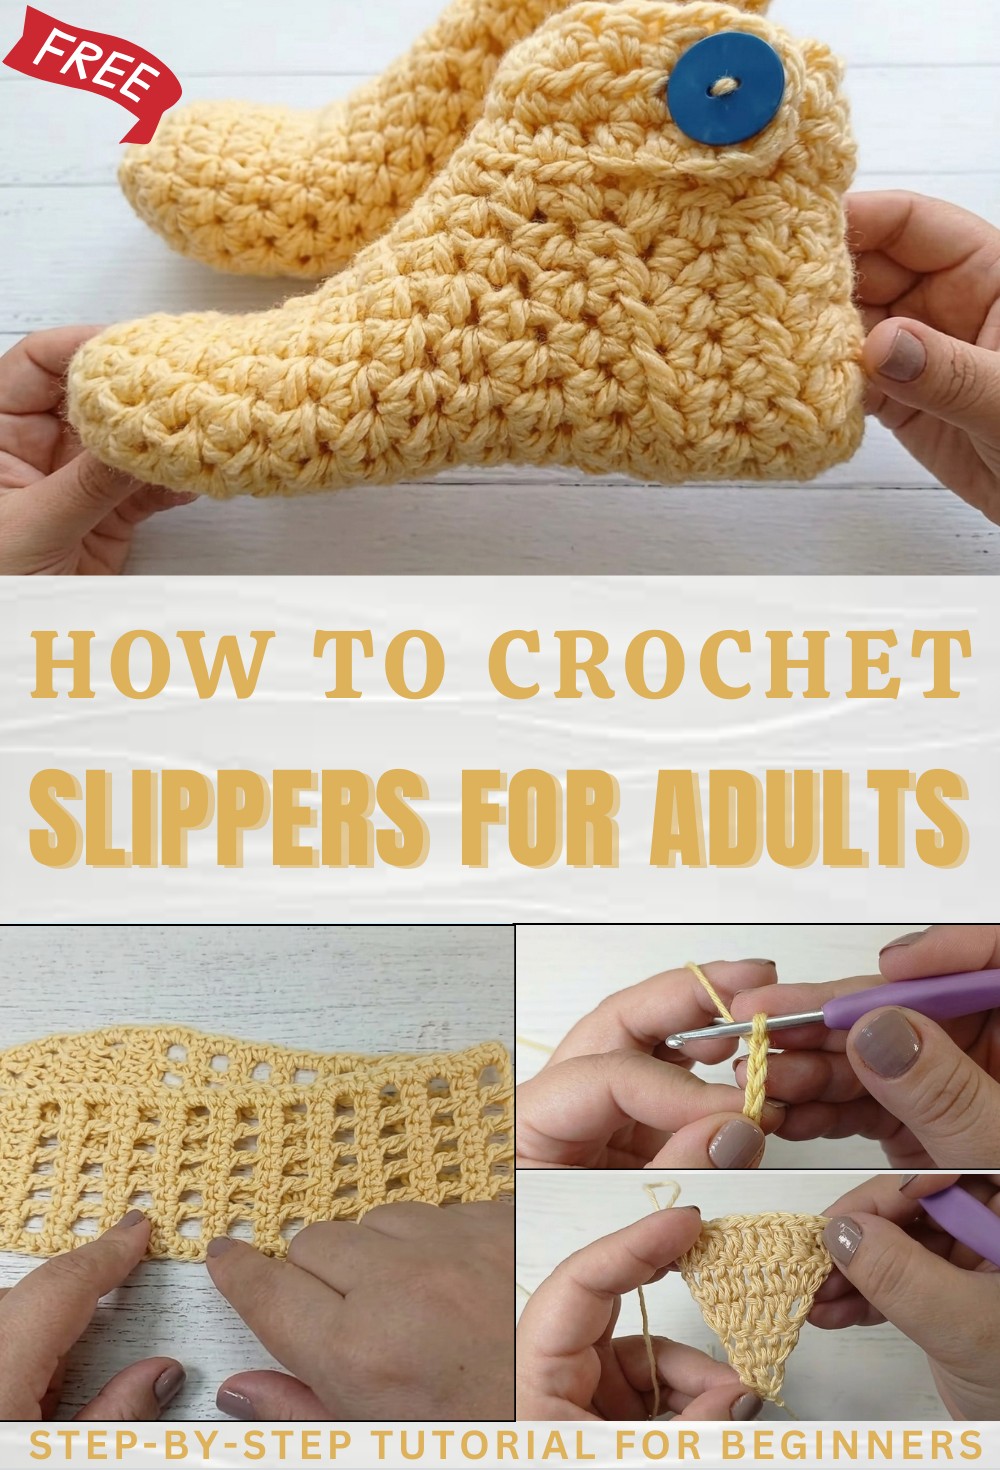
They are not just pretty to look at but also keep your feet safe from cold floors and make walking around the house more comfortable. The patterns come in many shapes so you can find one for every season or style. Slip them on in the morning or wear them for a relaxing evening and see how much better your feet feel. Making these slippers means you always have something warm and beautiful just for you.
Crochet House Slippers Pattern
Materials
- Yarn: 100g bulky (thick) wool or acrylic yarn
- Hook: 9 mm crochet hook
- Notions:
- Scissors
- Tapestry/yarn needle
- 5 stitch markers
- 1 button (approx. 1 inch / 2.5 cm in diameter)
- Optional: Measuring tape (for checking foot size)
Finished Measurements
- Fits: Adult women’s foot (approx. foot length 23 cm)
- Sole: ~24 cm length, 10 cm width
- Cuff (ankle): ~11 cm circumference, 5 cm height
Key Abbreviations (US Terms)
| Abbreviation | Meaning |
|---|---|
| ch | chain |
| sl st | slip stitch |
| hdc | half double crochet |
| hdc2tog | half double crochet 2 together (decrease) |
| st(s) | stitch(es) |
| rep | repeat |
| RS | right side |
| WS | wrong side |
All turning chains do NOT count as stitches unless stated.
Special Notes & Adaptation
- To make bigger/smaller: Adjust the initial count of the foundation round (see “Adaptation” notes).
- To widen the foot opening: Leave 3–4 sts unworked when splitting for foot opening, instead of 2 (as described in pattern).
- To lengthen/shorten: Adjust the number of hdc rounds before opening.
- Try on your slipper at every key stage for the best fit.
- Pattern is seamless—no sewing, except for button placement.
Pattern
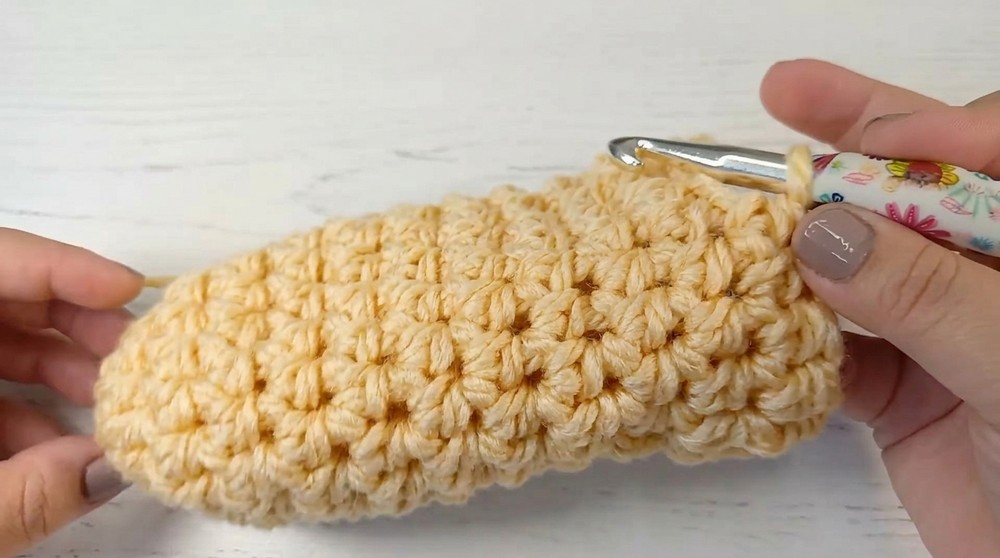
SOLE & FOOT
Round 1:
Start with a magic (adjustable) ring.
Ch 1 (does NOT count as a st), work 8 hdc into the ring.
Pull tail to close ring firmly.
Join with sl st to the first hdc. (8 hdc)
Round 2:
Ch 1 (does NOT count as st).
2 hdc in each st around.
Join with sl st to first hdc. (16 hdc)
Rounds 3–11:
Ch 1, hdc in each st around.
Join with sl st to first hdc. (16 hdc)
Repeat for a total of 9 “straight” rounds after increases.
Total: 11 rounds: 1 foundation, 1 increase, 9 straight
OPENING FOR FOOT
Round 12:
Ch 1, hdc in next 14 sts (leave last 2 sts unworked to create foot opening).
Do not join the round—stop here.
Turn work. Now you will work back and forth (rows) for the instep/top.
TOP/INSTEP SECTION
Rows 13–15:
Ch 1, hdc in each st across (14 hdc). Turn.
Repeat for a total of 4 rows (1 made above + 3 more), always working 14 hdc per row.
ADAPTATION NOTES
- To make a smaller slipper:
- Work less stitches in Round 1 (e.g. 7, 6, or even 5 hdc depending on the target size).
- Always double in Round 2.
- Straight rows/rounds are number of stitches based on the adjusted foundation.
- For a wider opening:
- Leave more than 2 stitches unworked after Round 12.
- For a longer instep/cuff, work additional back-and-forth rows above.
FINAL ROW (DECREASE/HEEL CLOSURE)
Row 16 (Across 14 sts):
Ch 1, hdc2tog (decrease) across entire row:
- [Yarn over, insert hook into next st, yarn over and pull up a loop, yo and draw through all three loops.]
- Repeat in every pair of sts across.
- You will have 7 decreases (one for every pair), and will finish with 7 sts.
HEEL SEAM – INVISIBLE JOIN
- Fold worked part so RS’s are together, aligning the 7 decrease stitches with the opposite side.
- Working through inner loops only of matching stitches on both sides, sl st seam across the 7 sts.
- Fasten off, secure with a knot, and weave in end on WS.
WEAVING ENDS & CLOSING MAGIC RING
- Use tapestry needle to close and secure the magic ring tail from the sole, weaving tail in a circle for extra security.
- Weave in all ends horizontally and vertically within your rounds/rows.
ANKLE CUFF (SHAFT)
Using same or contrasting yarn, and your stitch markers:
Find stitches for cuff foundation:
- Use markers to identify the 2 skipped sts from before and the 12 main sts along the top/heel.
- Mark each key point for accuracy.
Row 1:
- Begin on the right (outer side) for the right slipper, or on the left for the left slipper.
- With RS facing you, join yarn at the first marked st.
- Work 1 hdc in each marked st and each row-edge st around the opening (see tutorial for specifics and location—should have ~13–16 sts depending on adjustments).
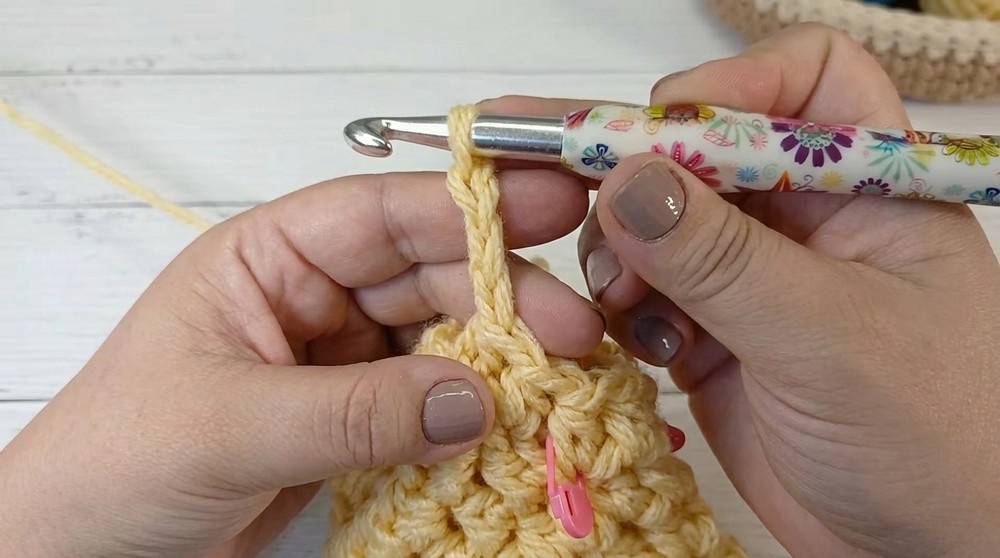
- Continue for 4 rows, turning at the end of each row, working hdc stitches into each st (add 3 chains for button tab at start of the 2nd row).
- On the 2nd row, after the hdc stitch pattern, ch 3 at end to form button loop, then turn and continue as before.
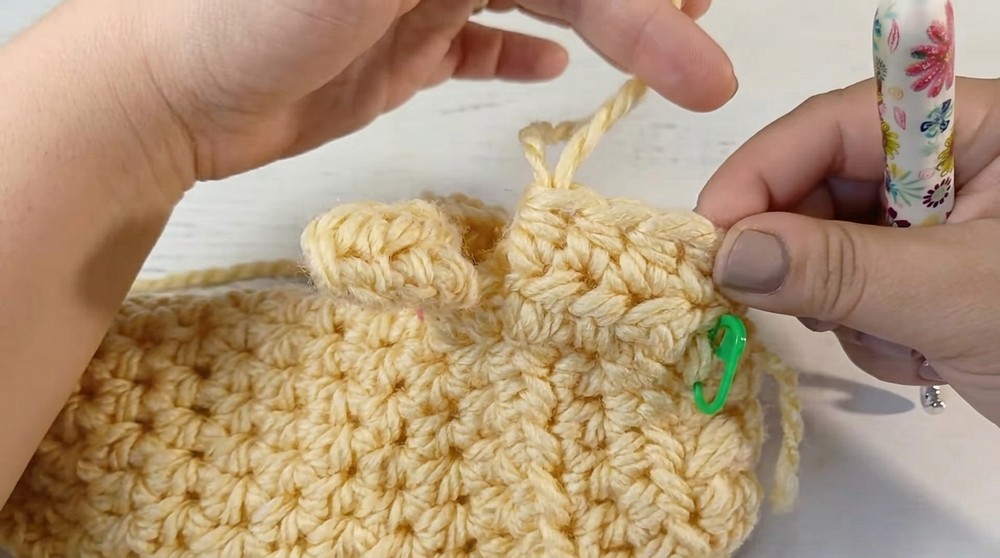
LEFT & RIGHT SLIPPER TAB MODIFICATIONS
- For the right foot, work button tab at outer right top of the opening.
- For the left foot, start at the opposite side to ensure the tab is on the outer left.
BUTTON SEWING
- Using tapestry needle and yarn, sew button at the correct place:
- Place 2 rows down from the cuff, checking fit as you go.
- Make sure the button is snug (not loose) so tab stays closed.
- Secure and hide ends on inside with a double knot and weave in tail.
- Try slipper on to ensure button loop fits tightly over button.
Conclusion
These slippers are quick to make and easy to size up or down for the whole family. They provide warmth, comfort, and can be personalized with different colors, buttons, or even surface embellishments. With a single seam and adaptable pattern, they are ideal for gift-making or cozy home use.
Pattern Correction and Tips
- Check size as you go! Try slippers on frequently while making.
- Always ch 1 at the start of rounds/rows; do NOT count ch as a stitch.
- If you want a firmer cuff, use a single crochet for the last row, or a smaller hook.
- Adjust the amount of decreases in Row 16 according to your stitch count—always decrease every 2 stitches.
- Weave ends securely for durability.
- Choose a button that fits your tab loop tightly for best hold.