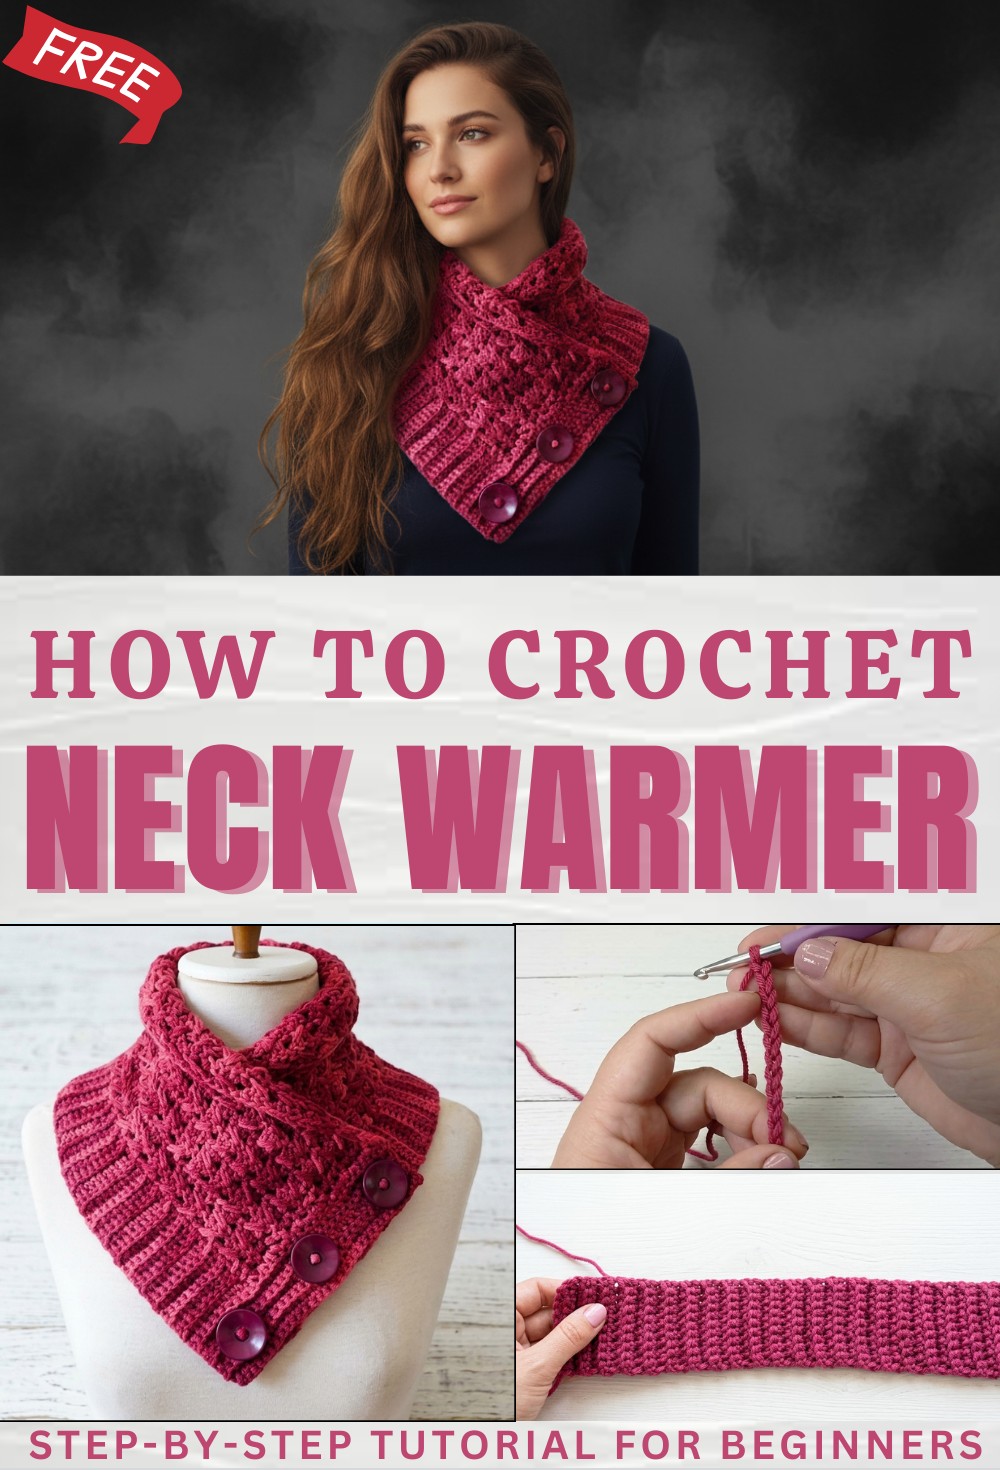
Soft Free Crochet Neck Warmer Pattern for Chilly Mornings
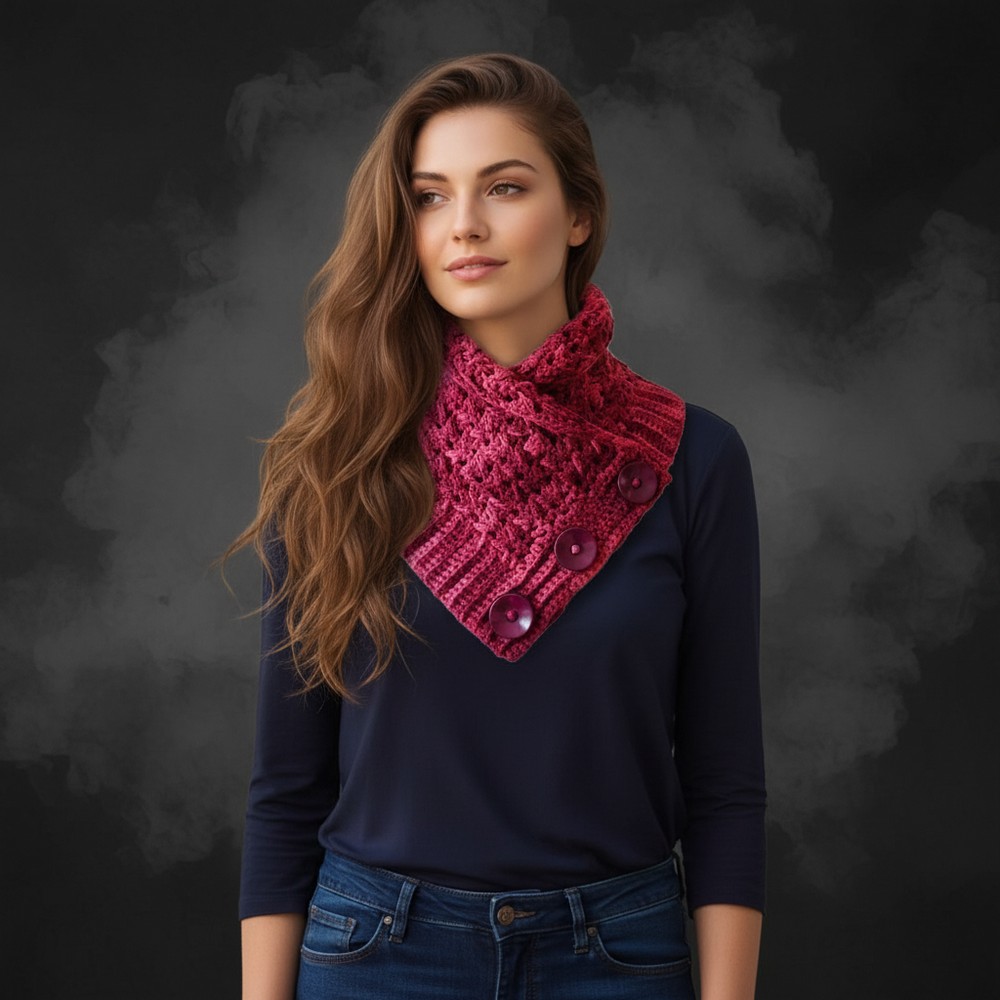
Soft comfort meets style in free crochet neck warmer pattern so effortless and appealing you’ll want to add it to every cold-weather outfit.
Warmth and elegance can meet in the simplest of ways, making cold days feel more comfortable and stylish. Using a crochet neck warmer pattern, anyone can make a charming accessory that not only keeps the chill away but also adds a polished touch to any look. A bright color brings playful style while a classic tone gives a timeless feel, making the neck warmer beautiful and fitting smoothly under jackets without the bulk of long scarves.
Simple Free Crochet Neck Warmer Pattern for Instant Comfort
This piece stays put, so there’s no fussing or adjusting throughout the day—a true convenience for busy mornings or relaxed evenings. Easy instructions make the crochet neck warmer pattern friendly for beginners, while the cozy result appeals to everyone. Add this to your wardrobe for fashion, comfort, and a little touch of luxury every time the temperature drops.
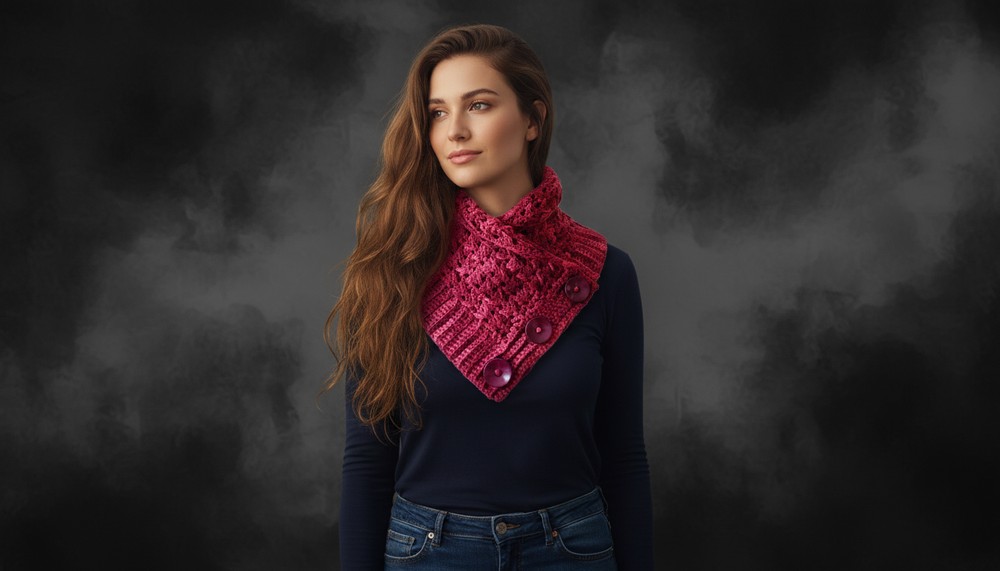
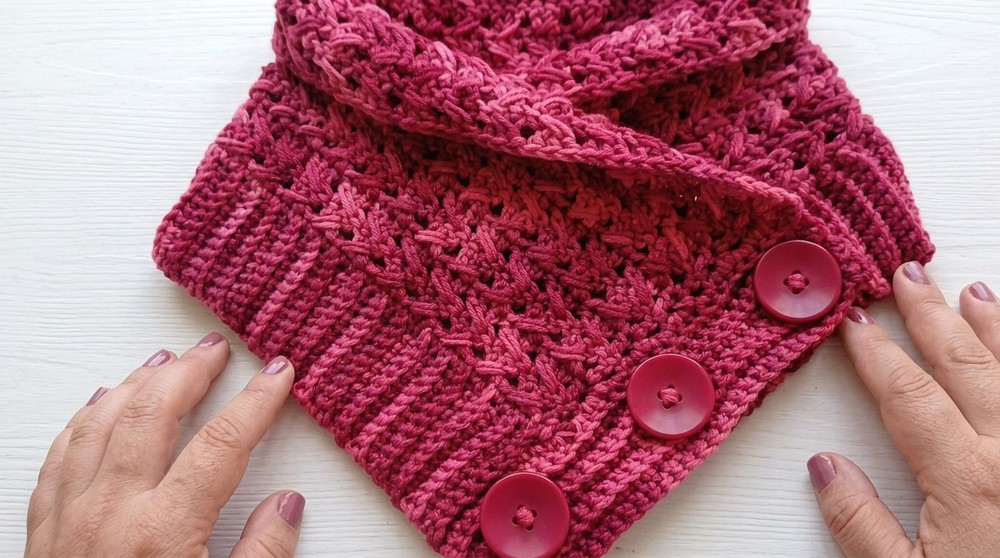
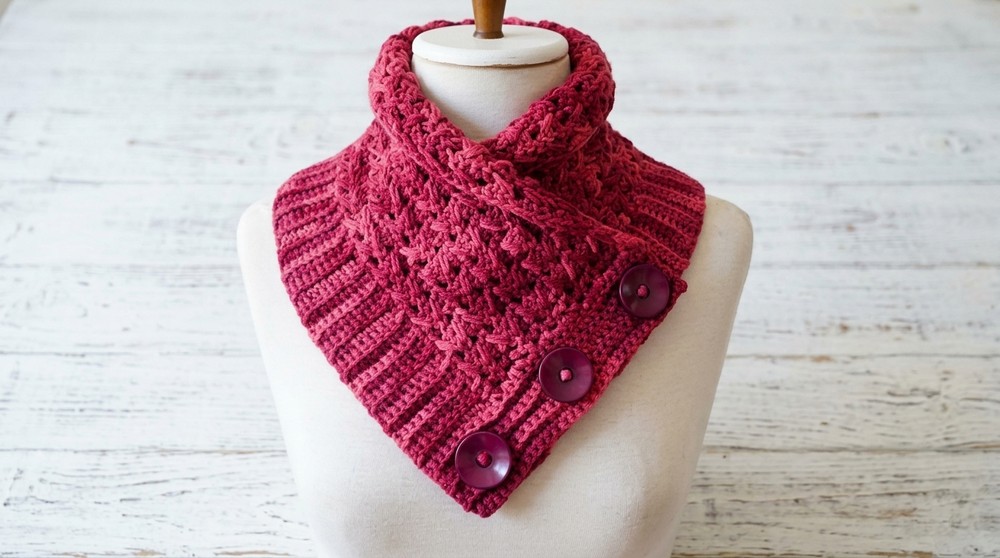
Crochet Ribbed Button Cowl Pattern
Materials
- Yarn: 120g acrylic yarn, approx. 2mm thick strand
- Hook: 5mm crochet hook
- Notions: Scissors, tapestry/yarn needle, stitch marker (optional)
- Buttons: Three, approx. 3cm diameter
- Measuring tape (optional)
Finished Size (Approximate)
- Ribbing height: 10 sts ≈ 6 cm
- Width (rectangle length): 76–80 cm (before seaming)
- Widest point: 33 cm
- Buttonband (folded end): 31.5 cm
- Finished height: ~25 cm
Key Abbreviations (US)
- ch = chain
- sc = single crochet
- hdc = half double crochet
- dc = double crochet
- sl st = slip stitch
- BLO = back loop only
- rep = repeat
Special Notes
- All ribbing (elastic) is worked BLO throughout for maximum stretch.
- Main fabric features crossed double crochet stitches for added texture.
- Number of starting ribbing rows must be a multiple of 3 plus 4 (e.g., 118 rows = 3×38 + 4), for clean symmetry.
- Buttonholes should be customized according to your button size.
- Always count your stitches for accuracy.
Pattern
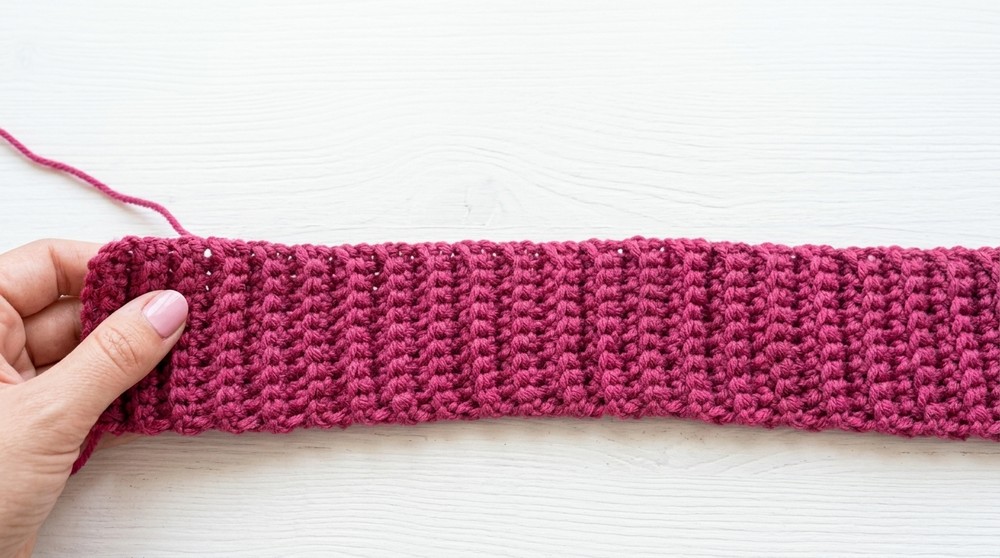
Part 1: Ribbed Edge (Elastic Band)
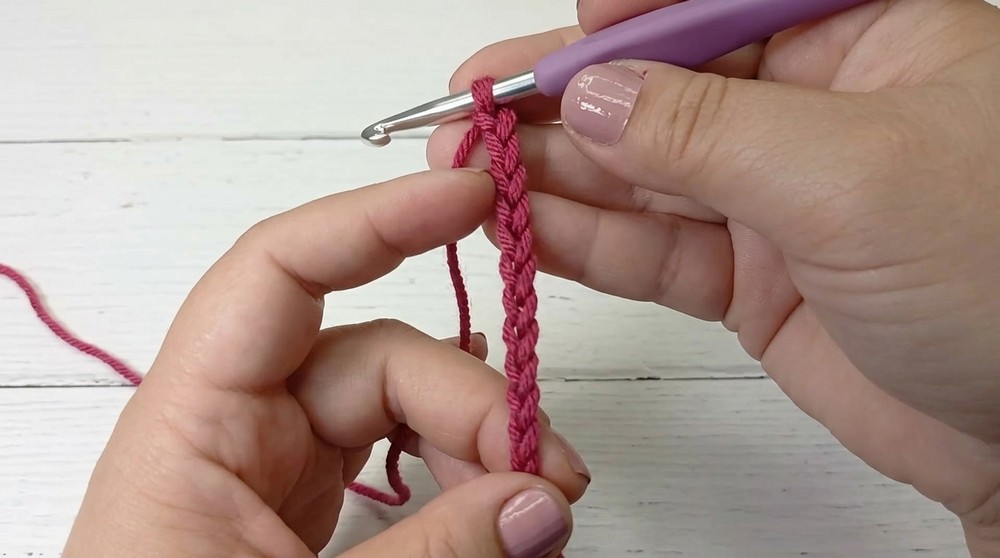
- Foundation:
Ch 11 (10 for the ribbing, 1 for turning). - Row 1:
Working in BLO, sc in 2nd ch from hook and each ch [10 sc].
Turn. - Row 2:
Ch 1 (does not count as st), sc BLO in each st across [10 sc].
Turn. - Repeat Row 2 until you have 118 rows (or any multiple of 3 plus 4 for your size; approx. 76 cm, unstretched).
- Join new yarn as needed.
- Your finished piece should comfortably wrap around your neck with some negative ease (ribbing will stretch).
Part 2: Picking Up for Body
- Turn work so you will work along the long edge (the 118-row side).
- Row 1:
Ch 1 (does NOT count as st).
Working one hdc into the end of each ribbing row (pick up two strands to avoid holes), hdc across [118 hdc].- Tip: In “valleys” where ribbing looks recessed, pick up a second nearby strand for a neater finish.
- When you reach the end, turn.
Part 3: Fancy Fabric (Crossed Double Crochet Rows)
Setup:
- The first and last two stitches of each row will always be straight dc (for a neat edge).
- The middle is crossed dc.
Row 1 (Foundation dc row)
- Fake dc (or ch 3) at start (edge), dc in next st (edge).
- Crossed section:
- [Skip next st, dc in next st] twice;
- Go back and dc in each skipped st, crossing your stitches over front. (You’re creating “X”-shaped pairs.)
- Continue until only two sts remain, then dc in each of the last two sts (edge).
- Turn.

Row 2 (and all following rows)
- Fake dc (or ch 3), dc in next st.
- Crossed section:
- Skip the next st, dc in next, dc in next st
- Then, dc in the skipped st, crossing in front.
- Continue crossing pairs across the row, until last 2 sts.
- Dc in each of last two sts.
- Turn.
- Repeat Row 2 until your fancy section is approx. 19–20 cm high, or desired depth. (Sample: 11 rows.)
Note: If you find the edge is getting uneven, you may use a modified dc2tog for the last stitches as explained in the video.
Part 4: Buttonhole Band & Second Ribbing
- Turn to work along one short edge (end of rows).
- Border Row 1:
Ch 1, 2 hdc into the side of every dc row (22 hdc for 11 rows), then 1 hdc per row for ribbing section (10 hdc from original rib).
[Total: about 32 hdc] - Border Row 2:
Ch 1, turn. Hdc BLO in each st across. - Border Row 3: (make buttonhole row)
Ch 1, hdc BLO in first 4 sts, ch 3, skip 3, hdc BLO in next 8 sts, ch 3, skip 3, hdc BLO in next 8 sts, ch 3, skip 3, hdc BLO in last 4 sts. (Adjust positions and number of skipped sts to evenly place 3 buttonholes according to your button size.) - Border Row 4 & 5:
Ch 1, turn. Hdc BLO in each hdc and in each ch (work 3 hdc into each ch-3 buttonhole).- Work 1–2 more rows of hdc BLO if a thicker band is desired.
- Fasten off.
Part 5: Finishing
Seaming & Weaving in Ends:
- Fasten off, pull yarn through last st.
- Weave in all yarn tails on the wrong side, working them horizontally and vertically for security.
Sewing On Buttons:
- Fold cowl so that the button band overlaps the ribbed band on the other end.
- Align both bands neatly.
- Using a tapestry needle and leftover yarn, sew each button on the ribbing, matching the placement of the buttonholes.
- Knot securely on the inside and weave in ends.
- Button up and enjoy!
Conclusion
This elegant cowl works up from a single rectangle, offering a comfortable ribbed neckline, gorgeous crossed double crochet detail, and a practical button closure. It’s easily customizable in both length and width and is a great project for beginners looking to expand their skills into shaping and texture.
Pattern Correction & Tips
Corrections:
- “Half point”: half double crochet (hdc)
- “Single crochet”: in US terms, usually means sc, but video uses hdc for ribbing, so follow as written.
- “Chain for turning”: Always do not count as a stitch.
Tips:
- If your buttonholes are too small or large, adjust the number of chains and skipped stitches to suit your buttons.
- Always count your stitches at the end of ribbing and border rounds.
- The crossed dc rows will create a lovely fabric with both drape and structure.
- When picking up sts on the ribbing edge, grab two loops for a sturdy and closed fabric.
- To avoid uneven edges, check your stitch count and use the decrease technique if needed.
- Sew buttons with a square knot and hide the thread tails well for a neat finish.