How to Crochet A Barbie Tote Bag for Beginners
In this post, learn how to crochet a stylish Barbie tote bag using three shades of pink yarn and tapestry techniques with a step-by-step tutorial. The video also covers assembling panels, sewing edges with slip stitches, and adding sturdy straps. It starts with detailed instructions on creating slip knots, chaining, and single crochets, followed by color changes for the bee design. This beginner-friendly guide ensures a dreamy, customized tote bag perfect for Barbie enthusiasts.

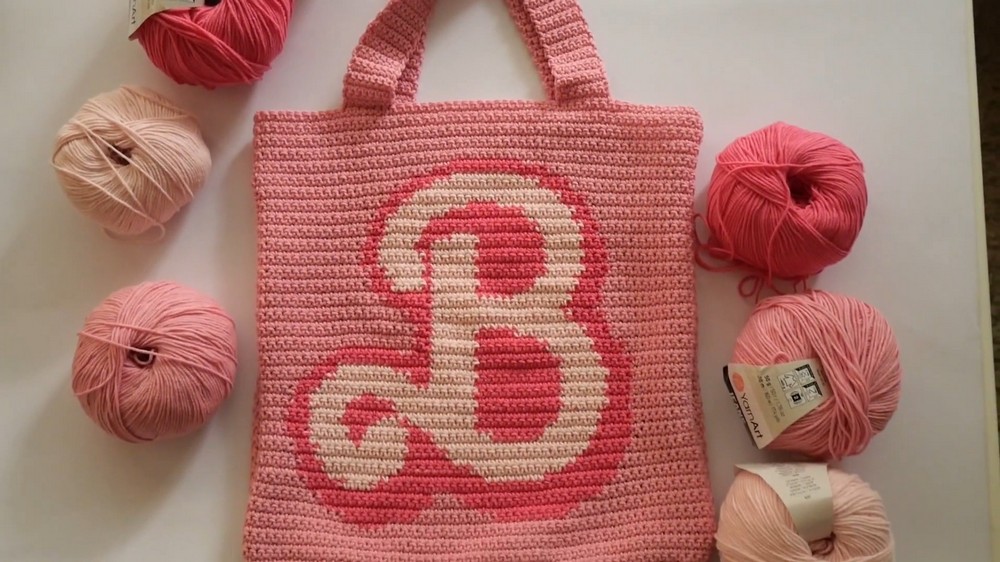
Barbie Graph Tote Bag Free Crochet Pattern
Materials
- Yarn:
- 3 skeins light pink (background)
- 1 skein dark pink
- 1 skein extra light pink
- Crochet Hook: 3 mm
- Yarn Needle: for weaving in ends
- Scissors
- Tape Measure
- Optional: Access to Stitch Fiddle for chart reference (pattern not included here)
Abbreviations
- ch: Chain
- sc: Single crochet
- sl st: Slip stitch
- st(s): Stitch(es)
- FO: Fasten off
Special Notes
- Color changes are achieved by carrying and switching yarns as described.
- Stranded crochet is used: carry unused colors across the row by crocheting over them.
- Always ch 1 at the start of each row.
- For a crisp look, keep color changes snug and maintain consistent tension.
- The bag is constructed in two flat panels, joined with slip stitches; straps are worked separately.
Pattern Instructions
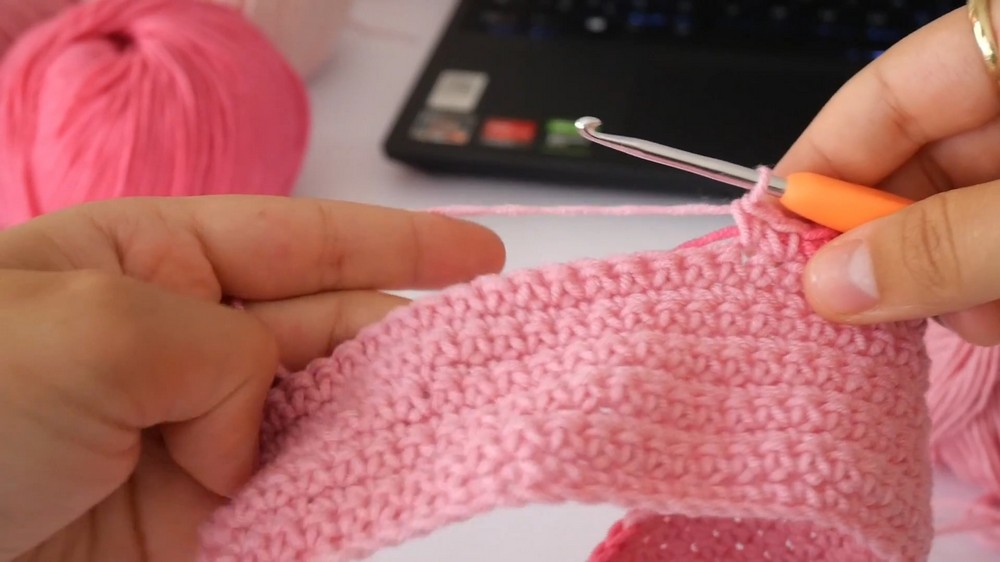
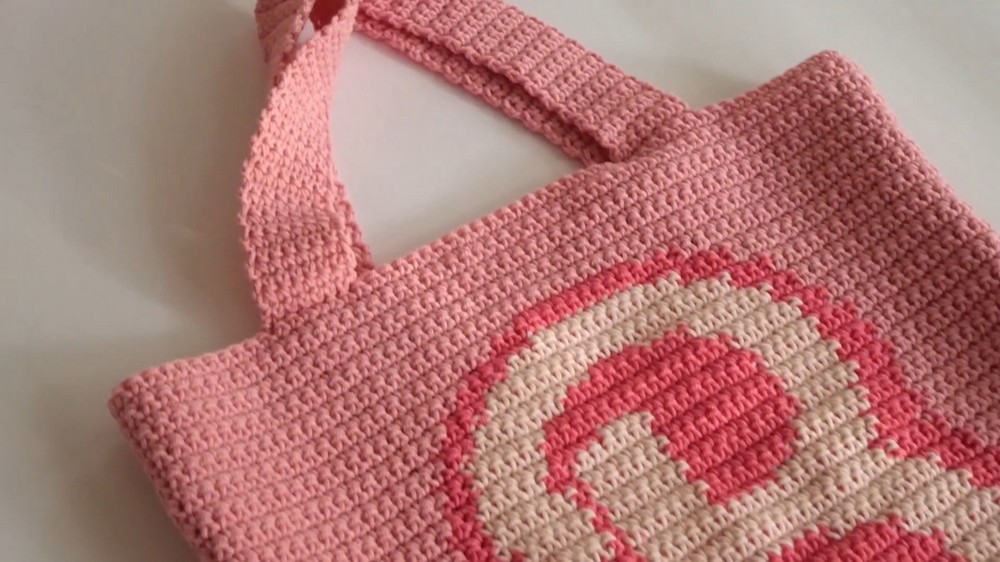
1. Front Panel (with Colorwork)
Using background light pink yarn:
- Foundation:
- Make a slip knot.
- Ch 61.
- Row 1:
- Starting in 2nd ch from hook, sc in each ch across (60 sts).
- Rows 2–9:
- Ch 1, turn.
- Sc in each st across (60 sts per row).
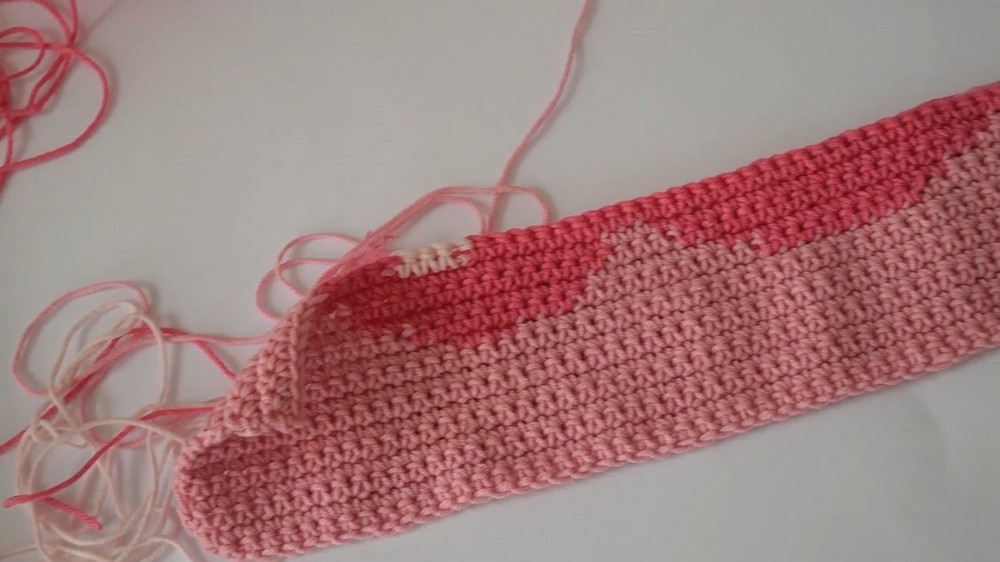
- Row 10 onward (Begin Colorwork):
- Follow your chart or use the written guide for color blocks. Example:
- For Row 10:
- Sc in pink for 41 sts
- Switch to dark pink: 4 sts
- Switch back to pink: 15 sts
- For Row 10:
- For each color change:
- On the last yarn-over of the stitch before color change, drop old color and complete stitch with new color.
- Carry unused yarn by holding it along the top of the row and crocheting over it.
- Continue repeating this method for each row, observing chart instructions.
- Sample for Row 11:
- Pink sc for 13 sts
- Dark pink sc for 9 sts
- Pink sc for 10 sts
- Dark pink sc for 9 sts
- Pink sc for 19 sts
- Tip:
- When multiple blocks of color are used (e.g. adding extra light pink for the ‘B’ sections), attach and carry the yarn as above, cutting extra tails only when blocks finish.
- Follow your chart or use the written guide for color blocks. Example:
- Ending Colorwork:
- By row 58, cut off dark pink (when not needed).
- Continue working only in background pink until row 67.
- Rows 59–67:
- Ch 1, turn.
- Sc in each st across (60 sts).
- FO and cut background yarn.


2. Back Panel (Solid Pink)
- Foundation:
- Make a slip knot with background pink yarn.
- Ch 61.
- Rows 1–67:
- Ch 1, turn.
- Sc in each st across (60 sts).
- Only use background pink for entire panel.
3. Joining Panels
- Place panels right sides facing each other.
- With background pink, attach yarn at any corner.
- Ch 1.
- Slip stitch through both panels’ matching edges all around, working evenly:
- Work up one side, across the bottom, and up the other side.
- At corners or row ends, place an extra ch 1 if desired.
- FO and turn bag right side out.
4. Bag Straps (Make 2)
- Position:
- Count 13 sts from edge; attach yarn at the 14th st.
- Strap Foundation:
- Attach with a knot, ch 1.
- Sc in same stitch and next 6 sts (7 sc).
- Rows 2–70:
- Ch 1, turn.
- Sc across 7 sts.
- Repeat until strap measures desired length (about 70 rows as shown).
- Joining Strap:
- Once strap is complete, skip 13 sts from opposite edge, align the strap, and slip stitch to bag for 7 sts.
- FO.
- Repeat for second strap on opposite side.

5. Finishing
- Weave in all yarn ends securely.
- Use yarn needle for neatness.
- Dimensions in the video: reference bag is roughly 23 cm x 34 cm before straps.
Conclusion
Your Barbie Tote Bag is complete—featuring vibrant colorwork and sturdy slip-stitched seams. The bag is perfect for collectors or as a gift for a Barbie fan. Enjoy carrying or gifting your work!
Pattern Corrections & Tips
- Make sure every row starts with ch 1 and ends with sc 60.
- Maintain consistent tension during color changes to avoid puckering.
- Cut off and weave in yarns only when their use is completed in the design.
- Try to use a yarn weight close to DK (recommended for 3–4.5 mm hook).
- If panels differ slightly in size, gently stretch edges to match before joining.