How to Crochet a Miffy Jewelry Holder for Beginners
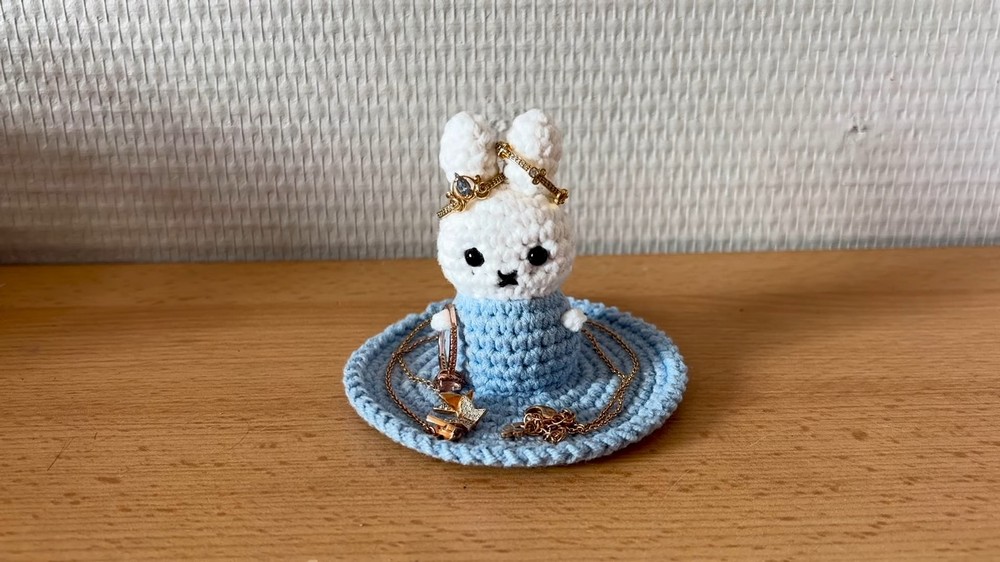
Here is a tutorial on how to crochet a Miffy jewelry holder through crochet, perfect for beginners. The presenter walks viewers through every step, from crocheting the trinket tray base to assembling Miffy’s body, ears, and arms, and adding intricate features like the face.
The project, which uses simple materials like cotton-acrylic yarn, a crochet hook, and safety eyes, is both functional and adorable. So, follow through with us for the complete tutorial.

Crochet Miffy Jewelry Holder Tutorial
This tutorial guides viewers through crocheting a charming Miffy jewelry holder. The holder features a base, Miffy’s head, body, ears, arms, and embroidered facial details, making it both functional for organizing jewelry and decorative.
Purpose of the Miffy Jewelry Holder
- Designed to hold necklaces, bracelets, and rings.
- Functional as a storage solution for small crochet items like stitch markers.
- Can be customized creatively for alternative uses.
Materials Needed
- Yarn: Two colors (e.g., white and blue); suggested blend is 60% cotton and 40% acrylic.
- Hook Size: 3 mm crochet hook.
- Tools and Supplies: Scissors, darning needle, stitch markers, stuffing material, safety eyes (5 mm), and embroidery yarn.
Steps to Crochet the Jewelry Holder
1. Creating the Trinket Base
- Foundation: Begin with a magic circle and crochet rounds to form a flat circular base.
- Circle Development: Use increases strategically in subsequent rounds to expand the circle.
- Edge Finishing: Chain and slip stitches are used for a clean finish.

2. Building Miffy’s Base (Head and Body)
- Head Formation: Start with a magic circle, followed by increases to shape the sphere.
- Eye Placement: Attach safety eyes between designated rounds for accuracy.
- Body Formation: Transition to a secondary color using a yarn-switching technique and continue creating a cylinder shape to complete the body.

3. Crocheting the Ears
- Size and Shape: Made smaller using fewer stitches than the base components.
- Stuffing: Lightly stuffed for a rounded and sturdy appearance.
- Assembly: Sew the ears onto the top of Miffy’s head in a symmetrical position.
4. Making the Arms
- Miniature Size: Each arm consists of a few stitches with no stuffing needed.
- Placement: Attach the arms evenly to Miffy’s body between designated rows.

5. Embroidering the Mouth
- Facial Features: Embroider a small cross-shaped mouth using embroidery yarn.
- Placement: Ensure the mouth is centrally aligned beneath the eyes, creating a triangular effect.
Assembly Process
- Attaching to the Tray: Secure Miffy’s base onto the trinket tray using the outer loops of stitches for neatness and stability.
- Final Adjustments: Stuff Miffy’s base before fully sewing it onto the tray.

Additional Tips
- Secure yarn ends with knots and hide them within the fabric.
- Double-check the placement of features like ears and arms to ensure symmetry.
- Experiment with alternative colors to personalize the design.
Conclusion
The Miffy jewelry holder is a versatile and adorable crochet project. The tutorial provides a step-by-step guide for crafting each component and assembling them effectively. It’s ideal for beginners looking to create a practical and charming crochet item.