How to Crochet Amazing Bell Flowers Hanging Tutorial

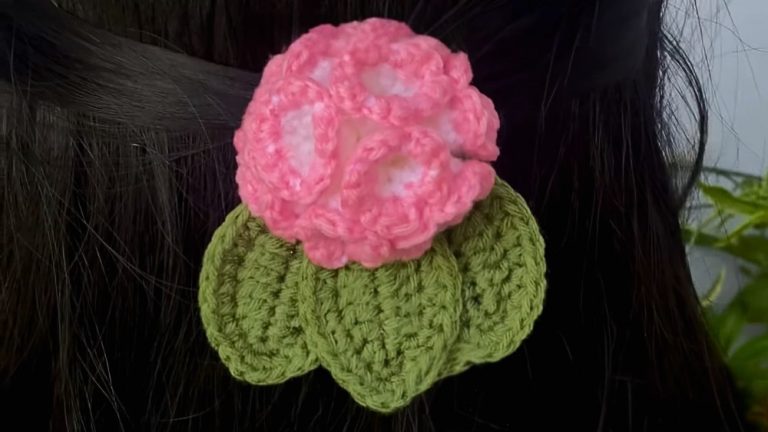
With a step-by-step tutorial, learn how to crochet a decorative hanging with flowers and a bell, which can be used for cars or home decor. The project is very easy and suitable for beginners. The tutorial walks you through making the components and assembling the final piece. You will need two colors of yarn and a 2.5 mm crochet hook. The flowers are created using a magic ring with triple crochet stitches to form the base, and then puff stitches with another color to form the petals, with picots added for extra detail.
The bell is started with a magic ring and double crochet stitches, with increases in the second round and a flared edge created with half double crochet stitches in the final round. To assemble, you will string five crocheted flowers together with pearls to create strands of different lengths.
These strands are then joined to a central flower and attached to the crocheted bell. More pearls are added above the bell to form the main hanging loop.

Introduction to the Lattkan
The video provides a tutorial on how to crochet a beautiful lattkan, a hanging decorative item with bell and flower designs. This project is suitable for beginners and can be made using leftover yarn. The finished product can be used to decorate a car, a closet, or a purse. The colors used in the video are white and orange yarn, and the recommended tool is a 2.5 mm crochet hook.
Step-by-Step Instructions
1. Making the Flowers
- The process begins with creating a magic ring.
- Chain four, then create a series of triple crochets inside the magic ring.
- The magic ring is then closed and the yarn is tied off and trimmed.

2. Adding the White Puff Stitches
- The next step is to use white yarn. Attach the yarn anywhere on the flower.
- The video shows how to make puff stitches by pulling up six loops, then closing them. These are made in every third stitch around the flower.
- The demonstrator completes a round of puff stitches and joins them with a slip stitch.

3. Creating the Picot Edging
- The next step involves making a picot edging to the flower. This is done by first making a single crochet stitch between two puff stitches.
- Next, create a series of double crochets and three chains to form a picot.
- This process is repeated to create a second picot in the same spot before moving to the next section between the next set of puff stitches.

4. Making the Bell
- The bell is also started with a magic ring.
- The first round of the bell is created by making a series of double crochets.
- The second round involves making two double crochets in each stitch from the previous round.
- For the following four rounds, a single double crochet is made in each stitch.
- The final round of the bell consists of making half double crochets, with two in each stitch to create a flared edge. The round is then joined with a slip stitch, and the yarn is cut.

5. Assembling the Lattkan
- The flowers are assembled onto a string of beads. The video uses 6mm beads.
- A bead is placed on the string, and a knot is tied to secure the first flower.
- The string is then threaded with beads.
- The second flower is attached to the other end of the string, and a bead is used to secure it with a knot.
- Two more flower strings are created with different bead counts to form the hanging tiers.
- A third flower is attached to a string of beads, and the hanging tiers are attached to it.
- The crocheted bell is attached to the top of the flower arrangement using beads.
- A long string of beads is then attached to the top of the bell to complete the hanging.
- A knot is tied at the top to create a loop for hanging.