How to Crochet Baby Teddy Bear Hat for Gift-Giving

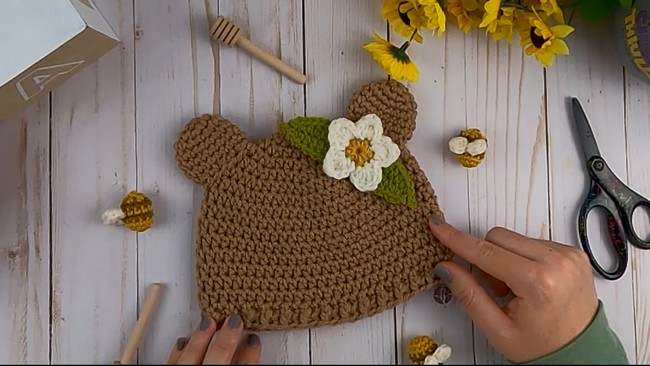
In this post, you’ll learn how to crochet an embellished baby teddy bear hat for babies aged between three to six months with a step-by-step tutorial from Storybook Crochet. You can also watch the tutorials for the sizes from premie to 12 months available in the description of the tutorial. This hat features cute teddy bear ears in solid color and embellished further with a little flower applique.
The tutor indicates that this hat is a fairly simple project, suitable for beginners. If you prefer, you can purchase a PDF version of all four hat sizes from Etsy or Ravelry. You can make this hat even more special using other embellishments. It can be an equally great baby shower gift and birthday gift.
You can find the complete video guide for crocheting this baby teddy bear hat at the end of this post. For learning more about this guide follow through with us below.

Skills Used: Working in continuous rounds, single crochet, and shaping through increases and decreases. It also demonstrates how to create a seamless finish by properly joining rounds and how to securely attach components like the ears to the hat.
Guide Span: 9 Minutes Only
Personalization Tips: Personalization options for the teddy bear hat include changing the yarn colors to represent different animals, such as gray for a koala or black and white for a panda. Add decorative elements like flowers, bows, bees or embroidered features to make the hat unique.
This tutorial is concise and spans only 9 minutes to help you crochet a sweet teddy bear hat for babies quickly. The focus on ear shaping and seamless attachment ensures will ensure a professional finish. As a tip, when making the ears, use a stitch marker to keep track of your rounds to ensure your ears come out even. You will find a lot of other tips throughout this guide. Here is a quick overview of the tutorial:
Free Crochet Teddy Bear Baby Hat Pattern
Materials
- Worsted weight acrylic or cotton yarn (sample uses “I Love This Yarn” in Toasted Almond)
- Hook: 5.0 mm (H/8) crochet hook
- Yarn needle (for sewing/finishing)
- Scissors
- Stitch marker (optional, to keep track of rounds)
Key Abbreviations
| Abbreviation | Meaning |
|---|---|
| mr | Magic ring |
| ch | Chain |
| sc | Single crochet |
| inc | Increase (2 sc in same st) |
| dec | Decrease (sc2tog over 2 next sts) |
| sl st | Slip stitch |
| st(s) | Stitch(es) |
Special Notes
- Ears are worked in continuous rounds (do not join at end of each round).
- Use a stitch marker to keep track of the first stitch of each round.
- Leave a long tail on each ear for sewing onto hat.
- This pattern makes two ears. Make your hat first in any size, then follow this pattern for the ears.
Teddy Bear Ear Pattern (Make 2)
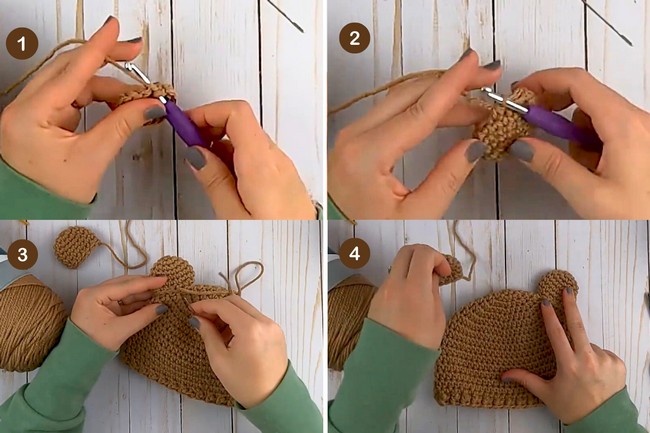
Round 1:
- Make a magic ring.
- Ch 1 (does not count as a stitch).
- Work 6 sc into the ring.
- Pull yarn tail to close ring tightly.
- (6 sts)
Round 2:
- 2 sc in each st around (inc in each st).
- (12 sts)
Rnd 3:
- [1 sc in next st, 2 sc in next st (inc)] – repeat around.
- (18 sts)
Rnds 4–6:
- Sc in each st around.
- (18 sts per round; total 3 rounds)
Rnd 7 (Shaping):
- [1 sc in next st, sc2tog (dec) over next 2 sts] – repeat around.
- (12 sts)
Finish:
- Sl st in next st to finish neatly.
- Cut yarn, leaving a long tail for sewing.

Attaching Ears to Hat
- Thread yarn needle with tail from ear.
- Place ear on hat:
- Ears usually attached approximately over the 4th round down from the top (adjust up or down for desired look).
- Play with positioning and pin if needed before sewing.
- Sew around the outer edge of the ear, securely attaching to hat.
- Weave yarn through ear a couple times to reinforce.
- Weave in yarn tail and trim excess.
- Repeat with second ear, making sure both are even and symmetrical.
Conclusion
- Your teddy bear ears are now ready and securely attached to the baby hat.
- This adds a cute, classic touch to your baby hat, and can be customized with different yarn colors or by adding a small flower or other embellishment.
- For added fun, reference the creator’s additional videos for a flower or tiny bumble bee to decorate your hat.
Pattern Corrections
- Double-check stitch counts at the end of each round to ensure symmetrical, even ears.
- If the ears curl or cup too much, try lightly steaming or blocking them before sewing onto the hat.
Tips
- If you are new to amigurumi-style increases/decreases, use a stitch marker to keep your place each round.
- Leave a long enough tail for sewing the ears securely onto the hat.
- For a softer join and less bulk at the seam, sew only through the outer loops of the ear and hat.
- Adjust ear placement before sewing to ensure a symmetrical, balanced look.