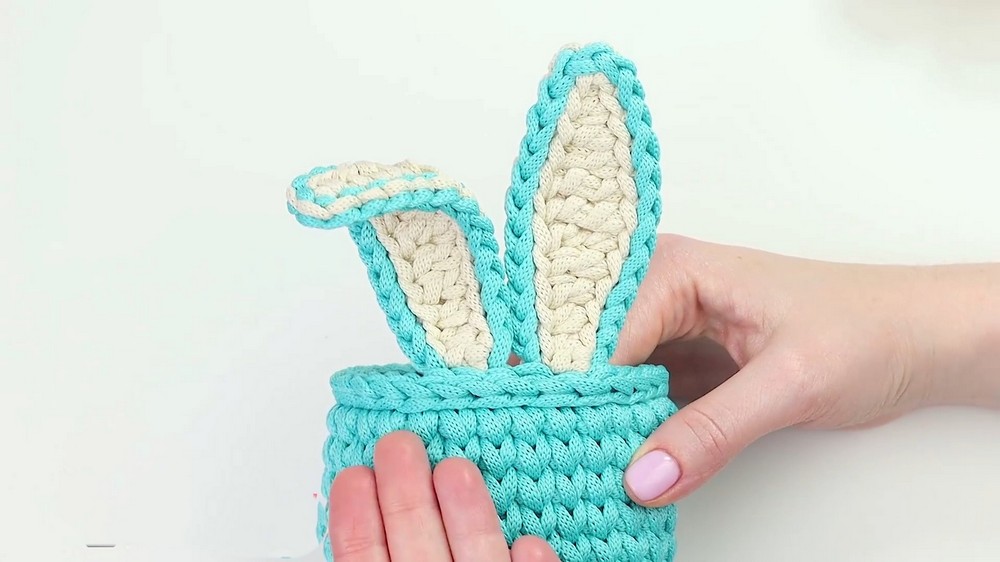
How to Crochet Bunny Basket with Ears for Kids
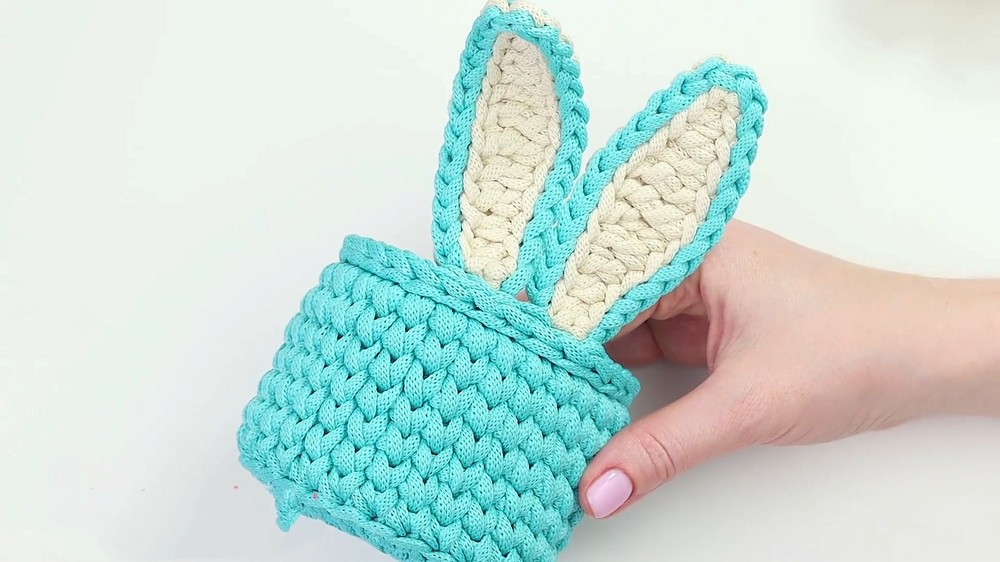
In this post, with a masterclass, learn how to crochet a cute bunny basket, perfect for the Year of the Rabbit and special occasions. Using a flat Caramel polyester cord, a 10 cm plywood base, and a 4.5 mm hook, Anya demonstrates step-by-step how to crochet the basket and bunny ears with detailed techniques.
This basket doubles as gift packaging or storage, and you can access materials that are cheap. So, follow through with us for the complete tutorial.

Crochet Bunny Basket Tutorial
This video provides a masterclass from Lenta Mania with Anna Sakhno on how to crochet a “bunny” basket, suitable for holding candies or as gift packaging. The basket’s design is inspired by the upcoming 2023 Year of the Rabbit.
Materials Used
-
Polyester Cord “Caramel”: Less than half a skein of the main color and a small amount of white. The cord is flat, which is important for the item to hold its shape well.
-
Plywood Base: 10 cm in diameter.
-
Crochet Hook: 4.5 mm.
-
Scissors: For cutting the cord.
-
Lighter: For singeing the cord ends.
All materials can be found on lamania.ru or directly from the manufacturer, with a 10% discount available using a provided promo code.
Basket Construction
The main body of the basket is crocheted in “split stitch” (also known as “waistcoat stitch”) for a dense and firm fabric.
-
Base Edging:
-
Insert the hook into any hole of the plywood base.
-
Pull out a loop and chain one.
-
Lay the cord tail under the top bar of the base to hide it within the row.
-
Pull out a loop and single crochet.
-
Continue inserting the hook into each hole once, without increasing stitches. The first row of single crochets will form the walls perpendicular to the base.
-
Once all holes are worked, adjust the stitches to ensure they stand perpendicular to the base.
-

-
Joining Rows (Invisible Seam):
-
Slightly pull out the last crocheted loop.
-
Insert the hook from back to front under the first horizontal chain (the turning chain).
-
Pull the loop halfway to the wrong side and hold it with your finger.
-
Insert the hook into the center of the first single crochet (into the “V” or “split”).
-
Pull out the working yarn and place the previously pulled-out loop back onto the hook.
-
Yarn over and pull through both loops on the hook. This creates a neat, seamless join for the “split stitch” pattern.
-

-
Basket Walls:
-
Crochet subsequent rows by inserting the hook directly into the center of the “V” (split) of the stitches from the previous row.
-
Continue crocheting single crochets without increases.
-
Repeat the joining technique at the end of each row.
-
The video recommends crocheting seven rows for an optimal basket height, but the height can be adjusted based on preference and base size.
-
Do not join the last (seventh) row, as an edging will be added.
-
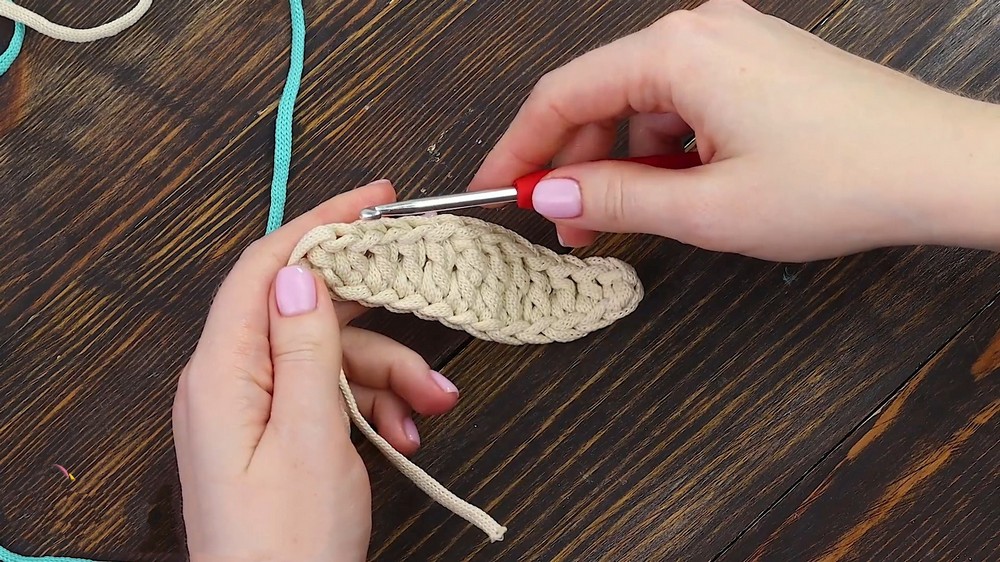
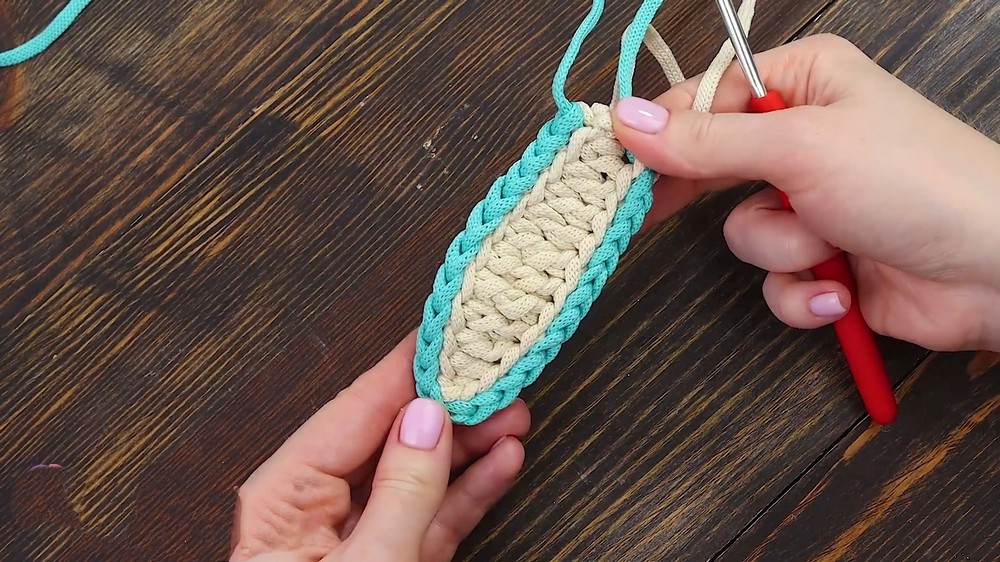
Ear Construction
The video provides a diagram of the ear. The foundation chain is made differently than typically expected for crochet.
-
Foundation Chain:
-
Form a slip knot (do not tighten).
-
Chain 13.
-
Turn the chain to its wrong side; locate the central “bars” or “bumps” of each stitch.
-
-
First Row of Ear:
-
Skip the last chain.
-
In the next chain, insert the hook from bottom to top into the central bar, pull up a loop, and single crochet.
-
Next, yarn over, insert the hook into the central bar of the next chain, pull up a loop, yarn over, and pull through all three loops on the hook (half double crochet).
-
Next, yarn over, insert the hook into the next chain, pull up a loop, yarn over, pull through two loops, yarn over, pull through the remaining two loops (double crochet). Repeat this for two double crochets total.
-
Next, yarn over twice, insert the hook into the next chain, pull up a loop, yarn over, pull through two loops, yarn over, pull through two loops, yarn over, pull through two loops (treble crochet). Repeat this for three treble crochets total.
-
Next, crochet three double crochets (same as above).
-
Next, crochet two half double crochets.
-
For the very last stitch, insert the hook under the very top bar of the chain (not the central bar), yarn over, and pull through all three loops (half double crochet).
-
-
Finishing the Ear:
-
Cut the yarn, leaving a 5-10 cm tail.
-
Singe the end of the tail with a lighter.
-
Pull the tail through the last loop to secure.
-
Ear Edging
This edging is done with a contrasting color using slip stitches, moving backward along the edge of the ear.
-
Attach New Color:
-
Insert the hook into the last crocheted stitch of the ear (where the tail was pulled through).
-
Attach the new color by pulling a loop through.
-
Hold the tail along the edge to crochet over it.
-

-
Slip Stitch Edging:
-
Working backward, insert the hook into the back loop (rightmost bar) of each stitch along the edge.
-
Yarn over and pull through both loops on the hook (slip stitch).
-
Maintain consistent tension, ensuring the slip stitches are not too tight to avoid the ear curling.
-
Continue around the entire perimeter of the ear.
-
-
Finishing Ear Edging:
-
Once the edging is complete, cut the yarn, leaving a 5-10 cm tail.
-
Singe the end and pull it through the last loop.
-
Tie the four tails at the end of the ear together for security.
-
-
Second Ear & Pressing:
-
Crochet a second ear exactly the same way.
-
Press both ears with steam using an iron on medium heat (setting 3), possibly through a cotton cloth to protect the cord.
-
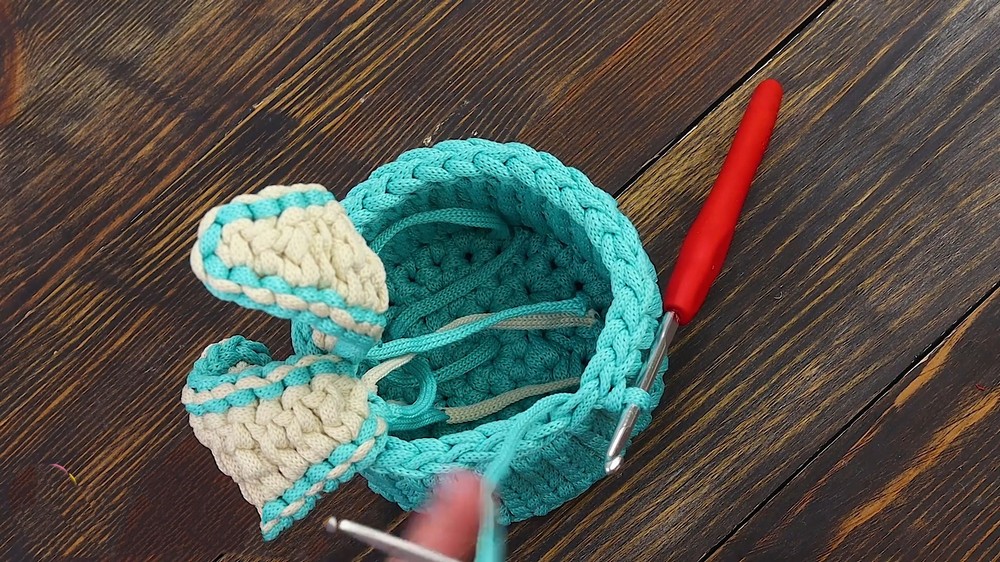
Attaching Ears and Final Edging
-
Basket Top Edging:
-
Return to the basket, where the last row was left unjoined.
-
Insert the hook into a stitch on the top edge and pull up a loop.
-
Slip stitch along the top edge of the basket, making sure to keep even tension and height.
-
-
Attaching Ears:
-
After crocheting approximately six or seven slip stitches, begin attaching the first ear.
-
Fold the ear and determine two points for attachment.
-
Insert the hook through the next stitch on the basket and through the first attachment point on the ear.
-
Pull up the working yarn (be careful not to snag the ear tails).
-
-
-
Make a slip stitch, ensuring the stitch is neat and consistent in height.
-
Repeat the process for the second attachment point of the ear.
-
Continue slip stitching along the basket’s top edge until you reach the desired position for the second ear, then attach it using the same method.
-
-
Closing the Edging:
-
Continue slip stitching until the last stitch before the beginning of the edging.
-
Cut the yarn, singe the end, and pull it through the last loop.
-
To create a seamless join, insert the hook from bottom to top into the first slip stitch of the edging.
-
Pull the tail up through it.
-
Adjust the tension to match adjacent stitches.
-
Insert the hook from back to front into the center of the last slip stitch made.
-
Pull the tail through, forming a final “chain” that blends with the others.
-
Finishing Touches
-
Hide all remaining tails by weaving them into the inside of the basket stitches.
The video concludes by wishing viewers a great mood and a Happy New Year.
Video Guide