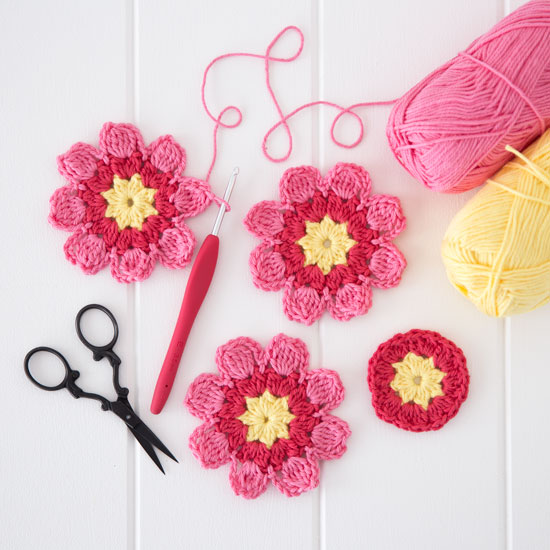
How to Crochet Granny Square Flower for Spring
With a step-by-step guide learn how to crochet a granny square flower with detailed spaces and more. Starting with a magic circle and working with double crochets, you create a floral centerpiece with layers of petals joined seamlessly. The tutorial covers adding multiple colors, shaping the petals, and connecting them to form the flower. It also explains adding a neat border and how to connect the squares for a finished look.
With helpful tips on managing loose ends and shaping the design, this project is beginner-friendly and perfect for creating decorative pieces. Materials and a key for abbreviations are provided in the description.

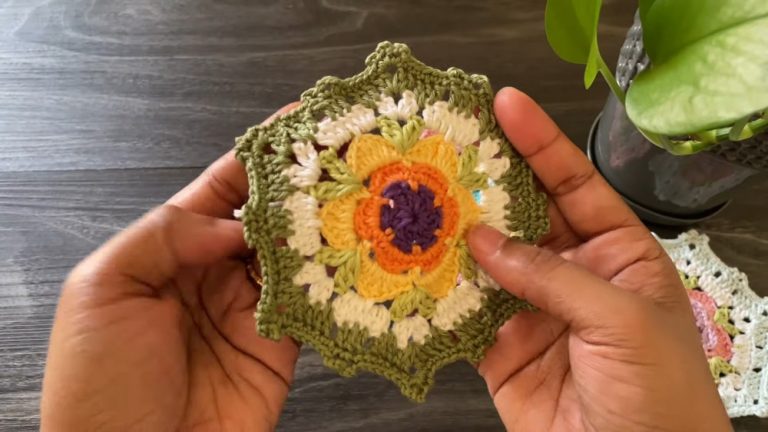
Granny Square Flower Crochet
This tutorial demonstrates how to create a beautiful granny square flower with a detailed step-by-step process. Using a combination of colors and easy-to-follow crochet techniques, the project results in a stunning handmade floral design that can be used for various purposes, such as blankets, decorations, or gifts. Below is a summarized breakdown of the tutorial’s process, divided into key steps and headings.
Materials and Preparation
- Materials Mentioned:
The creator lists all materials, including yarn in three colors (center, petals, and border), a crochet hook, scissors, and a needle for weaving in ends. These are detailed in the video description, along with an abbreviation key for stitches such as double crochet and single crochet. - Color Selection:
The flower involves multiple shades, with the darker color chosen for the center and contrasting colors for the petals and border.

Step 1: Creating the Center
- Magic Circle:
Begin by creating a magic circle for the center of the flower using your chosen first color. - Double Crochets in the Circle:
Crochet double crochets into the magic circle to complete the center. After looping through, pull the magic circle tight to close the middle, leaving no gaps. - Tie Off the Yarn:
Slip stitch to secure the work, cut the yarn, and tie it off. You may choose to weave in the ends at this stage or wait until the end of the project.

Step 2: Adding the Flower Petals
- Attaching the Second Color:
Attach your second color in one of the corners created in the previous step and secure it by chaining one. - Crocheting the Petals:
Work double crochets around each corner to form the petals. Repeat this process for all four corners to complete the first layer of petals.

- Count and Join:
Carefully count your stitches to avoid errors, and after completing the last corner, slip stitch into the first double crochet. Cut the yarn and tie off. - Repeat for Additional Petals:
Repeat this process several times until you have five petals. Each petal will later be joined to form the flower.
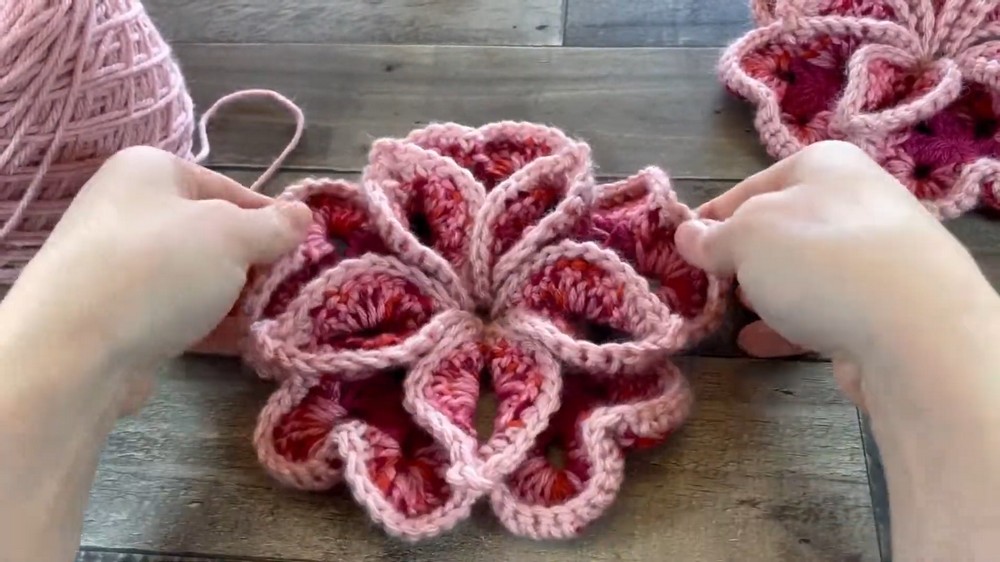
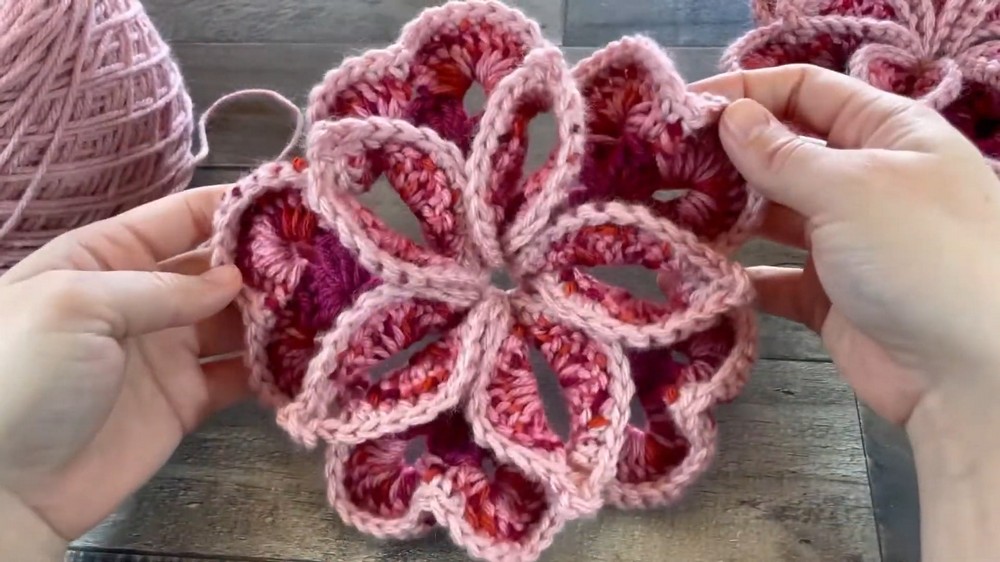
Step 3: Joining Petals
- Attach the Border Color:
Using the third yarn color, secure it at the starting stitch of your first petal. Begin working single crochets around the edges. - Connecting the Petals:
As you crochet halfway around a petal, attach it to another petal with single crochets at specific points. Carefully align the petals to create a connected circular shape. - Continue Around:
Repeat this joining process for all petals while maintaining consistency in tension to ensure a neat and secure connection.
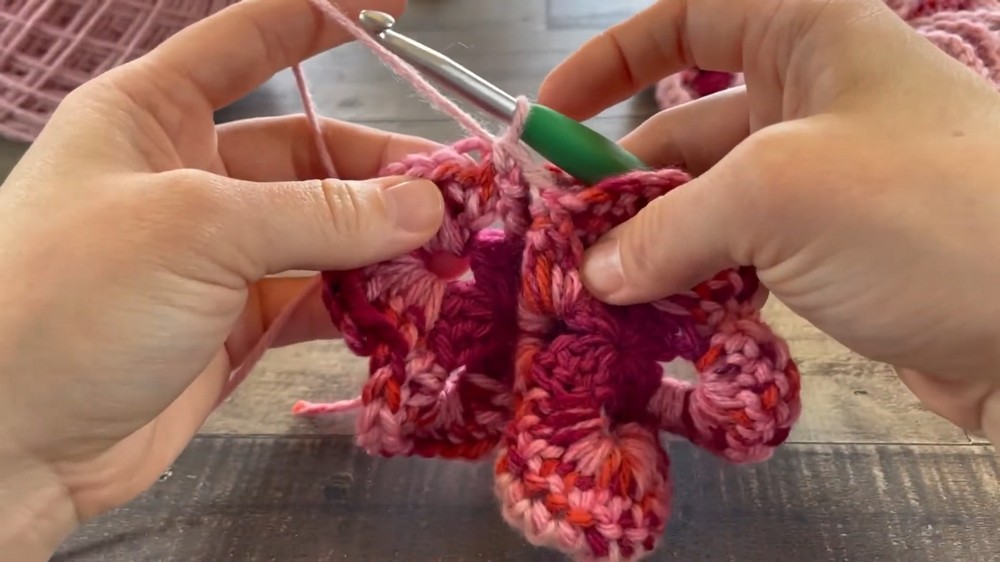
Step 4: Constructing the Inner Flower
- Work on the Wrong Side:
Flip the work to the wrong side, as the remaining steps involve creating the tufts and shaping the inner petals. - Add Stitches Around Each Petal:
Begin with slip stitches and follow a sequence that includes double crochet, half double crochet, and single crochet. This creates the texture and shape for each petal’s tuft. - Pinching and Securing:
To create the puffy tufts, pinch the edges of the petals and connect them via slip stitches. All petals are joined this way to form the center.

Step 5: Final Adjustments
- Closing the Final Petal:
On the last petal, additional connections are made to ensure all petals are securely joined. The final steps also involve tying off loose ends. - Shaping the Flower:
Stretch and shape the completed work to adjust the petals and make the flower structure more visible.
Conclusion
This granny square flower crochet tutorial is beginner-friendly yet detailed enough for experienced crocheters. With clear instructions, the video covers creating a flower center, constructing petals, joining pieces, and shaping the final product. The result is a unique and customizable design that can add a creative touch to any crochet project. By following along, you’ll master foundational techniques while producing something beautiful.