How to Crochet Mini Frog Keychain Amigurumi (Tutorial for Beginners)

In this post, you’ll learn how to crochet a mini crochet frog keychain amigurumi that’s perfect for beginners and makes a great keychain. We have brought a step-by-step tutorial from Cute Crochet to help you recreate it spending little amount of yarn and time. This crochet frog is inspired illustrations of kawaii frog and so features cute round body, belly and a eyes.
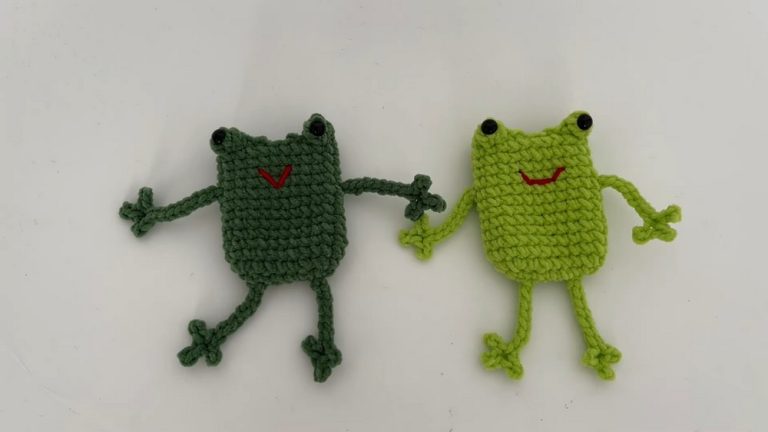
The tutor rates it as an easy project and a perfect chance to practice all the main amigurumi skills quickly. Black beads will complete eyes complete the frog’s charming face which should be retained. This miniature frog can stand on its own thanks to its flat bottom, making it ideal for decorations or ornaments.

This Mini Frog Amigurumi is perfect for learning foundational crochet skills like working in rounds, increasing, and decreasing stitches. The design offers chance for personalization in color and facial expressions. Clear, step-by-step instructions make it even easy to create. Here is a quick overview of this tutorial:
Crochet Frog Amigurumi Keychain Pattern
Materials
- Yarn:
- Light green (body, arms, feet, eyes) – 4-ply or worsted weight cotton or acrylic
- White (belly) – same weight
- Pink (cheek/blush embroidery) – scrap
- Black (mouth/eye embroidery) – scrap
- Hook: 3 mm crochet hook (smaller than the recommended for tighter stitches)
- Stuffing: Polyester fiberfill
- Needle: Yarn (tapestry) needle
- Eyes: 2 small black beads (or embroider with black thread)
- Keychain (optional)
- Stitch marker
- Scissors
- Fabric glue (optional, for attaching bead eyes)

Key Abbreviations (US Terms)
| Abbreviation | Meaning |
|---|---|
| ch | chain |
| sc | single crochet |
| inc | increase (2 sc in same stitch) |
| dec | decrease (sc 2 together) |
| MR | magic ring (magic circle) |
| sl st | slip stitch |
| BLO | back loop only |
| st(s) | stitch(es) |
Special Notes
- The frog is crocheted in continuous rounds unless otherwise noted.
- Mark the last stitch of each round to keep track.
- Use tight stitches so stuffing does not show through.
- Safety eyes or French knot embroidery can be used in place of beads.
- Always stuff as you go; do not overstuff.
Pattern
Frog Body

With green yarn:
- Rnd 1: Make a magic ring, ch 1, and work 6 sc into the ring. (6 sts)
- Rnd 2: Inc in each st around (2 sc in each st). (12 sts)
- Rnd 3: (1 sc, inc), repeat around (18 sts)
- Rnd 4: Sc in each st around (18 sts)
- Rnd 5: (5 sc, inc), repeat 3 times (21 sts: 6, inc, 6, inc, 6, inc, or as per transcript 5 sc, inc x3)
- Rnd 6: Sc in each st around (21 sts)
- Rnd 7: (6 sc, inc), repeat 3 times (24 sts)
- Rnds 8-9: Sc in each st around (24 sts per round)
Begin Decreases
- Rnd 10: (2 sc, inv dec), repeat around (18 sts)
- Invisible decrease: Insert hook through front loop only of next st, then through front loop only of following st, yarn over, draw up a loop, yarn over, pull through both loops.
- Rnd 11: (1 sc, inv dec), repeat around (12 sts)
- Stuff the body firmly.
- Rnd 12: [BLO] Dec in each st around (6 sts)
- Use “regular decrease”: Insert through next st, yarn over, pull through, insert in next st, yarn over, pull through (3 loops on hook), yarn over, pull through all loops.
- Finish off by leaving a long tail. Using a yarn needle, weave the tail through the front loops of remaining sts and pull tight to close. Bring yarn out the top center, reserve for keychain assembly.
Frog Belly
With white yarn:
- Rnd 1: MR, 6 sc in ring (6 sts)
- Rnd 2: Inc in each st around (12 sts)
- Rnd 3: (1 sc, inc), repeat around (18 sts)
- Sl st in next st. Finish off, leave tail for sewing.
Eyes (Make 2)
With green yarn:
- MR, ch 1, 5 sc in ring. (5 sts)
- Draw tight and finish off, leave tail for sewing.
Arms (Make 2)
With green yarn:
- Make a slip knot, leaving a long tail.
- Ch 4,
- Working in the back loop of the chain: Starting in 2nd ch from hook, sc 1 in each of next 3 ch.
- Finish off, leave a long tail for sewing.
Feet (Make 2)
With green yarn:
- Rnd 1: MR, 6 sc in ring (6 sts)
- Rnd 2: Sc in each st around (6 sts)
- Sl st in next st. Finish off, leave a tail for sewing.
Assembly
- Sew the Belly:
Place belly on lower front of the frog body, just above the flat base. Sew in place, matching stitches, and bring tail out at back. - Attach the Feet:
Tuck in yarn tails or lightly stuff feet. Place beside the belly on the flat base, sew in place. Bring tails out back and knot securely, weaving ends inside. - Attach the Eye Pads:
Position eye pads on rounds 3 and 4, symmetrically above the belly and feet. Sew on securely. - Attach Eyes:
With fabric glue, add black beads to center of each eye pad (if not for children), or embroider using black thread ((use French knot for safety). - Embroider Face:
- Smile: Using black thread, embroider a smile between rounds 2 and 3.
- Blush/Cheeks: With pink yarn, make a French knot below each eye pad for blush.
- Sew on Arms:
Position arms on round 6, one stitch apart from eyes, right sides of arms out. Sew in diagonally for a natural look. - Attach Keychain:
Thread body’s top yarn through the jump ring of the keychain. Bring down and tie securely. Hide knot inside the body.

Conclusion
Congratulations! You have crocheted a cute and beginner-friendly frog amigurumi that makes the perfect keychain or ornament. This project is quick, uses minimal yarn, and lets you practice shaping and assembly.
Pattern Correction
- Increase/decrease rounds might differ from transcript; always check your counts at end of each round.
- Regular decrease forms a bump; invisible decreases blend better into amigurumi.
- Use BLO only for final decrease round for a flat base.
Tips
- Safety: Do not glue on eyes if making for young children; use embroidery instead.
- Use a smaller hook than yarn recommends to keep stitches tight.
- Mark last stitch of each round with a stitch marker to keep your rounds even.
- Lightly stuff to retain shape, but not so much that stitches stretch.
Video Guide
https://youtu.be/ZRAsqAlGjHU