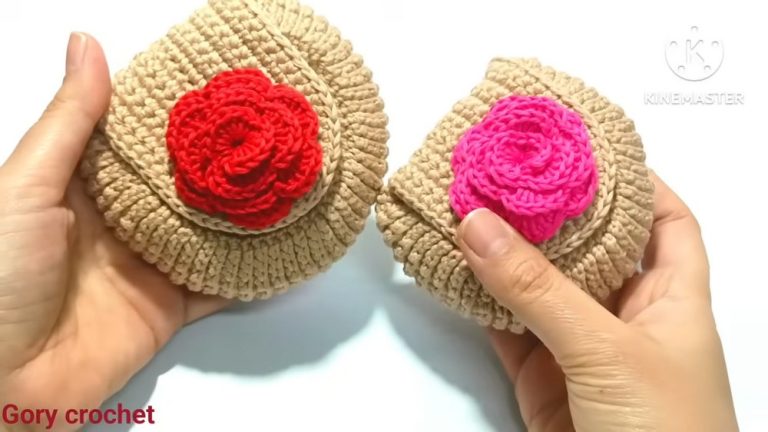
How to Crochet Pouch With Liner and Zipper (Tutorial for Beginners)

Learn how to crochet a flower granny square pouch with a liner and zipper perfect for storing makeup or craft supplies with a step-by-step tutorial from Play Hooky with Me. Luckily, adding a liner and zipper to this crochet pouch doesn’t require a sewing machine and can be completed very quickly.
The tutor explains everything from crocheting 4×4-inch squares to attaching a 7-inch zipper using a needle and thread.
For a non-sew option, she suggests using industrial strength glue but warns to work in a well-ventilated area. This project is suitable for beginners and great if you are already comfortable with making magic ring.
The complete video guide for crocheting this granny square pouch will be available at the end of this post.

Skills Used: Creating the magic ring or chain-4 loop, single crochets, popcorn stitches for petal shapes, and granny square patterns for structured designs. Joining squares using the “join-as-you-go” method ensures clean assembly. Additionally, the tutorial emphasizes fabric-cutting skills, backstitch sewing for secure zipper attachment, and fabric alignment for the liner.
Guide Span: 19 Minutes Only
Personalization Tips: Experiment with colors and yarn textures to create unique pouches. You can also adjust the pouch size by altering the square dimensions or using larger zippers.
This crochet pouch with liner and zipper tutorial will help you learn your learn both sewn and no-sew methods. The step-by-step instructions ensure that every element, from the crochet squares to the final assembly, is easy to follow. You can crochet it in a range of colors and also gift it to someone.
Free Crochet Granny Square Pouch with Liner & Zipper
Materials List
- Yarn: Worsted Weight (Category 4) Cotton Yarn (for best results on pouch size and shape)
- Hook: 4.0 mm (US G-6)
- Zipper: 7-inch (use 9-inch if your squares run large)
- Fabric (for liner): Lightweight cotton (e.g., Fat Quarter)
- Needle & All-Purpose Thread (for hand sewing)
- Industrial Strength Glue (optional, for no-sew option)
- Iron (recommended for neat liner edges)
- Scissors
- Pins (for seaming/attaching the liner)
- Measuring Tape
- Optional: Pencil or tailor’s chalk for marking sewing guidelines


Key Abbreviations (US Terms)
- ch: chain
- sl st: slip stitch
- sc: single crochet
- dc: double crochet
- st(s): stitch(es)
- mr: magic ring
- popcorn: 3 double crochets joined at the top by pulling up a loop through the first dc and pulling the working loop through to secure
Special Notes
- Squares must measure 4×4 inches for the recommended 7-inch zipper.
- Use a 9-inch zipper if your squares are larger.
- Instructions are for four squares for a pouch approximately 4×7 inches finished.
Pattern Instructions

1. Make Granny Squares (Make 4)
R1 (Magic Ring/Circle):
- Start with a magic ring (or ch 4 and sl st to form a ring).
- Ch 1 (does not count as a st), work 8 sc in ring.
- Sl st to first sc. Fasten off.
R2 (Popcorn Petals):
- Join new yarn (any st), ch 3 (counts as dc).
- Work 2 dc in same st. Remove hook from working loop, insert hook into top of ch-3, replace loop and pull through (forms a popcorn). Ch 2.
- In next st: 3 dc, remove hook, insert into first dc of group, replace loop, pull through (popcorn), ch 2.
Repeat from * to * around (8 popcorns). - After last ch-2, sl st to back of first popcorn. Fasten off.
R3 (First Granny Square Row):
- Join green (or “leaves” color) in any ch-2 sp.
- Ch 2 or 3 (counts as dc). Work 2 dc in same space (side cluster).
- (In next ch-2 sp: 3 dc, ch 2, 3 dc) (corner cluster); In next ch-2 sp: 3 dc (side cluster))
Repeat around until you have 4 corners and 4 sides. - Join with sl st to first true dc (for neatest edge). Fasten off.
R4 (Second Granny Square Row):
- Join in any space between corner and side clusters, ch 3 (counts as dc), 2 dc (complete first cluster).
- (In next space: 3 dc) (side clusters—now two per side), Next corner sp: 3 dc, ch 2, 3 dc (corner cluster))
Repeat around. - Join with sl st to first true dc. Fasten off.
Check size: Square should measure 4×4 inches. Adjust hook or tension if needed.
2. Join Squares
Join-as-You-Go Method:
- Fully complete one square (all 4 rounds).
- For the next 3 squares, work only through Round 3; join on the final round, matching corners and sides as follows:
- Fasten to the side before corner.
- Work side cluster as normal, then in the corner: 3 dc, ch 1, sl st into adjacent square’s corner, ch 1, 3 dc.
- For sides: After each granny cluster, sl st to adjacent square’s space (for secure join), then continue granny clusters below.
- Continue joining for all squares, joining corners/edges to create a rectangle.
- Pattern correction/tip: For best results, lay out squares before joining to plan color placement and ensure orientation is correct.
3. Top Edge
- Ch 1. Work 1 sc in each st around the top edge.
- At joins, add 1 sc in each space between joined squares (add or omit sc to maintain a flat edge).
- Join with sl st, fasten off.
4. Seam Bottom Edge
- Cut a length of yarn four times the pouch width.
- Use a tapestry needle and sew the bottom edge together just inside the inside loops of the single crochets using a zigzag seam for strength.
- Weave in ends securely.
5. Make & Prepare Liner
- Fold fabric in half. Measure 8.5″ x 5.25″ (or lay finished pouch on folded fabric, cut ¼” larger on each side, and 1″ higher at top).
- Iron fabric and press top edge over by 1″ for the liner hem.
6. Add Zipper to Liner
With Glue:
- Lay liner with right side up. Lay zipper face down on the liner top edge so zipper teeth align just above fabric edge.
- Apply industrial-strength glue between end stops on the zipper tape.
- Press to attach. Repeat on other side. Let dry 15–30 minutes.
With Needle & Thread:
- Pin zipper as above.
- Draw a pencil line for a stitching guide on the zipper tape.
- Use back stitch along zipper (details below).
- Repeat for other side.
Back Stitch:
- With doubled thread, knot at end, insert needle from back of fabric.
- Insert needle backward into fabric 1 st behind entry, bring up ~⅛” ahead, repeat.
7. Seam Liner Sides
With Glue:
- On wrong side, glue ¼” seam along both sides and bottom, stopping at zipper end stops. Press.
- Dry 15–30 minutes.
Sew Option:
- Pin ¼” in from edge, sew sides and bottom with backstitch or running stitch for strong seams.
- Knot and fasten off.
8. Final Assembly
- Clip ends of zipper (zipper tape) to help fold nicely inside pouch.
- Optionally glue or tack these ends down so they stay hidden.
- Insert liner (wrong side out) into pouch so folded hem and zipper line up with pouch edge.
Attach Liner to Crochet Pouch:
- Unzip and fit liner into pouch.
- Glue: Add bead of glue under zipper tape, press yarn edge under zipper. Hold. Let dry.
- Sew: With thread and needle, whipstitch or backstitch through zipper tape and inside of pouch edge, catching yarn but not full depth so stitches don’t show on pouch outside.
Conclusion
This granny square pouch is stylish, durable, and practical, with a professional finish from the liner and zipper. The project is beginner-friendly and offers practice in both crochet and basic fabric techniques—no sewing machine required.
Pattern Correction & Tips
- Gauge: If your squares are larger than 4″, use a longer zipper.
- Tension: If edging is wavy, use fewer sc at joins; if tight, add more.
- Join-as-you-go: Align squares carefully for neat edges.
- Zipper: Avoid sewing or gluing end-to-end to prevent difficulty operating the zipper.
- Liner: Always check fit against pouch before final assembly; pre-ironing keeps edges neat.
- Sides: When sewing liner to pouch, keep stitches hidden for a clean look.
Video Guide
https://youtu.be/MYjEfF6Me4s