How To Crochet Rose Flower Pattern for Spring

Learn how to crochet a beautiful rose flower, perfect for gifting following a step-by-step tutorial for all skill levels. The tutorial features how to crochet flower patterns and leaves. The tutorial also shares tips on assembling the finished pieces for a professional look. Follow through with us for this complete tutorial!
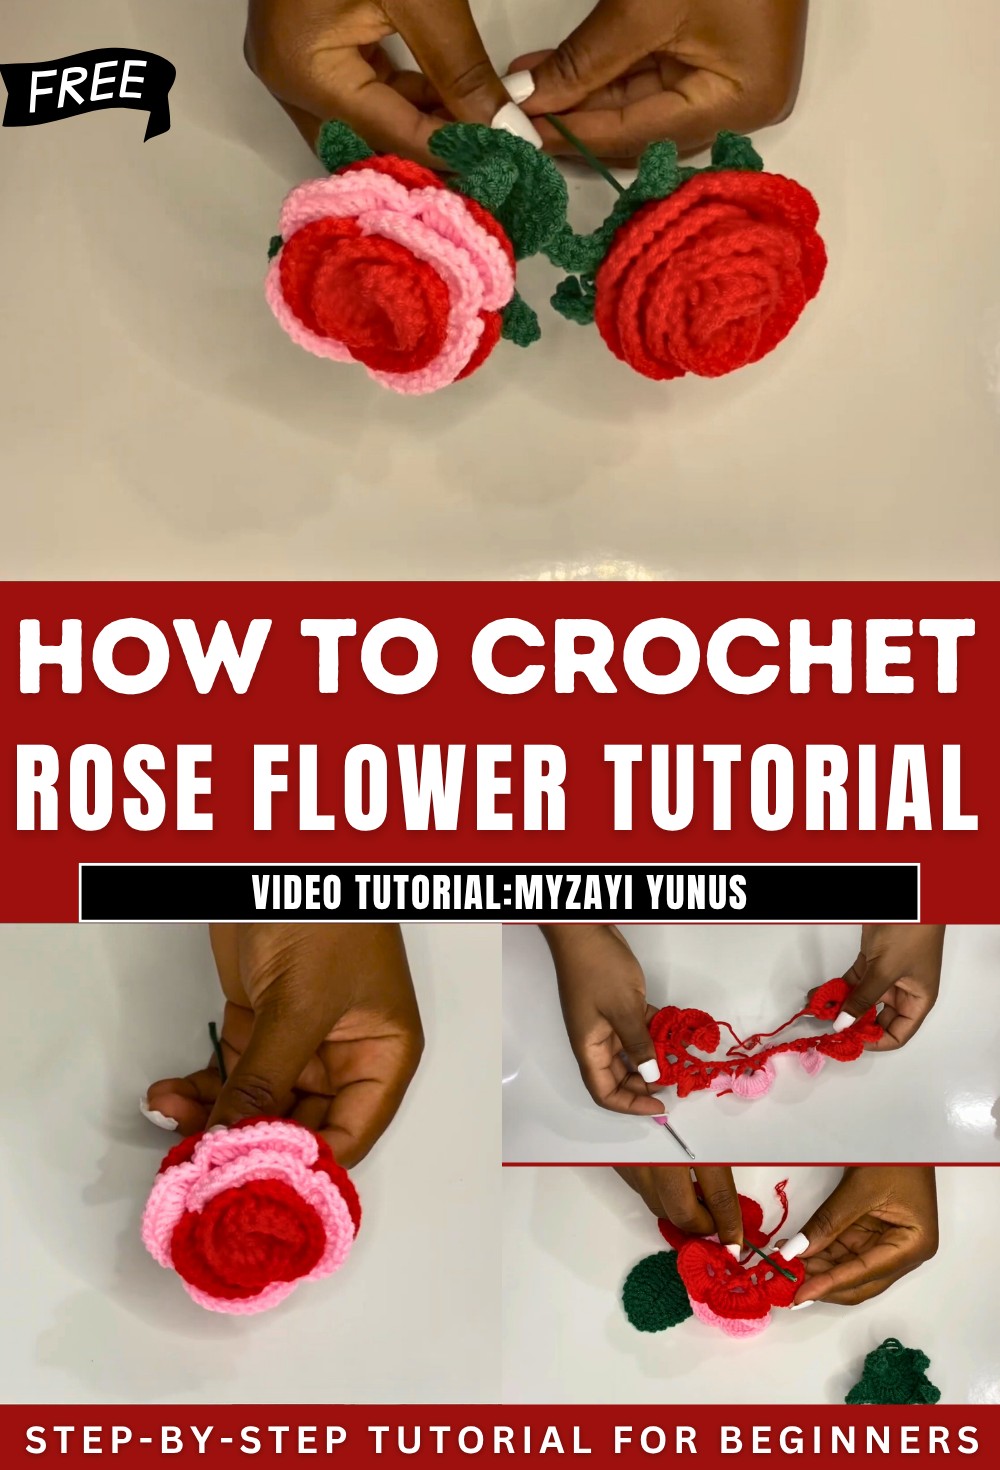
Crochet Valentine Rose Pattern
Materials
- Yarn: 50g milk cotton in red, pink, and green (or any desired colors)
- Crochet hook: 3.0 mm
- Wire stick (floral wire; 0.2 mm – double if thin) or bamboo stick (alternative stem)
- Yarn needle
- Scissors
- Glue gun (for securing flower/leaf to stem)
- Measuring tape (optional)
Key Abbreviations (US Terminology)
- ch = chain
- sl st = slip stitch
- sc = single crochet
- hdc = half double crochet
- dc = double crochet
- tr = treble crochet
- sp = space
- st = stitch
- yo = yarn over
Special Notes
- Work with firm tension for neat petals and leaves.
- You may use any stem/stick that is sturdy for wrapping (wire or bamboo).
- For a more realistic flower, vary the pink and red as desired for petal stripes/center.
- Wires should be doubled if using a thin gauge for sturdiness.
Pattern
Part 1: Crochet Rose Petals
Foundation
- Make a slip knot.
- Ch 60 (adjust for larger/smaller rose).
Row 1 (Petal Setup)
- Skip 3 ch, dc in 4th ch from hook.
- Ch 4, dc in same ch (creates a V-stitch).
- Skip 3 ch, dc in next ch; ch 4, dc in same ch.
- Repeat Step 3 across the row until last 3 ch remain.
- Turn. Ch 3.

Row 2 (Petal Shaping)
- 12 dc in each ch-4 sp from previous row.
- Sc in the space between V-stitches.
- Repeat steps 1–2 across (in each ch-4 sp, (12 dc, sc in next space)).
- If changing color after 4 sets of 12 dc:
- End sc of last “red” section with new color (e.g., pink) and continue 12 dc in next ch-4 sp, sc in next space. Work 5 pink sections.
- Cut pink yarn, rejoin “red,” and finish last 4 petal sections.
- At the end: Sc in last space, ch 1 or 2, fasten off.

Part 2: Flower Center
- Make a magic circle.
- Ch 1. Work 10 hdc into the ring. Pull to close. Sl st to ch-1 to join.
- Ch 3, dc in same st (counts as 2 dc in first st).
- 2 dc in each st around (20 dc total). Sl st to top of initial ch-3.
- For each petal:
- Ch 8.
- Skip first ch, sl st in next ch, sc in each of next 2 ch, hdc in next 2 ch, dc in last 2 ch.
- Skip 4 base sts, sl st in 5th st.
- Repeat until you have about 5 petals around (5 total, or fill as desired).
- Fasten off.

Part 3: Leaf
- With green yarn, make a slip knot and ch 10.
- Work one way across:
- Sl st in 2nd ch from hook
- Sc in next ch
- Hdc in next ch
- Dc in next ch
- 2 tr in next ch
- Tr in next ch
- 2 tr in next ch
- Dc in next ch
- Hdc in next ch
- Sc in last ch
- 2 sc in last ch (so 3 sc total in last ch)
- Work down the other side of the starting chain:
- Hdc in next ch
- Dc in next ch
- Tr in next ch
- 2 tr in next ch
- Tr in next ch
- Dc in next ch
- Hdc in next ch
- Sc in next ch, sc or sl st to beginning
- Wire-edging (if using wire):
- Lay wire beside the leaf. Work sc around the leaf, catching the wire with each stitch.
- At intervals, ch 2, sc in next st (for a decorative edge).
- At end, sl st to first sc, fasten off.

Note: Make a second leaf for a fuller rose if desired.

Part 4: Assembly & Finishing
- Wrap the rose petal strip (from Part 1) tightly around the stick or wire. Secure with glue gun or strong craft glue.
- Attach the center piece (Part 2) with glue to the middle.
- Position and glue the leaf(s) to the stem, either close to the flower or spaced as naturally as desired.
- Wrap green yarn around the wire/bamboo stick, securing with glue at both ends for a neat finish.
- Trim all loose ends. Shape petals and leaves as desired.

Conclusion
This pattern creates a beautiful, realistic crochet rose—perfect for gifts, holidays, and home décor. The design uses basic stitches and simple assembly, ideal for confident beginners and experienced crocheters alike. Stems may be varied using wire or bamboo for your preferred finish.
Pattern Correction & Tips
Correction:
- Double check petal counts—always ensure 12 double crochets per chain-4 space.
- For a fuller look, use more petal strips or increase stitch counts.
Tips:
- Use floral wire for adjustable stems. Double thinner wires for extra strength.
- Maintain tight, consistent tension for best results—especially with petals.
- Change yarn colors carefully at the end of a single crochet for seamless transitions.
- Wrap yarn tightly and use glue to keep all parts secure.
- For a more natural look, slightly curl outer petals, and make two leaves per stem.