How to Crochet Easy Mickey Keychain for Tutorial
Learn how to crochet a beautiful, beginner-friendly bow mickey keychain using two yarn colors, a crochet hook, and a cutter with a step-by-step tutorial. The process involves crocheting three rectangular strips, crocheting a small bow with a magic circle, and assembling them with glue to form a lovely circular design.
Key stitches include magic circle, chain, double crochet, and slip stitch. The result is an elegant and easy-to-make accessory perfect for any crochet enthusiast. Follow through with us for the complete tutorial!

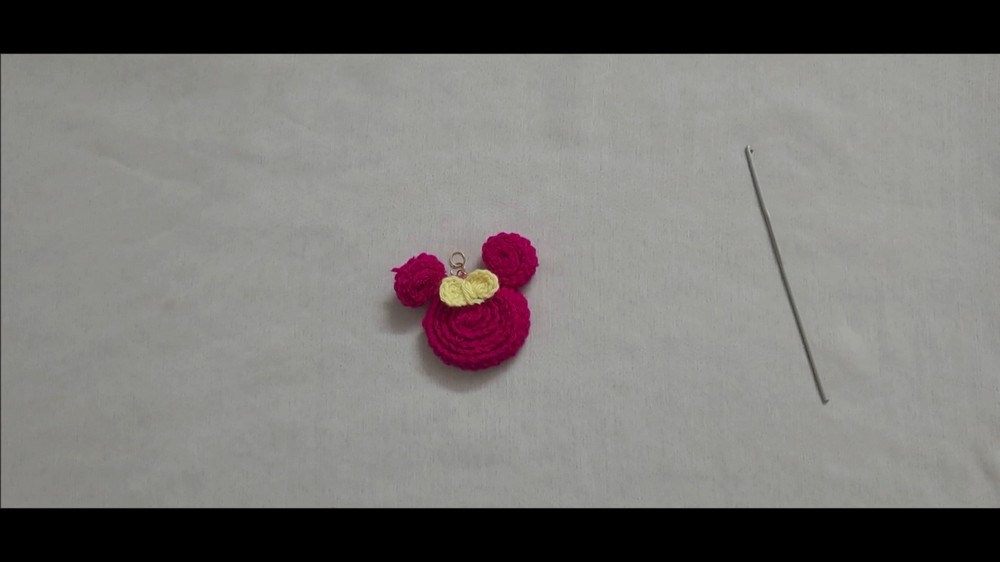
The video, posted by Club Craft Area, demonstrates how to create a beginner-friendly bow keychain. The final product is both cute and easy to make, making it accessible even for those new to crochet.

Cute Crochet Keychain Pattern
Materials
- Yarn: Two colors of lightweight or worsted weight yarn (contrast recommended)
- Hook: 3.5 mm (E) or 4.0 mm (G) crochet hook (adjust size for your yarn)
- Scissors
- Hot glue or fabric glue
- Keyring (optional)
- Yarn needle (optional, for weaving in ends)
Key Abbreviations (US Terms)
- ch – chain
- dc – double crochet
- sl st – slip stitch
- MR – magic ring
- st – stitch
Special Notes
- Pattern is beginner-friendly, using only basic stitches.
- Pieces are assembled with glue; sewing is optional.
- Adjust the length and color for personal style.
Step-by-Step Pattern
Rectangular Stripes (Make 3 Pieces)
Small Stripes (Make 2)
- With Color A, make a slip knot.
- Ch 30.
- Work in the second ch from the hook:
- dc in each ch across (29 dc).
- Ch 1; snip yarn and fasten off.
- Repeat to make a second small stripe.
Large Stripe (Make 1)
- With Color B, make a slip knot.
- Ch 101.
- Work in second ch from the hook:
- dc in each ch across (100 dc).
- Ch 1; snip yarn and fasten off.
Bow
- With Color A (or preferred bow color):
- Make a magic ring (MR).
- Ch 3.
- 2 dc into the ring.
- Ch 3, then sl st into the ring.
- Repeat steps 2–4 to create the other side of the bow:
- Ch 3, 2 dc in ring, ch 3, sl st in ring.
- Pull yarn to tighten the ring.
- Ch 1; extend yarn and snip off.
- Wrap yarn around the center to finish the bow; tie a knot at the back.
Assembly
- Roll Stripes:
- Take each rectangle and roll it up tightly from one end.
- Apply glue at the end to secure the roll and hold shape.
- Repeat for all three stripes.
- Glue Circles Together:
- Arrange the three rolls (one large, two small) as shown in the video.
- Apply glue to join the rolled pieces into a cluster.
- Attach Bow:
- Place the bow on top of or beside the rolls, or as desired.
- Use glue to secure.
- Add Keyring (optional):
- Glue or sew a keyring to the assembled cluster.
Conclusion
This adorable crochet keychain is perfect for beginners and makes a cute accessory or thoughtful gift. The project is fast to complete and lets you experiment with color combinations and bow placement for a personalized result.
Pattern Correction
- Ensure you start double crochet in the second ch from hook for correct stitch count.
- Adjust glue placement for strong, neat joins; avoid excess glue spills.
Tips
- Use a yarn needle to weave in ends neatly before final assembly.
- Let glued elements dry fully before handling the keychain or attaching to a bag.
- Experiment with stripe lengths and colors to make unique designs.