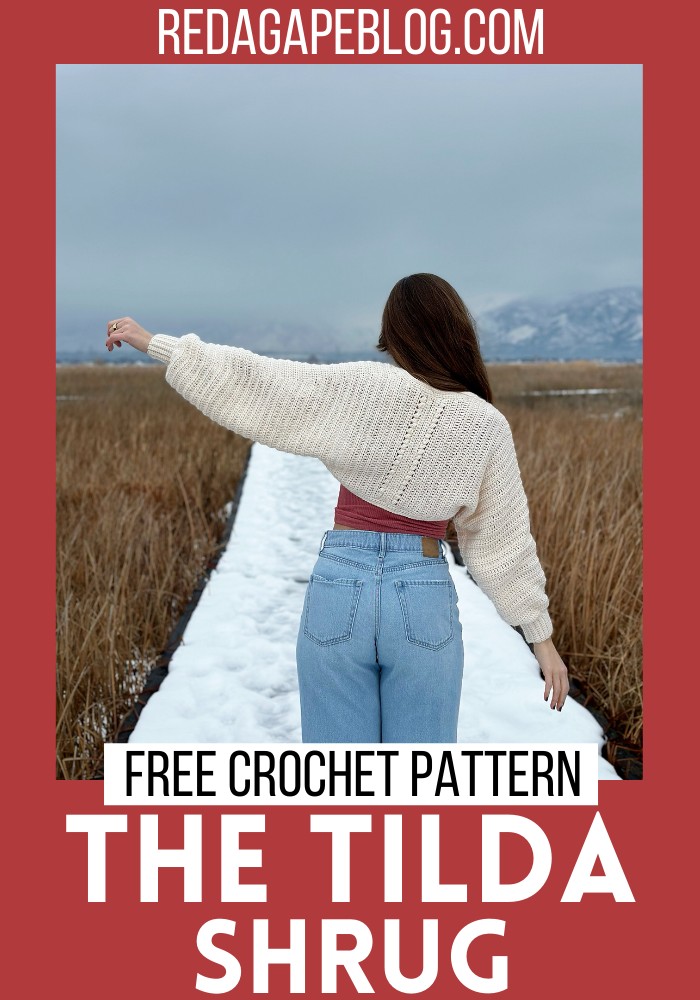
Super Stylish Crochet The Tilda Shrug Pattern

Crochet your own stylish and cozy Tilda Shrug with this detailed crochet pattern. Perfect for all skill levels, this pattern includes unique shaping techniques, oversized sleeves, and comprehensive support through a video tutorial. This Tilda Shrug is a cozy piece of clothing that wraps around your shoulders like a warm hug. It’s perfect for days that are a bit chilly or when you just want something soft and comfy to wear. It features large, cozy sleeves that blend nicely into the main part, giving it a loose and fashionable look.
Crochet The Tilda Shrug Pattern
Materials:
- Worsted (4) weight yarn, Lion Brand Wool Ease Recycled in Cream 5(5, 5, 6, 6 skeins) or 810(870, 950, 990, 1030) yards
- H/5.00mm Crochet Hook
- Needle
- Stitch Marker (2)
- Scissors
The pattern comes in sizes ranging from XS to 5X, offering a good fit for different body types.
Sizes:
XS(S/M, L/XL, 2X/3X, 4X/5X)
Stitches and Abbreviations (US Terms):
- Ch(s)- Chain(s)
- St(s)- Stitch(es)
- Sc- Single Crochet
- BLO- Back Loop Only
- Hdc- Half Double Crochet
- Hdc2tog- Half Double Crochet 2 Together (decrease)
- Dc- Double Crochet
- Sl St- Slip Stitch
- RS- Right Side
- SM- Stitch Marker
Pattern:
Right Arm Panel (when worn)-
- 1. Ch 14
- 2. Row 1: 1 Sc in the second Ch from the hook and each Ch across, turn. (13 Sc)
- 3. Rows 2-26(27,28, 29, 30): Ch 1, 1 Sc in first St, 1 Sc (BLO) in each St across until 1 remains, 1 Sc in last St, turn.
- 4. Do not turn after your last row made. Rotate your work, you will now be working Row 1 of the sleeve into the ends of the ribbing rows.
- 5. Row 1(RS): Ch 1, 2 Sc into the end of each ribbing row across until 1 row remains, 1 Sc into the end of the final row, turn. 51(53,55, 57, 59) Sc)
Continue…
Locate the center St 26th(27th, 28th, 29th, 30th) St) from Row 1 and place a SM. You will move this SM up with you each row, keeping it in the center St each time you move it up.
- 1. Row 2: Ch 2, 1 Hdc in each St across until you reach the center SM, 3 Hdc in center St, (don’t forget to move up your SM, making sure you place it in the center St of the 3 Sts), 1 Hdc in each remaining St across row, turn. 53(55, 57, 59, 61) Hdc)
- 2. Row 3: Ch 2, 1 Dc in each St across, turn. 53(55, 57, 59, 61) Dc)
- 3. Row 4: Ch 2, 1 Hdc in each St across until you reach the center SM, 3 Hdc in center St, 1 Hdc in each remaining St across row, turn. 55(57, 59, 61, 63) Hdc)
- 4. Row 5: Ch 2, 1 Dc in each St across, turn. 55(57, 59, 61, 63) Dc)
- 5. Row 6: Ch 2, 1 Hdc in each St across, turn. 55(57, 59, 61, 63) Hdc)
- 6. Row 7: Ch 2, 1 Dc in each St across until you reach the center SM, 3 Dc in center St, 1 Dc in each remaining St across row, turn. 57(59, 61, 63, 65) Dc)
- 7. Row 8: Ch 2, 1 Hdc in each St across, turn. 57(59, 61, 63, 65) Hdc)
- 8. Rows 9-41 : Repeat Rows 3-8, ending on a Row 5 repeat. You will increase by 2 Sts on every increase row and end with 79(81, 83, 85, 87) Sts.
Continue…
- 9. Row 42: Ch 2, 1 Hdc across until 5 Sts remain, leave unworked, turn. (74(76, 78, 80, 82) Hdc)
- 10. Row 43: 1 Sl St in first 4 Sts, Ch 2, 1 Dc in same St as last Sl St, 1 Dc in each St across to center SM, 3 Dc in center St, 1 Dc in each remaining St across row, turn. (73(75, 77, 79, 81) Dc)
- 11. Row 44: Ch 2, 1 Hdc in each St across until 3 remain, leave unworked, turn. (70(72, 74, 76, 78 Hdc)
- 12. Row 45: 1 Sl St in first 4 Sts, Ch 2, 1 Dc in same St as last Sl St, 1 Dc in each st across, turn. (67(69, 71, 73, 75 Dc)
- 13. Row 46: Ch 2, 1 Hdc in each St across until you reach the center SM, 3 Hdc in center St, 1 Hdc in each remaining St across until 3 remain, leave unworked, turn. (66(68, 70, 72, 74 Hdc)
- 14. Row 47: Repeat Row 45. (63(65, 67, 69, 71 Dc)
- 15. Row 48: Repeat Row 44. (60(62, 64, 66, 68 Hdc)
- 16. Row 49: Repeat Row 43. (59(61, 63, 65, 67 Dc)
- 17. Row 50: Repeat Row 44. (56(58, 60, 62, 64 Hdc)
- 18. Row 51: Repeat Row 45. (53(55, 57, 59, 61 Dc)
- 19. Row 52: Repeat Row 46. (52(54, 56, 58, 60 Hdc)
- 20. Row 53: Repeat Row 45(45,43, 43, 43). (49(51, 55, 57, 59) Dc)
- 21. Row 54: Repeat Row 44. (46(48, 52, 54, 56) Hdc)
- 22. Row 55: Repeat Row 45(45,45, 43, 43). (43(45, 49, 53, 55 Dc)
- 23. Row 56: Ch 2, 1 Hdc in each St across until 3 remain, Hdc2tog, leave final St unworked, turn. (41(43, 47, 51, 53) Hdc)
XS STOP HERE AND MOVE ON TO THE BEAD SECTION
- 24. Row 57: Ch 2, 1 Dc in each St across, turn. (-(43, 47, 51, 53) Dc)
S/M STOP HERE AND MOVE ONTO ROW 58
L/XL- Rows 58 & 59: Repeat Rows 56 & 57. (45 Sts)
2X/3X- Rows 58-61: Repeat Rows 56 & 57. (47 Sts)
4X/5X- Rows 58-61: Repeat Rows 56 & 57.(49 Sts)
Row -(58, 60, 62, 62): Ch 2, 1 Hdc in each St across, turn. (-(43, 45, 47, 49) Hdc)
BEAD SECTION-
- 25. Row 57(59, 61, 63, 63): Ch 2, 1 Dc in first 2 Sts,*1 Dc in next, **YO, insert hook from front to back around the post of the most recent Dc, YO, pull up loop** repeat from ** to ** 2 more times (7 loops on hook), YO, pull through first 6 loops, YO pull through final 2 loops, Sk next St*, repeat from * to * across row, 1 Dc in final St, turn. (19(20, 21, 22, 23) Beads)
- Row 58(60, 62, 64, 64): Ch 2, 1 Hdc in each St across, turn. 41(43, 45, 47, 49) Hdc)
Fasten off.
Left Arm Panel (when worn)-
- 1. Repeat ribbing rows 1-27 and Rows 1-41 of right arm panel.
- 2. Row 42: 1 Sl St in first 6 Sts, Ch 2, 1 Hdc in same St as last Sl St, 1 Hdc in each remaining St across row, turn. (74(76, 78, 80, 82) Hdc)
- 3. Row 43: Ch 2, 1 Dc in each St across until you reach the center SM, 3 Dc in center St, 1 Dc in each St across until 3 remain, leave unworked, turn. (73(75, 77, 79, 81) Dc)
- 4. Row 44: 1 Sl St in first 4 Sts, Ch 2, 1 Hdc in same St as last Sl St, 1 Hdc in each remaining St across, turn. (70(72, 74, 76, 78 Hdc)
- 5. Row 45: Ch 2, 1 Dc in each St across until 3 remain, leave unworked, turn. (67(69, 71, 73, 75 Dc)
- 6. Row 46: 1 Sl St in first 4 Sts, Ch 2, 1 Hdc in same St as last Sl St, 1 Hdc in each St across until you reach the center SM, 3 Hdc in center St, 1 Hdc in each remaining St across, turn. (66(68, 70, 72, 74 Hdc)
Continue…
- 7. Row 47: Repeat Row 45. (63(65, 67, 69, 71 Dc)
- 8. Row 48: Repeat Row 44. (60(62, 64, 66, 68 Hdc)
- 9. Row 49: Repeat Row 43. (59(61, 63, 65, 67 Dc)
- 10. Row 50: Repeat Row 44. (56(58, 60, 62, 64 Hdc)
- 11. Row 51: Repeat Row 45. (53(55, 57, 59, 61 Dc)
- 12. Row 52: Repeat Row 46. (52(54, 56, 58, 60 Hdc)
- 13. Row 53: Repeat Row 45(45,43, 43, 43). (49(51, 55, 57, 59) Dc)
- 14. Row 54: Repeat Row 44. (46(48, 52, 54, 56) Hdc)
- 15. Row 55: Repeat Row 45(45,45, 43, 43). (43(45, 49, 53, 55 Dc)
- 16. Row 56: 1 Sl St in first St, Hdc2tog, 1 Hdc in each remaining St across, turn. (41(43, 47, 51, 53) Hdc)
XS STOP HERE AND MOVE ONTO BEAD SECTION
- 17. Row 57: Ch 2, 1 Dc in each St across, turn. (-(43, 47, 51, 53) Dc)
S/M STOP HERE AND MOVE ONTO ROW 58
L/XL- Rows 58 & 59: Repeat Rows 56 & 57. (45 Sts)
2X/3X- Rows 58-61: Repeat Rows 56 & 57. (47 Sts)
4X/5X- Rows 58-61: Repeat Rows 56 & 57.(49 Sts)
- 18. Row -(58, 60, 62, 62): Ch 2, 1 Hdc in each St across, turn. (-(43, 45, 47, 49) Hdc)
BEAD SECTION-
- 19. Row 57(59, 61, 63, 63): Ch 2, 1 Dc in first St, *1 Dc in next, **YO, insert hook from front to back around the post of the most recent Dc, YO, pull up loop** repeat from ** to ** 2 more times (7 loops on hook), YO, pull through first 6 loops, YO pull through final 2 loops, Sk next St*, repeat from * to * across row, 1 Dc in last 2 Sts, turn. (19(20, 21, 22, 23) Beads)
- 20. Row 58(60, 62, 64, 64): Ch 2, 1 Hdc in each St across, turn. 41(43, 45, 47, 49) Hdc)
- 21. Fasten off, leave a long tail for seaming the last row to the other panel.
Join panels-
- 1. Block your panels to the measurements above.
- 2. Place your 2 panels together, RS facing and both oriented in the same direction. Use the tail of yarn from your panel and seam Rows 58(60, 62, 64, 64) together, working through both panels to join.
- 3. Next fold your sleeves/panels in half, RS facing. Seam from the cuff, across the bottom until you reach Row 42. Repeat on other side, the tilda shrug crochet pattern.
Trim
With your shrug RS out, join yarn to the St right next to the underarm seam on the left side (right sleeve when worn) with a Sl St.
- 1. Round 1: Ch 1, 1 Sc in same St as join, 1 Sc in each St up the side of the shrug, when you reach the ends of the short row shaping, work 1 Sc into the ends of each of those rows.
- 2. Continue crocheting evenly across the back neckline, working approximately 1 Sc into the end of each Hdc row and 2 Sc into the end of each Dc row. Sc down the side of the other panel, again working 1 Sc into each St and 1 Sc into the sides of the short rows.
- 3. When you reach the bottom of the shrug, continue across with approximately 1 Sc into the end of each Hdc row and 2 Sc into the end of each Dc row.
- 4. Sl St to join to the top of the first St made, turn. Your St count is not crucial here, just try to keep your Sts evenly placed.
- 5. The “steps” of the short rows on both sides of the opening of the sweater will start to blend in and straighten out with each round made.
- 6. Rounds 2-4(4, 4, 6, 6): Ch 1, 1 Sc in each St around, Sl St to first Sc made to join, turn.
- 7. Round 5(5, 5, 7, 7): 1 Sl St in each St around, Sl St to first St made to join.
- 8. Fasten off and weave in all ends.