Free Crochet Triangular Shawl Pattern to Upgrade Your Style
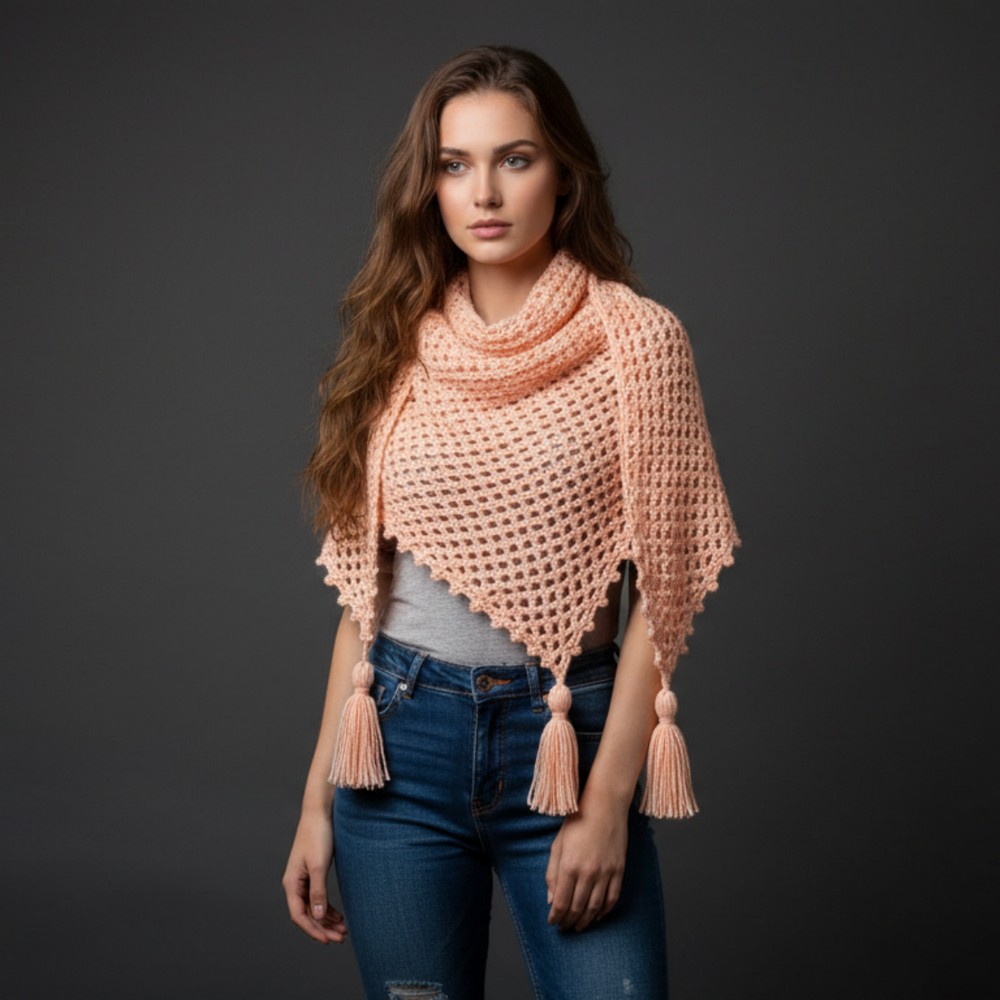
Feel cozy with Free Crochet Triangular Shawl Pattern that drapes beautifully and adds warmth gentle charm and graceful touch to your outfit.

You can wear it over dresses or simple clothes to add style without effort. It is perfect for daily use small gatherings or travel as it folds easily and feels light to carry. This shawl also makes a thoughtful gift filled with care and creativity. Making it brings peace and joy and the finished piece offers comfort elegance and a soft stylish look for every season.

Free Crochet Triangular Shawl Pattern
Materials
- Yarn: 250g of lightweight yarn (approximately 1.5mm thick strand)
- Hook: 4mm and 5mm crochet hook (choose size appropriate for your yarn thickness and desired drape)
- Scissors
- Yarn Needle
- Cardboard piece (approx. 10cm x 10cm, for making tassels)
- Optional: Stitch markers
Key Abbreviations
- ch: Chain
- dc: Double Crochet
- hdc: Half Double Crochet
- sl st: Slip Stitch
- picot: Ch 3, sl st into the front and back loops of the preceding st
Special Notes
- Pattern begins at the shawl’s point and increases row-by-row.
- The shawl works up quickly and is ideal for beginners.
- Measurements without tassels: ~50cm from point to top edge, ~150cm from side to side.
- Three tassels are added as trim, each approximately 10cm in height.
- You may adjust row count for desired size.
Shawl Body
1. Foundation:
- Make a slip knot.
- Chain 6.

2. Row 1:
- Yarn over, insert hook into the first chain, work 1 dc.
- Turn work.
3. Row 2:
- Chain 6.
- The first 4 ch count as the first dc.
- The next 2 ch are ch-sp (chain space).
- Yarn over, insert hook into the last dc worked in previous row, work 1 dc.
- Chain 2, skip first 2 ch, insert hook into the third ch of foundation, work 1 dc.
- Chain 2, insert hook into same ch, work 1 dc.
- Turn work.
4. Row 3:
- Chain 6 (4 for dc, 2 for ch-sp).
- Yarn over, insert hook into last dc from previous row, work 1 dc.
- Chain 2, insert hook into next dc, work 1 dc.
- Continue:
- Chain 2, insert hook into next dc, work 1 dc (repeat as needed).
- At end: Chain 2, skip first 2 ch of the turning chain, into third ch, work 1 dc, chain 2, same place, 1 dc.
- Turn work.

5. Subsequent Rows (4–48):
- Repeat Row 3 directions for desired length, always:
- ch 6 to start row (4 as dc, 2 as ch-sp)
- Work dc into dc of previous row, separated by ch 2.
- At end: chain 2, in third ch of turning ch, dc, chain 2, same place, dc.
- Increase continues along the edges creating a triangle.
6. Final Measurements:
- After 48 rows, your shawl should measure:
- 50cm from the point to the top edge.
- 150cm from side to side.

Picot Border
1. With new yarn, start at last stitched point on edge.
2. Side Border:
- Ch 1 (does not count as a stitch).
- For each dc along edge (except at vertex and starting row):
- Work 3 hdc around dc.
- After 3 hdc, make a picot:
- Ch 3, sl st into front and back loops of third hdc just made.
- Skip to next dc, repeat:
- 3 hdc, picot, until you reach the vertex.
3. At Vertex (Corner):
- Work 2 hdc around the next dc.
- In the first ch of the corner, work 1 hdc + picot (ch 3, sl st).

4. Opposite Side:
- In first dc, work 2 hdc only.
- For subsequent dc:
- Work 1 hdc, make a picot, then 2 more hdc around same dc.
- Repeat along edge.
5. Along remaining edge:
- In each ch, work 1 hdc.
- For each dc: 1 hdc + picot, then 2 hdc.
6. Finish:
- When reaching the starting point, work final hdc and picot in third ch, sl st to first hdc to close.
- Fasten off, weave in all ends neatly with yarn needle.

Tassels
1. Prepare Cardboard (approx. 10cm height).
2. Wrapping:
- Wrap yarn around cardboard 30 times.
- Cut yarn at end of wraps.
3. Tying Tassels:
- Cut a 40cm strand of yarn, thread under all wraps, tie tight double knot.
- Remove from cardboard, cut loops on opposite end.
4. Making “Head”:
- Cut another 40cm strand, wrap around head of tassel 3 times, knot securely.
- Use tapestry needle to hide both knot strands behind wraps, one strand at a time.
5. Trimming:
- Arrange strands, cut excess to even length.
6. Placement:
- Make three tassels for the three shawl points.
- Use tapestry needle to secure each tassel via picot at each shawl corner, tie double knot, hide strands in tassel head.
- Trim excess.

Conclusion
This pattern is ideal for beginners and creates an elegant, quick-to-make shawl with neat, decorative picot edge and simple tassels. The project is versatile for gifting, selling, or personal use and features clear instructions for both the main shawl and finishing touches. Adjust measurements and row count as preferred for your desired size.
Pattern Correction & Tips
Correction:
- The original transcription refers to “half points” and “rod” stitches. In US terminology, “half points” are half double crochet (hdc) and “rod” is double crochet (dc).
Tips:
- When working the border, start the picots consistently in the same spot to ensure proper alignment.
- Use stitch markers at corners for clarity.
- When weaving in ends, pass behind the hdc border for invisibility and neatness.
- Tassels can be made larger or smaller by varying wrap count or cardboard size.
- Block shawl lightly for best drape before adding tassels.