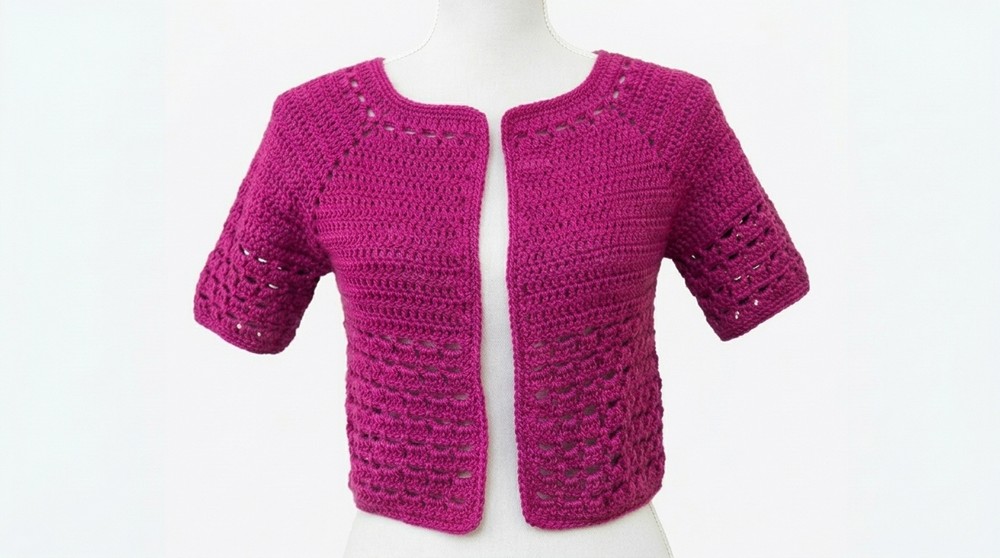
Crochet Jacket Ideas Free Pattern for All Seasons
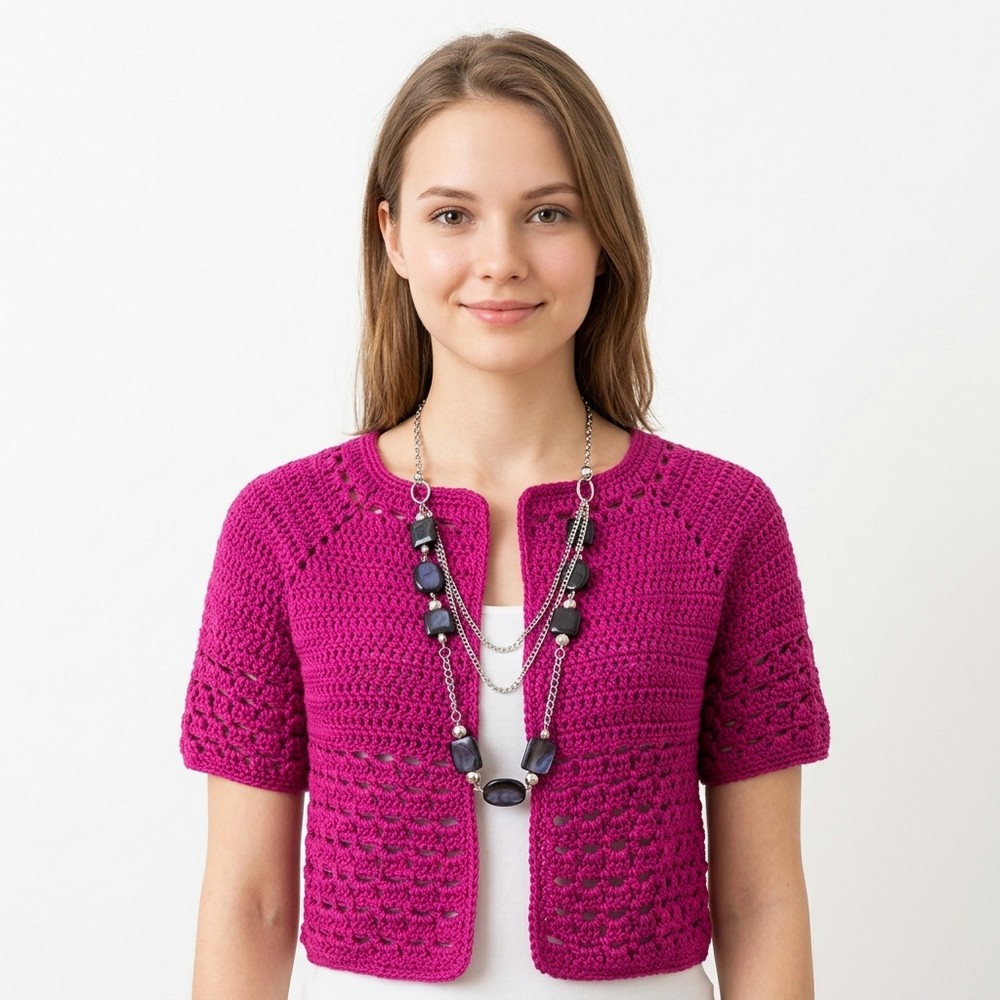
Unlock endless possibilities with this free crochet jacket pattern—stylish, practical, and perfect for layering in every season while keeping things unique.
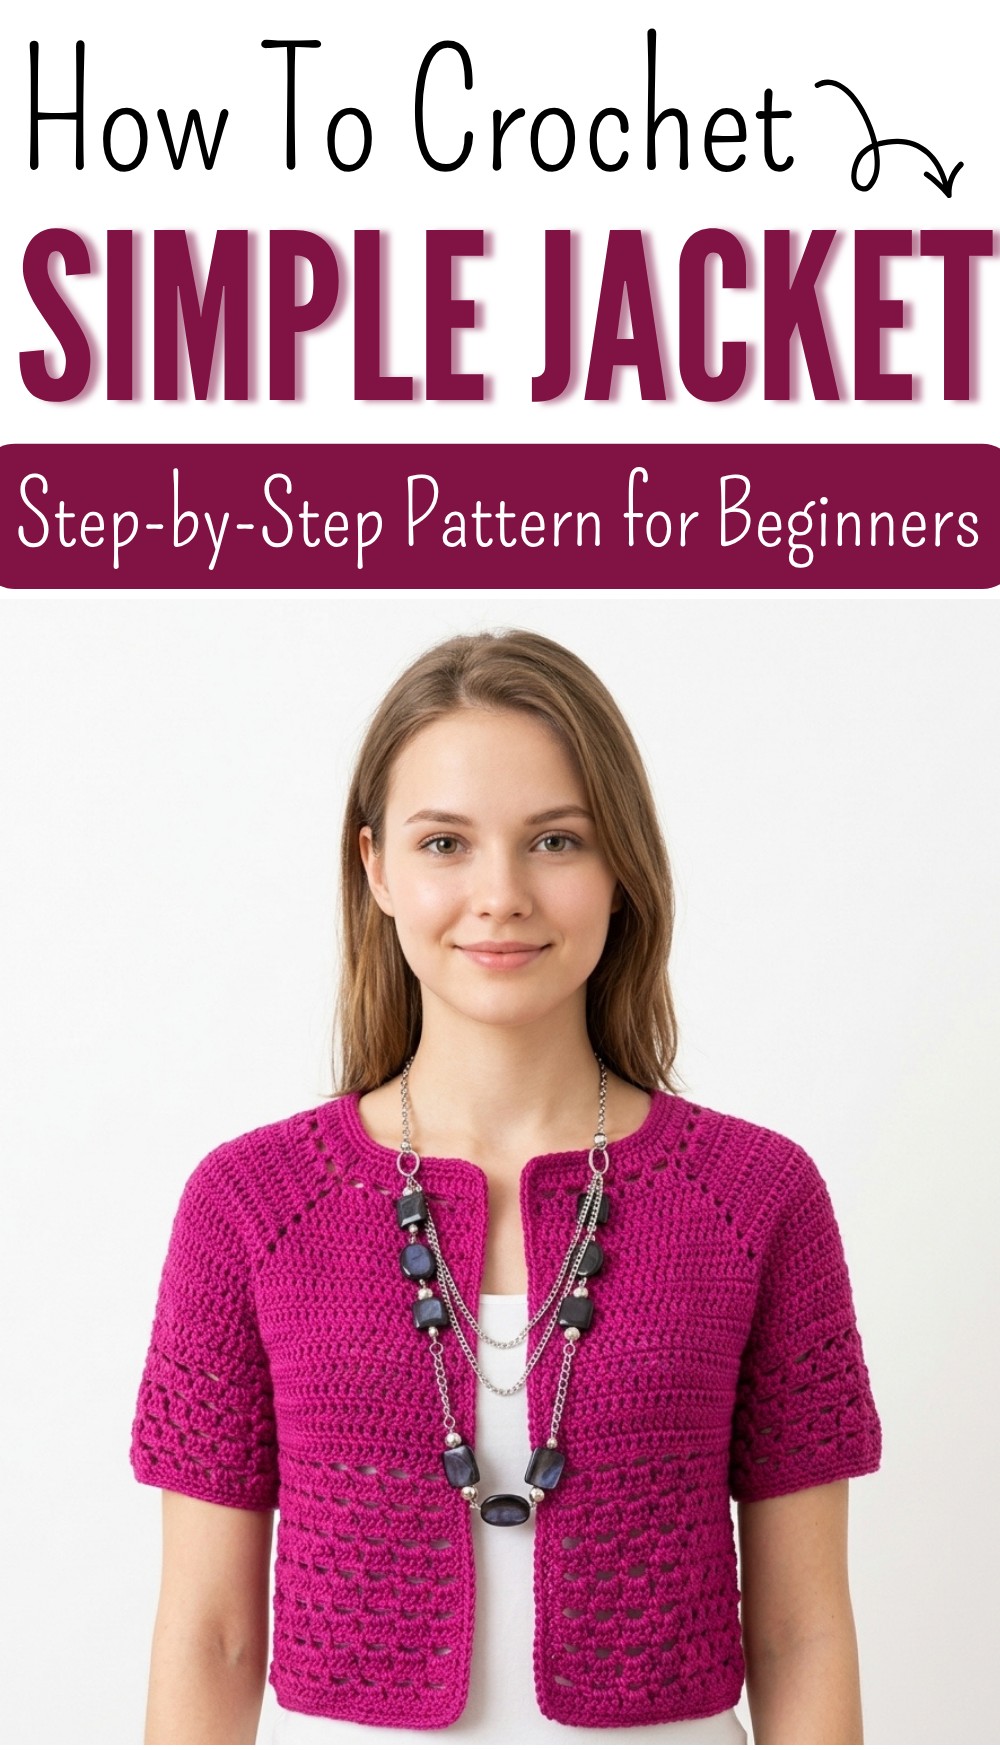
Did you know that creating your own crochet jacket can be both a fun hobby and a way to express your personal style? A crochet jacket offers the perfect blend of comfort and elegance, making it a standout piece in any collection. Using a “Free Crochet Jacket Pattern,” you can easily craft a cozy yet lightweight layer suitable for any season. Often adorned with textured stitches, flowing designs, or vibrant shades, this jacket isn’t just practical—it’s a piece of wearable art.
Free Crochet Jacket Pattern to Stay Stylish

Whether you’re dressing up for a special occasion or keeping things casual, this jacket pairs beautifully with almost anything, be it jeans, top or a summer dress. Beyond its beauty, it’s breathable, soft, and perfect for layering, making it a go-to option for staying comfortable in colder or transitional weather. Add this handmade creation to your wardrobe and enjoy the warmth, style, and love that only a handmade crochet design can offer.
Top-Down Yoke Jacket – Crochet Pattern
Materials
- Yarn:
- DK or light worsted weight yarn recommended (exact yarn is not specified in the transcript; choose a yarn that works well with the listed hook and gives good drape).
- Yardage will depend on size and length; as a rough guideline for a medium-length women’s jacket:
- S–M: ~900–1200 yards (820–1100 m)
- L–XL: ~1200–1500 yards (1100–1370 m)
- Fiber: cotton, acrylic, or blend with good stitch definition.
- Hook Size:
- Main hook: 4.0–4.5 mm (G–7 or US 7) for a light yarn, or 5.0 mm (H–8) for a heavier yarn.
- Choose the hook size that gives you the desired drape and gauge.
- Notions:
- Stitch markers (strongly recommended for corners and underarms)
- Yarn needle
- Scissors
- Measuring tape
Finished Size (Approximate, based on transcript counts)
The pattern as transcribed corresponds roughly to a small/medium with:
- Top of yoke to armhole separation: after 14 rounds in dc.
- Bust circumference and body length depend on how many rows you add after the yoke.
- Sleeves: about ¾ length or shorter, depending on how many rounds you choose.
Pattern Instructions
1. Yoke Foundation – Round 1 (dc)
Foundation chain:
- Ch 99.
You will now work the first dc row (Round 1):
- Skip 3 ch (these count as the first dc).
- Dc in the 4th ch from hook.
- Now you have effectively 2 dc (the starting ch 3 counts as 1 dc, plus 1 dc).
- Continue working dc in each ch until you have 15 dc total (including the starting ch-3).
- This is the first front half.
- Corner 1:
- Ch 2, then dc in the next ch (do not skip a chain).
- Shoulder section 1:
- Continue working dc in each ch after the corner dc until you have 20 dc for the shoulder.
- Corner 2:
- Ch 2, then dc in the next ch.
- Back section:
- Work 29 dc for the back.
- Corner 3:
- Ch 2, then dc in the next ch.
- Shoulder section 2:
- Work 20 dc for the second shoulder.
- Corner 4 & last front:
- Ch 2, then dc in the next ch, and continue dc in each remaining ch until you have 15 dc for the second front half.
- Finish the row; you should have used all 99 foundation chains.
At the end of Round 1, your yoke consists of:
- 15 dc – front
- ch-2 corner
- 20 dc – shoulder
- ch-2 corner
- 29 dc – back
- ch-2 corner
- 20 dc – shoulder
- ch-2 corner
- 15 dc – front
2. Round 2 – Eyelet (Arches) Round
Switch temporarily from dc to a mesh/arches pattern.
- Ch 1, sc in first dc.
- Ch 4, sk 2 dc, sc in next dc.
- Rep: ch 4, sk 2 dc, sc in next dc across until you reach corner 1.
- Corner treatment:
- In the corner ch-2 space, work: (sc, ch 4, sc).
- Continue along each section:
- After the corner, resume: ch 4, sk 2 dc, sc in next dc across the shoulder.
- In each corner ch-2 sp: (sc, ch 4, sc).
- At the very end of the row, finish with ch 4, sc in last dc.

You now have a row of arches (4-ch loops) across the entire yoke with doubled arches at each corner.
3. Round 3 – Groups of 3 dc in Arches
Return to dc, working into each 4-ch arch:
- Ch 3 (counts as first dc) or use the “perfect edge” method:
- Ch 1, sc in first st, ch 2 (recommended by the video).
- Work 2 dc in the first 4-ch arch (for a total of 3 dc if counting your initial dc).
From here:
- In each 4-ch arch, work: 3 dc.
- At each corner (the special arch made as sc, ch 4, sc in Round 2):
- Work: dc, ch 2, dc in the corner ch-2 space (this corner space persists from Round 1).
- Then continue 3 dc in each regular 4-ch arch.
- Finish the round with 2 dc in the last arch and 1 dc in last sc (or simply 3 dc in each arch and a dc in the final sc, depending how you started).
From now on, all corners are: (dc, ch 2, dc) in the ch-2 space.
4. Rounds 4–14 – Yoke Expansion in dc
Now the yoke is worked entirely in dc, with increases only in the 4 corners:
For each dc round:
- Beginning of round (smooth edge option):
- Ch 1, sc in first st, ch 2, then dc in next st and in each dc across.
- At each corner:
- Work 1 dc in the dc before the corner space, then in the ch-2 corner space work:
(dc, ch 2, dc) - Then 1 dc in the dc after the corner space and continue dc across.
- Work 1 dc in the dc before the corner space, then in the ch-2 corner space work:
- Repeat this for all corners. Work dc in each st for all sections; only the corners add stitches.
- Repeat this pattern up to approximately Round 14 (as in the transcript).
- At this point, the yoke should be wide enough to reach across your upper bust/shoulders, and the depth from neckline to underarm should be comfortable.
Pattern correction / clarification:
- The transcript refers to “up to the fourteenth round”; ensure all rounds between 4 and 14 are plain dc with corners (dc, ch 2, dc). No more mesh/arches until later at the hem.
5. Round 15 – Joining for Armholes (Separating Body and Sleeves)
Round 15 forms the armholes and joins fronts and back under the arms.
- Start as for a normal dc round:
- Ch 1, sc in first st, ch 2, dc in each dc across the first front until you reach corner 1.
- The transcript mentions 27 dc in the first front at this stage; use your actual stitch count.
- Corner 1 (front/shoulder area):
- Work corner as usual: (dc, ch 2, dc) in the corner ch-2 sp.
- Shoulder section (sleeve to be):
- Continue dc across all shoulder sts (the transcript suggests about 45 dc plus corner sts, so 47 including corners for the full shoulder segment, but your count may vary slightly).
- Joining front to back at Underarm:
- At the next corner (between shoulder and back), work:
- dc in corner space,
- Instead of ch 2, work:
- 1 dc into the corresponding corner space of the back, using a slightly different method:
- The transcript’s technique:
- Work dc in your current corner, then insert hook into the corner space of the back section, sl st (very low stitch) into that space, then dc again in your current corner. The net effect is that the front and back corners are “grabbed” together with a low stitch and then dc, forming a joined armhole.
- The transcript’s technique:
- 1 dc into the corresponding corner space of the back, using a slightly different method:
- The key idea: front and back corners are connected by inserting the hook into the back corner space and pulling through (sl st) before completing the second dc in the corner on the front.
- This creates the underarm join and closes the sleeve opening.
- At the next corner (between shoulder and back), work:
- Work dc across the back sts to the next corner.
- At the next corner (other side underarm), repeat the same joining technique to attach the back corner to the second front’s corner, forming the second armhole.
- Continue dc across the last front section to the end of the round.
At the end of Round 15, your yoke is now divided:
- Sleeves (the shoulder sections) are separated and left unworked for now.
- The jacket is now a continuous loop composed of front–back–front, with armholes formed under each shoulder.
6. Rounds 16–18 – Body in dc
Now you work only on the body, ignoring the sleeves for the moment.
- Round 16:
- Start as usual: ch 1, sc in first st, ch 2, then dc in each dc of the first front until you reach the area where corners were joined at underarm.
- In the first underarm joining zone:
- Work 2 dc into the first corner space,
- 1 dc into the stitch that joins the corners (the “very low stitch”/sl st that connected front and back),
- 2 dc into the second corner space.
- Continue dc across the back.
- At the second underarm join, repeat:
- 2 dc in first corner space, 1 dc in join st, 2 dc in second corner space.
- Dc across the second front to finish the round.
- Rounds 17 & 18:
- Continue in dc all around the body, one dc in each dc. No more corners exist; this is now a simple tube.
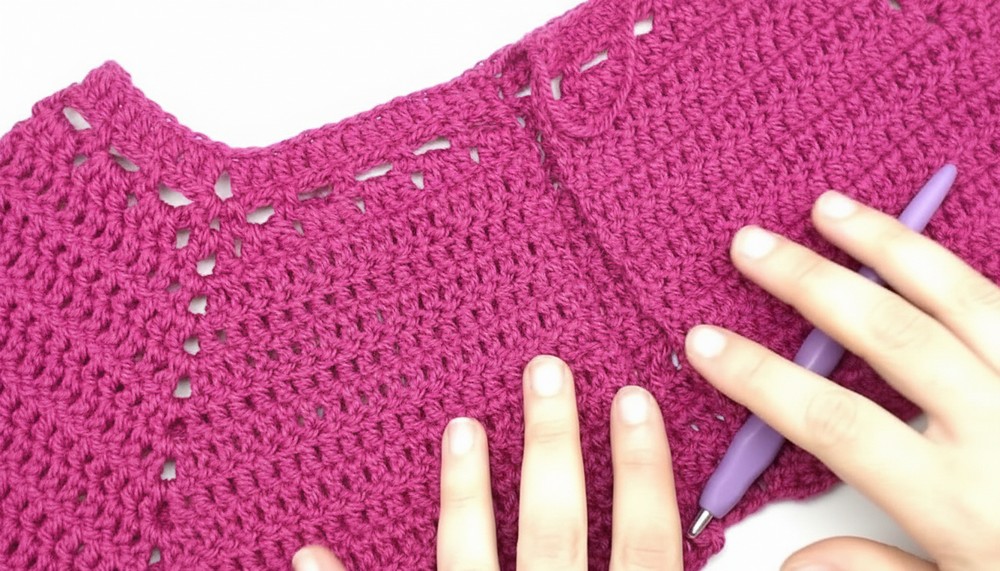
7. Body Pattern Section – Alternating Arches and 3-dc Groups
After establishing a plain dc section below the bust (transcript: after Round 18), you begin alternating:
- 1 round of arches (mesh)
- 1 round of groups of 3 dc in each arch
The transcript indicates doing this 16 rounds (i.e., 8 repeats of arches + dc groups) for the body.
Arches Round (Body)
- Ch 1, sc in first st.
- Ch 4.
- At the very beginning of each front half, the transcript makes a special note:
- After the first 3 dc, you start the arch pattern:
- So after your first sc, sk 3 dc, sc in 4th st, then ch 4. (This is only at the very beginning and very end of each front half, to make the pattern align correctly.)
- For the rest of the round:
- Ch 4, sk 2 dc, sc in next dc.
- Continue this sequence around the back and front body.
- At the end of the round:
- For the final arch in the front, again skip 3 dc instead of 2, then sc in the last dc. This matches the pattern that started with skipping 3 dc at the beginning of each front half.
Groups of 3 dc in Arches Round (Body)
- Ch 3 (or ch 1, sc, ch 2 for perfect edge), counts as first dc.
- Work 2 more dc in the first 4-ch arch (or simply 3 dc in each arch starting from the first, depending how you like).
- In each 4-ch arch around:
- Work 3 dc.
- At the end of the round, join with sl st to the first dc.
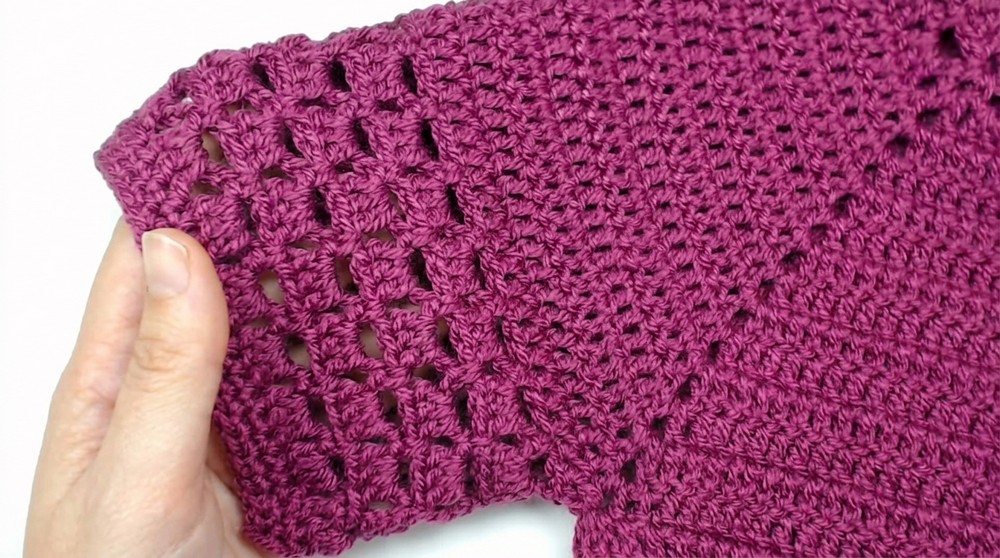
Repeat for Body
- Alternate 1 arches round and 1 groups-of-3-dc round.
- The transcript: 16 rounds total (arches + 3-dc groups), after the initial dc body rounds.
- Adjust the number of repeats to achieve your desired jacket length.
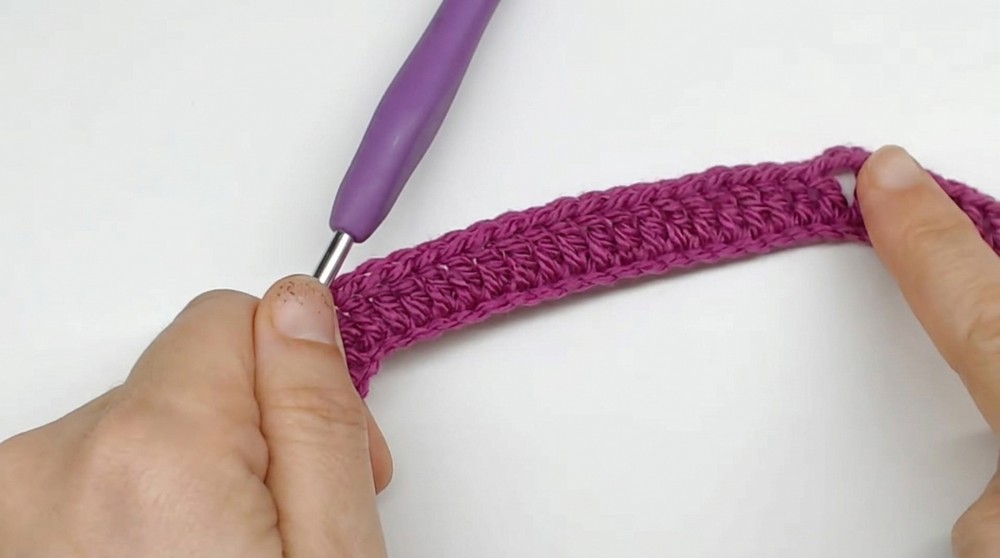
8. Front & Neckline Edging (Single Crochet Border)
Do not cut the yarn after the last body round. Continue directly into the edging.
- Turn your work with RS facing you (confirm orientation).
- Ch 1, sc in first st, then sc in each dc across the bottom hem of the body.
- At the bottom corners (where the front openings begin):
- In each corner dc, work:
(sc, ch 1, sc) in the same st. - This helps the edging turn the corner nicely.
- In each corner dc, work:
- Continue sc evenly up the front opening, placing one sc where the hook can enter cleanly (use your judgment to avoid puckering or gaping).
- Work sc across the neckline, again placing (sc, ch 1, sc) in any sharp corner points.
- Continue down the other front opening, placing sc evenly.
- When you reach the start point:
- Work sc in that st, ch 1, sl st in the first sc of the round.
- For a more substantial border:
- The transcript suggests 2 or 3 total rounds of sc:
- After finishing the first sc round, you may:
- Ch 1, sc around again (no more special corner increases if the fabric lies flat).
- Work 1–2 additional sc rounds, then sl st to join, fasten off, weave in ends.
- After finishing the first sc round, you may:
- The transcript suggests 2 or 3 total rounds of sc:
9. Sleeves
Sleeves are refined after the body and edging are done.
1 – Dc Round at Armhole
- Join yarn at the underarm area.
- Ch 3 (or use the ch 1, sc, ch 2 method), counts as first dc.
- Work 1 dc in each dc around the armhole.
- The transcript mentions 48 dc for the example size; your count may differ depending on yoke size.
- Join with sl st to starting dc.
2 – Arches Round (Sleeve)
- Ch 1, sc in first dc.
- Ch 4, sk 2 dc, sc in next dc.
- Repeat ch 4, sk 2 dc, sc in next dc around.
- Join with sl st into the starting ch (the one that replaced first sc).
3 – Groups of 3 dc in Each Arch
- Ch 3 (or ch 1, sc, ch 2), counts as first dc.
- Work 3 dc in each 4-ch arch around.
- Join with sl st to the first dc.
Repeat on Sleeves
- Alternate:
- 1 round arches
- 1 round 3-dc groups
- Transcript: 8 rounds of arches + 3-dc groups plus the initial dc round, so 9 rounds total before cuff edging.
Cuff Edging – Single Crochet Rounds
- After the last 3-dc groups round, work 2 rounds of sc around the cuff:
- Ch 1, sc in each st around, sl st to join.
- Repeat for a second sc round, then fasten off, weave in ends.
Customization note:
- For longer sleeves, add more repeats of the arches + 3-dc groups before the sc cuff, and distribute some decreases (e.g., every few rounds) to avoid a sleeve that is too wide or bell-shaped.
Repeat the entire sleeve process for the second arm.
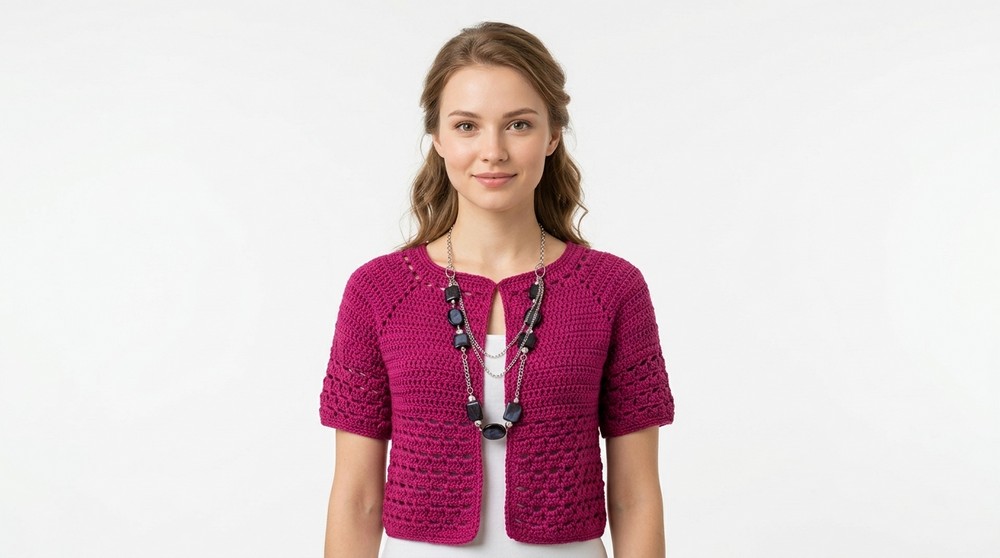
Conclusion
This top-down jacket:
- Uses a classic raglan-style yoke with 4 corners,
- Transitions smoothly from solid dc fabric to a light, airy lace band along the body and sleeves,
- Is finished with neat single crochet borders around the front opening, hem, neckline, and cuffs.
The result is a versatile, elegant jacket that can be worn open, layered, or customized with buttons, ties, or additional decorative edges.
Tips
- Try-On As You Go:
Top-down construction is perfect for adjusting length and width. Try on the jacket after the yoke and again after separating sleeves. - Mark Corners:
Always keep markers in the corner spaces until armhole joining is complete. This prevents miscounting and skewed yokes. - Blocking:
Light blocking (steam or wet) will open up the eyelet/lace sections, straighten edges, and unify the fabric. - Customization Ideas:
- Add buttons with button loops on one front edge.
- Use contrasting color for edging and cuffs.
- Make a longer coat version by extending the body pattern repeats.