Free Crochet Mask Connector Pattern for Daily Comfort

Say Thanks: Rajutan Whita.
Optimize protective wear comfortably by applying a free crochet mask connector pattern that supports secure mask positioning without sacrificing comfort.
Sometimes the smallest handmade gifts are the most special, especially when they help someone every day. A perfect example is a simple ear saver you can make using a Free Crochet Mask Connector Pattern. This little project is a wonderful way to use up leftover yarn and create something incredibly useful and kind for the people you care about.
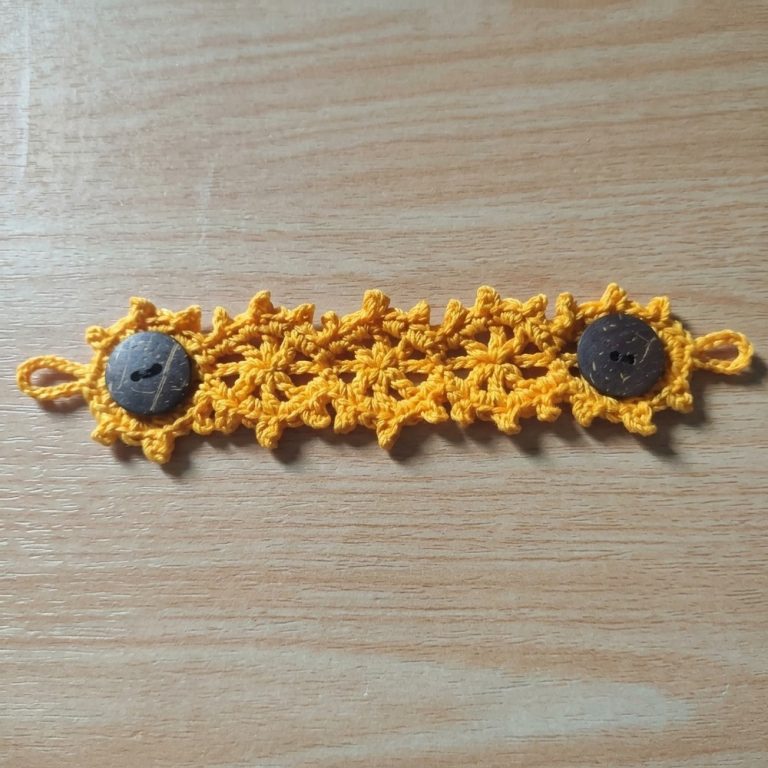
This handy helper is a small, soft strip of crocheted fabric. It is designed to be flat and comfortable against the back of your head. You can make it in fun, bright colors or simple, plain ones to match anything you wear. The most important parts are the two sturdy buttons, one sewn securely onto each end. These buttons are what make this little band so smart and helpful.
Easy Mask Connector Crochet Pattern (Free)

The way it works is so simple. Instead of hooking the elastic loops of your mask over your ears, you stretch them around the buttons on the connector. This takes all the pressure off your ears, preventing them from getting sore and red after a long day. It’s a game-changer for anyone who has to wear a mask for many hours, like nurses, teachers, or even kids at school. A very clear and easy-to-follow tutorial showing how to make one is shared by the creator at Rajutan Whita.

People love making these because they are so fast and easy, and they truly make a difference in someone’s comfort. They are a thoughtful gift for friends, family, and essential workers in your community. Giving someone a handmade mask connector is like giving them a small dose of comfort, showing them you care in a sweet and practical way. It is a small project with a very big heart.
Crochet Mask Connector Pattern
This beginner-friendly crochet mask connector project creates a beautiful textured accessory that secures your face mask comfortably with style. Designed to be quick and simple, this pattern features decorative button loops at both ends and a series of puff stitch motifs that add tactile detail and visual interest.
Quick Overview of Pattern
- The project starts with crafting functional button loops on each end.
- The main body is formed using a repeating puff stitch motif, paired with chains and single crochets for texture.
- The design is symmetrical, finishing with another button loop that mirrors the starting edge.
- Embellished with two decorative buttons for an elegant and practical fastening system.
Notes
- Maintaining consistent tension throughout is important to ensure the motif rows work up evenly.
- Puff stitches are slightly advanced but explained clearly to accommodate beginners.
- Use synthetic yarn if you plan on sealing ends with a lighter, to avoid damaging natural fibers.
- Buttons should be securely sewn onto the loops for durability given the manipulation the connector may receive.
- Measuring the length as you go ensures the connector fits comfortably with your mask size and strap length.
- The crochet hook size depends on your yarn choice but typically ranges from 3.0 mm to 4.0 mm for Polycherry or similar yarns.
Skill Level
- Suitable for beginners comfortable with chain stitches, single crochet (SC), slip stitches (sl st), and turning chains.
- Intermediate beginners who have experience with basic stitch clusters may find the puff stitch portion straightforward with practice.
- No complicated shaping or joining makes this project ideal for those expanding their stitch repertoire.
Materials
- Yarn: Polycherry yarn or equivalent in your color preference.
- Hook: Crochet hook appropriate for the selected yarn (commonly 3.0–4.0 mm).
- Tools: Scissors, a lighter for finishing ends if yarn permits, a sewing needle with matching thread.
- Embellishments: Two matching decorative buttons.
Measurements / Sizing (Optional Schematic)
- The length of the mask connector is determined by the number of puff stitch motifs worked. This pattern creates 24 puff stitch motifs total, translating roughly to 15-18 cm (6-7 inches), suitable for most standard mask sizes.
- Width is approximately 3-4 cm (1.2 – 1.6 inches), measured across the puff stitches and chains.
- Adjust the number of motifs or chains in the button loops to meet personal fit and mask strap length needs.
Gauge (and Stitch Pattern)
- Gauge is flexible but consistent tension will ensure the puff stitch motifs align neatly.
- Typical gauge with Polycherry yarn and recommended hook:
- Approximately 18 stitches and 12 rows per 10 cm (4 inches) in the puff stitch sequence.
Stitch Abbreviations
| Abbreviation | Meaning |
|---|---|
| ch | Chain |
| sc | Single Crochet |
| sl st | Slip Stitch |
| st(s) | Stitch(es) |
Special Stitches
- Puff Stitch: Yarn over and insert hook into the designated stitch or space, yarn over and pull up a loop. Repeat pulling loops through the stitch three times (four loops on hook), then yarn over and draw through all loops to complete one puff stitch. This creates a dense textured cluster.
- Button Loop: Created by chaining several stitches and slip stitching to the base to form a secure loop for button attachment.
The Crochet Pattern
Step 1: Creating the Base and First Button Loop
- Begin with a slip knot on your hook. Chain 2 to start (this forms a starting edge).
- Chain 12 additional stitches to create the loop base.
- Join by slip stitching into the second chain from the hook to form a closed loop. This loop will serve to hold the button.
- Chain 2 to prepare for the first row of single crochets.
- Work 3 single crochet (SC) stitches into the loop area you just formed.
- Turn your work, chain 1, and work 3 SC stitches.
- Repeat this turning and working 3 SC rows a total of three times, building a sturdy button loop band.
Step 2: Finishing the First Button Loop
- For the final row in this section, chain 1 and turn.
- Work 1 SC into the first stitch, chain 1 to create a space (this will be the buttonhole).
- Skip the middle stitch of the row and then work 1 SC into the last stitch.
- This chain 1 space serves as the buttonhole through which the decorative button will fasten.

Step 3: Working the Main Puff Stitch Motif Pattern
- Chain 2 and turn your work.
- Locate the previous row’s chain-1 space formed by the buttonhole, and work a Puff Stitch into this space:
- Yarn over, insert the hook into the chain-1 space.
- Yarn over, pull up a loop; repeat this two more times to have four loops on the hook.
- Yarn over and pull through all loops to complete the puff stitch.
- Chain 4, then work a single crochet (SC) into the same chain-1 space.
- Turn your work, chain 1, and work 5 SC stitches into the chain-4 space from the previous row.
- Turn again, chain 2, and repeat the sequence:
- Puff stitch into the chain-1 space,
- Chain 4,
- SC into the same space,
- Chain 1,
- 5 SC into the chain-4 space.
- Continue repeating this puff stitch motif sequence until you have worked 24 motifs in total, creating a textured, raised effect along the connector.
- At the final motif, work 2 SC into the initial space where you began the puff stitch to neatly complete the edge.


Step 4: Creating the Second Button Loop and Ending the Connector
- Repeat the initial button loop pattern symmetrically on the other end.
- Chain 1 and turn, then work 3 SC stitches for two rows, building the band.
- Chain 12 to form the second button loop and slip stitch to the base edge to close this loop.
- Secure with a final SC stitch.
- Cut the yarn leaving a tail to weave in.
- Hide loose ends carefully using a yarn needle.
- If using synthetic yarn, gently singe the tail using a lighter to seal and prevent unraveling.

Step 5: Attaching the Buttons
- Using a sewing needle and matching thread, sew one decorative button securely onto each of the button loops at either end of the connector.
- Ensure buttons are fastened tightly since this accessory will endure repeated buttoning and unbuttoning.
Assembly & Finished Size
- The finished mask connector measures about 15-18 cm in length, suitable to bridge between standard mask ear loops for improved comfort.
- The width spans 3-4 cm driven by the puff stitch motif dimensions.
- Button loops securely hold medium-sized decorative buttons approximately 12 mm in diameter.
- This piece can be used immediately after finishing or cleaned gently by hand-washing, taking care to avoid damaging the puff stitches.
Conclusion
This crochet mask connector combines beginner-accessible stitches with a stylish puff stitch pattern, yielding a practical and elegant accessory. The modular design with button loops on either end offers adjustability and ease of use, while the textured puff stitch row adds a decorative flair.
Constructed from Polycherry or similar yarn, the pattern is quick to complete but makes a big difference in comfortable mask wear. The addition of decorative buttons personalizes your creation and provides secure fastening without compromising style.
The project boosts beginner crocheters’ confidence by introducing cluster stitches in manageable steps and encourages creativity with color and button choice. Work carefully through the steps—forming button loops, mastering puff stitch clusters, and joining motifs neatly—to achieve a polished final product.