How to Crochet Flower Motif Bag for Beginners
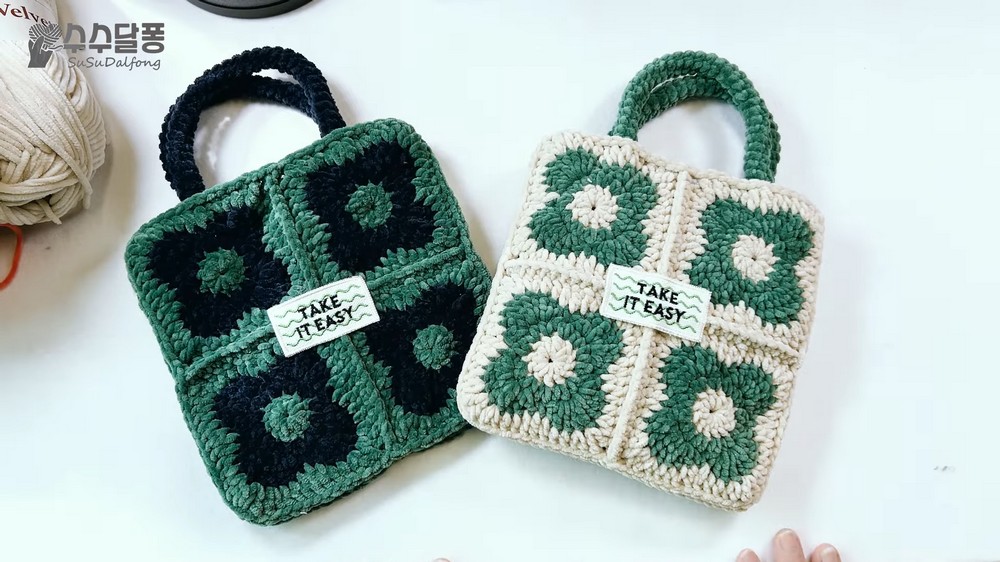
With a step-by-step tutorial, learn how to crochet a Chenille velvet flower motif daily bag for beginners and experts. The creator recommends using chenille velvet yarn because of its soft and plush texture. The tutorial is broken down into several key steps, starting with creating a foundation circle and then working through four rounds to form the flower motif, with the final round shaping it into a square.
The video also explains how to seamlessly join multiple motifs together, add a border, and create and attach the handle. The final steps show how to sew the sides of the bag and add an optional decorative patch. So, follow through with us for the complete tutorial.

Getting Started
-
The video recommends using Chenille velvet yarn, which is soft, thick, and plush.
-
It is suggested to pull the yarn from the center of the skein to prevent it from getting messy.
-
The tutorial begins by showing how to make a chain circle with a slip knot and three chains.
Motif Construction
-
Round 1: The first round is worked inside the chain circle. It consists of creating double crochet stitches, for a total of 12. The video demonstrates a modified method for finishing the round to create a clean, uniform look.
-
Round 2: The second round uses a technique to start with a half-double crochet foundation instead of a chain stitch. Each stitch in this round is worked twice.
-
Round 3: This round forms the flower petals. It involves a sequence of stitches, including double crochet, extended double crochet, and treble crochet, repeated four times.

-
Round 4: This round squares the circular motif. It begins with a treble crochet and incorporates various stitches to form the corners. The video advises checking for symmetry while working on the corners.
-
After each motif is completed, a blocking process using a cold water spray is recommended to help the shape hold better.

Bag Assembly and Finishing
-
Four completed motifs are joined together to create one side of the bag. This is done by holding two motifs with their right sides facing each other and joining them with single crochet stitches along the edges.
-
The two sets of four connected motifs are then joined at the bottom to form the bag.

-
A border is added to the top edge of the bag using slip stitches.
-
A handle is crocheted and then sewn onto the inside of the bag, aligning with the flower pattern.

-
The final step is to seam the two sides of the bag together. The video suggests using a whipstitch technique along the outermost loop of the back loops of the border stitches.
-
As an optional last step, a patch can be attached to the finished bag for personalization.

Video Guide
https://youtu.be/h2J9q6hgeBU