Colorful Crochet Headband Pattern Perfect for Any Hair Day
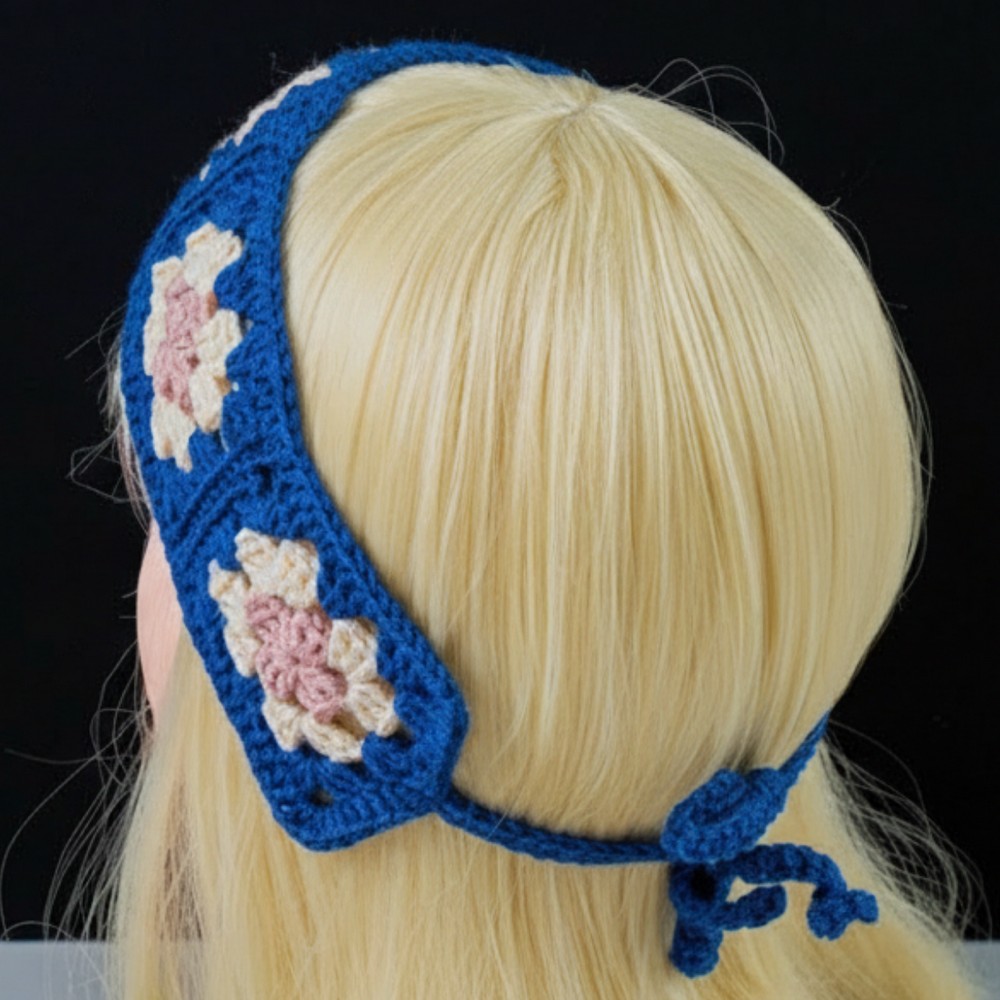
A simple yarn can turn into a stylish and colorful accessory that fits any occasion! A crochet granny square headband pattern offers a timeless charm with its vibrant designs and unique appearance. Its mix of bold colors and traditional shapes gives it an eye-catching look that suits all ages. This headband is lightweight, comfortable, and perfect for keeping hair in place while adding a pop of personality to any outfit.

Chic & Easy Crochet Granny Square Headband to Wear
It works well for casual days, special events, or as a thoughtful handmade gift for someone special. With endless color options, each headband reflects unique creativity and style, making it both practical and fashionable. Whether you’re new to crochet or have experience, this headband is a perfect project to enjoy and cherish.
Materials Needed
- Yarn: Two contrasting colors (choose lightweight or medium yarn depending on the season or style preference).
- Crochet Hook: Size suitable for selected yarn weight (recommend size 3.0 mm to 5.0 mm for medium yarn).
- Stitch Markers: To keep track of pattern repeats and row beginnings.
- Scissors: For cutting yarn ends.
- Measuring Tape: To confirm the circumference of the hat.
Special Techniques
- Magic Ring: A flexible foundation often used in circular crochet, allowing the center hole to be adjustable.
- Double Crochet (DC): Yarn over, insert the hook into a stitch, YO again, pull through the stitch, YO, pull through two loops, YO, pull through the last two loops.
- Half Double Crochet (HDC): Yarn over, insert the hook into the stitch, YO again, pull through, YO, pull through all three loops.
- Slip Stitch (SS): Used to join rounds seamlessly or give a finished look.
- Color Change: Adjusting from one yarn color to another to create the contrasting look.
Pattern Instructions
Step 1: Foundation
- Start with Color 1.
- Create a magic ring.
- Inside the ring:
- Make 3 chain stitches.
- Work 2 double crochet (DC).
Step 2: Creating the Pattern
- Begin the repeating pattern:
- 3 chain stitches.
- 3 double crochet (DC).
- Repeat the above pattern three times, completing the circular foundation.
- End the row with 3 chain stitches.
- Join the round with slip stitch (SS).

Step 3: Adding Contrast
- Switch to Color 2.
- Row 2 (Color 2):
- Make 3 chain stitches.
- Work 2 double crochet (DC).
- Begin repeating the pattern:
- 1 chain stitch.
- 3 double crochet (DC).
- 3 chain stitches.
- 3 double crochet (DC).
- Repeat to complete the round.
- End with 3 chain stitches and join with slip stitch.

Step 4: Adding Rows
- Row 3 (Color 2):
- Make 3 chain stitches.
- Work 2 double crochet (DC).
- Begin repeating:
- 1 chain stitch.
- 3 double crochet (DC).
- 1 chain stitch.
- 3 double crochet (DC).
- 3 chain stitches.
- 3 double crochet (DC).
- Repeat the pattern to complete the row.
- End with 3 chain stitches and join with slip stitch.

Step 5: Expanding the Base
- Switch to Color 1.
- Create a new round with 2 chain stitches.
- Work 160 half double crochet (HDC) evenly across the round to expand and base the circumference.
- Complete the round with slip stitch.
Step 6: Building the Hat Length
- Begin with 51 chain stitches for the next round.
- Work 50 single crochet (SC) into each chain space. This forms a firm beginning layer for the hat length.
- End the row with slip stitch.
Step 7: Repeat the Pattern
- Repeat the pattern sequence as required to build the height of the hat while maintaining a consistent circumference of 56 cm.
Finishing the Hat
- Secure all loose yarn ends by weaving them with a yarn needle.
- If desired, block the hat to smooth edges or stretch for shape using light steam (only for acrylic yarn) or water blocking with pins.
- The hat is now complete and ready for wear!

Final Words
Your granny square headband is finished! This project combines contrasting colors and foundational techniques to create a clean, polished accessory. The alternating pattern motif adds elegance while maintaining comfort and style.

Tips for Success
- Adjust Size as Needed:
- To increase circumference, add more rows during the foundation and expanding base steps.
- For smaller circumference, reduce the expanding base (HDC stitches).
- Maintaining Tension:
- Keep stitches consistent to avoid bulges or tight sections.
- Enhance the Design:
- Consider embellishments such as pom-poms, buttons, or appliqués to personalize the hat.
- Know Your Yarn:
- Softer yarns are ideal for comfort, while mixed fibers ensure durability.