How to Crochet Amigurumi Octopus Shape for Beginners
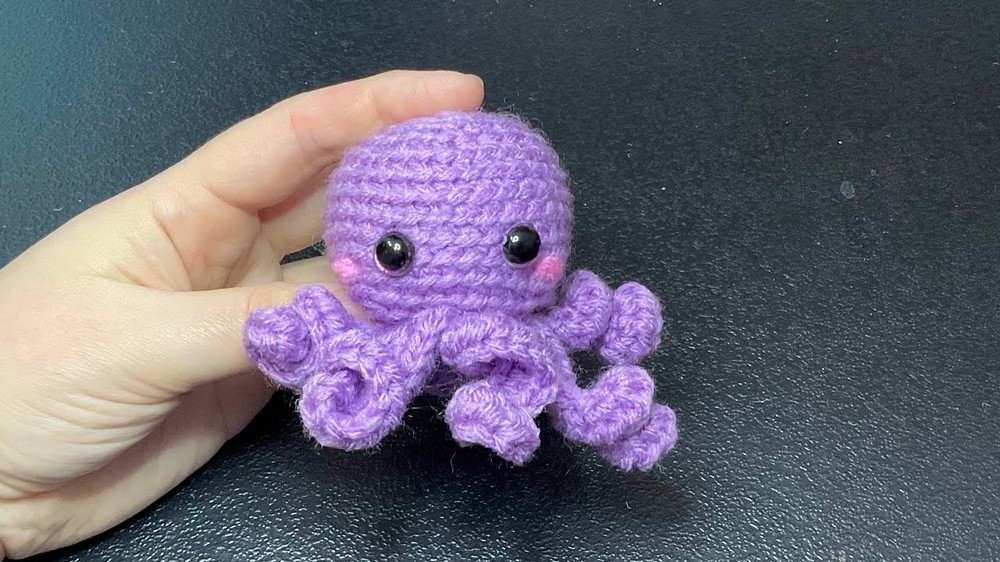
In this post, with a step-by-step tutorial for beginners, learn how to crochet an amigurumi octopus shape for kids. It covers the materials needed, including yarn, stuffing, and safety eyes. The tutorial guides viewers through crocheting the octopus head, including increasing and decreasing rounds, eye placement, and stuffing.
It also explains how to embroider cheeks and create and attach the eight spiral tentacles. So, continue reading this post till the end.

Tutorial: Amigurumi Octopus Shape
This video tutorial by Mundo Arte Crochet walks viewers through creating a beginner-friendly amigurumi octopus step-by-step. With a simple design, minimal materials, and clear explanations, this pattern is perfect for those new to crochet or amigurumi projects.
Materials Needed
- Yarn: Lavender (for the body); pink (for the cheeks).
- Tools: 4mm crochet hook, wool needle, scissors, and a stitch marker.
- Accessories: Stuffing, safety eyes (or alternatives), and a row/lap counter.
1. Starting the Octopus Head
- Begin by creating a magic ring and working single crochet stitches into it. The magic ring forms the base of the octopus head.
- Use a stitch marker to indicate the beginning of each round for clarity.
- Work in the round without joining, transitioning into a spiral after the second row.

2. Building the Octopus Head
- Alternate between rounds of single crochets and increase stitches to create the expanding shape of the head.
- Once the desired diameter is achieved, crochet even rounds with single crochets to give the head height.
- Gradually decrease stitches in subsequent rounds to taper the head and prepare for closing.

3. Adding Eyes
- Place safety eyes onto the head after completing specific rounds.
- Measure and count stitches between the eyes for symmetrical placement. Secure the eyes with backs to ensure they stay in place.

4. Stuffing the Head
- Before fully closing the head, stuff it firmly with fiberfill or similar stuffing material.
- Ensure the head is evenly filled, shaping it as needed to achieve a rounded form.
5. Closing the Head
- Work the final decrease rounds and ensure the small opening at the base of the head is tightly closed.
- Use a wool needle to sew the opening shut neatly, securing any loose ends.

Adding Details
6. Creating Cheeks
- Use pink yarn to create small cheek circles on either side of the face.
- Tie and hide any loose threads by threading them through the inside of the octopus head for a clean finish.

7. Making the Tentacles
- Work chains and half-double crochets to create curling tentacles.
- Repeat the process until eight tentacles are completed from a continuous line of yarn.
- Ensure even tension in the tentacles so they curl naturally.

8. Attaching Tentacles
- Position the tentacles evenly at the base of the octopus’s head.
- Use a wool needle to sew each tentacle carefully to the base, securing them firmly.
- Shape the tentacles manually to enhance their natural curl.