Free Crochet Mesh Top Pattern for Beach and Vacation

Refresh your summer style with free crochet mesh top pattern that keeps you cool and a fun airy layer to your favorite warm-weather outfits.
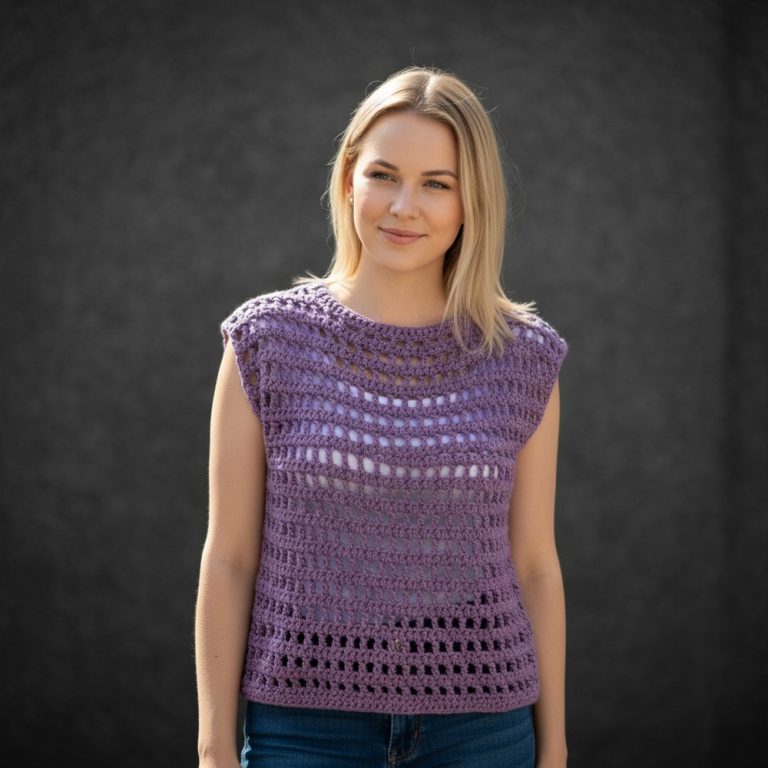
Not everyone enjoys heavy or tight clothing that sticks to you and makes you uncomfortable in warm weather. That is why the Crochet Mesh Top pattern is so loved for its light and breezy feel that helps you stay cool all day. The open spaces in the beautiful design let air flow through easily so you never feel too hot or sticky. With this Crochet Mesh Top pattern your look becomes playful and fresh adding simple charm to every outfit without effort.
Crochet Mesh Top Pattern: Free Guide for All Skill Levels

The gentle texture feels soft and smooth against your skin making it perfect for layering over your favorite tops or dresses at home on a walk or out in the sun. Friends and family will notice the soft shapes and lovely colors that make your outfit shine. Choosing the Crochet Mesh Top pattern means picking comfort with style and enjoying a piece that is both easy and beautiful for anyone to wear.

Simple Crochet Top (Beginner-Friendly)
Materials
- Yarn: Worsted weight cotton yarn (approx. 170g for size S; adjust for other sizes)
- Example: 100g = 160m
- Choose high-quality, smooth cotton for best results
- Hook: 4.0 mm (US G-6)
- Notions: Yarn needle, scissors, measuring tape, stitch markers
Key Abbreviations
| Abbreviation | Meaning |
|---|---|
| ch | chain |
| sc | single crochet |
| dc | double crochet |
| sl st | slip stitch |
| rep | repeat |
| st(s) | stitch(es) |
Special Notes
- Gauge: Check your gauge after the first few rows to ensure correct sizing.
- Foundation Chain: Work in multiple of 8 + 1 for width.
- Panel Layout: Panels are seamed to create the top shape with an offset border for visual effect.
- Sizing: Example panel measurements for size S are 37 cm wide × 39 cm tall.
- Armhole & Neckline: Adjust seam openings for desired fit.
- Fit: The top is intended to have a relaxed, comfortable silhouette.
Pattern Instructions
1. Sizing & Measurements
- Measure from shoulder to shoulder (width).
- Measure from shoulder down to waist (length).
- For size S, suggested: 37 cm (width) × 39 cm (height).
- Adjust starting chain and rows for your measurements.
2. Panel Construction
a. Foundation
- Make foundation chain:
- Ch a multiple of 8 + 1 to match your measured width in cm/in.
- Example: Ch 33 (if 37 cm ≈ 33 chains), adjust for your gauge.
- Row 1 (Border Row):
- Ch 3 (counts as first dc), dc in each ch across (border row).
- Alternatively, use sc in first ch, then ch 3, dc across for a firmer edge.
- Row 2 (Border Row):
- Ch 1, turn.
- Sc in first st, ch 1, dc in next st, ch 1, skip 1 st, dc in next st; rep across.
- Row 3 (Border Row):
- Repeat Row 2 (or alternate sc/dc border for three rows for a thicker edge).


b. Mesh Pattern Body
- Row 4 (Start Mesh Pattern):
- Ch 1, turn.
- Sc in first st.
- Ch 1, skip 1 st, dc in next st; rep from * across row.
- Row 5:
- Ch 1, turn.
- Sc in first st.
- Ch 4, skip 3 sts, sc in next st; rep across.
- Row 6:
- Ch 3, turn (counts as dc).
- Ch 2, sc in next ch-4 space (under “arch”), ch 4, sc in next ch-4 space; rep across.
- Finish row with half arch if needed: ch 2, dc in last st.
- Row 7 and Onward:
- Repeat Rows 5–6, alternating:
- Every even row: Start with a full arch (ch 4), sc in next space, and end with a full arch.
- Every odd row: Start/end with half arch (ch 2, dc).
- Continue until piece reaches desired height (waist measurement), including border rows.
- Repeat Rows 5–6, alternating:

c. Top Border
- Last Row (Even Out for Border):
- Ch 1, turn.
- Sc in first st.
- Ch 3, sc in next arch space; rep across row.
- This row creates a straight edge for final border.
- Final Border Rows:
- Work 1–3 rows as at the start:
- Ch 3, turn, dc across.
- Alternately, sc, ch 1, dc across for decorative touch.
- Work 1–3 rows as at the start:
3. Make Second Panel
- Repeat the entire panel pattern for the second panel, matching stitches and rows.
4. Assembly and Seaming
a. Side Seam
- Place panels side by side, aligning border edges (make sure dc edges face each other for symmetry).
- With yarn needle and matching yarn, stitch sides together:
- Leave 16–18 cm (6–7″) open at the top for armholes.
- Seam down the remainder of the side for the body.

b. Top Seam
- Align and seam the top borders together (using the 3 border rows for guidance).
- Adjust width and opening for desired neckline.
- Leave open space for head and neck; seam only the border rows on each panel’s edge.
5. Edging (Neckline and Hem)
- With hook and yarn, attach at neckline edge (side of panel).
- Work sc evenly around neckline:
- Insert hook in each border/space, sc loosely to avoid puckering.
- Continue all around neckline, sl st to starting sc to join.
- Cut yarn, weave in ends.
- [Optional] Repeat the same edging at the hem/bottom edge for stability and symmetry.

6. Finish
- Weave in all remaining ends with yarn needle, hiding tails in seams for neatness.
- Gently block the finished top for shape if desired.
Conclusion
This beginner-friendly crochet top is quick to construct and highly customizable. The mesh arch pattern creates a light, airy fabric ideal for summer. The design’s simple construction allows for easy size adjustments and personal embellishments such as fringe or decorative borders.
Pattern Corrections & Tips
- Correction: Ensure both panels have identical row counts and widths for a seamless finish.
- Tip 1: Keep stitches loose when working border edgings to avoid tightening the neckline or hem.
- Tip 2: Use stitch markers to mark armhole and neckline openings during seaming.
- Tip 3: If desired, work additional rows before top border for longer fit.
- Tip 4: For a more fitted look, slightly reduce width or add waist shaping with decreases.