Cute Multicolor Crochet Robot Cat Amigurumi Pattern
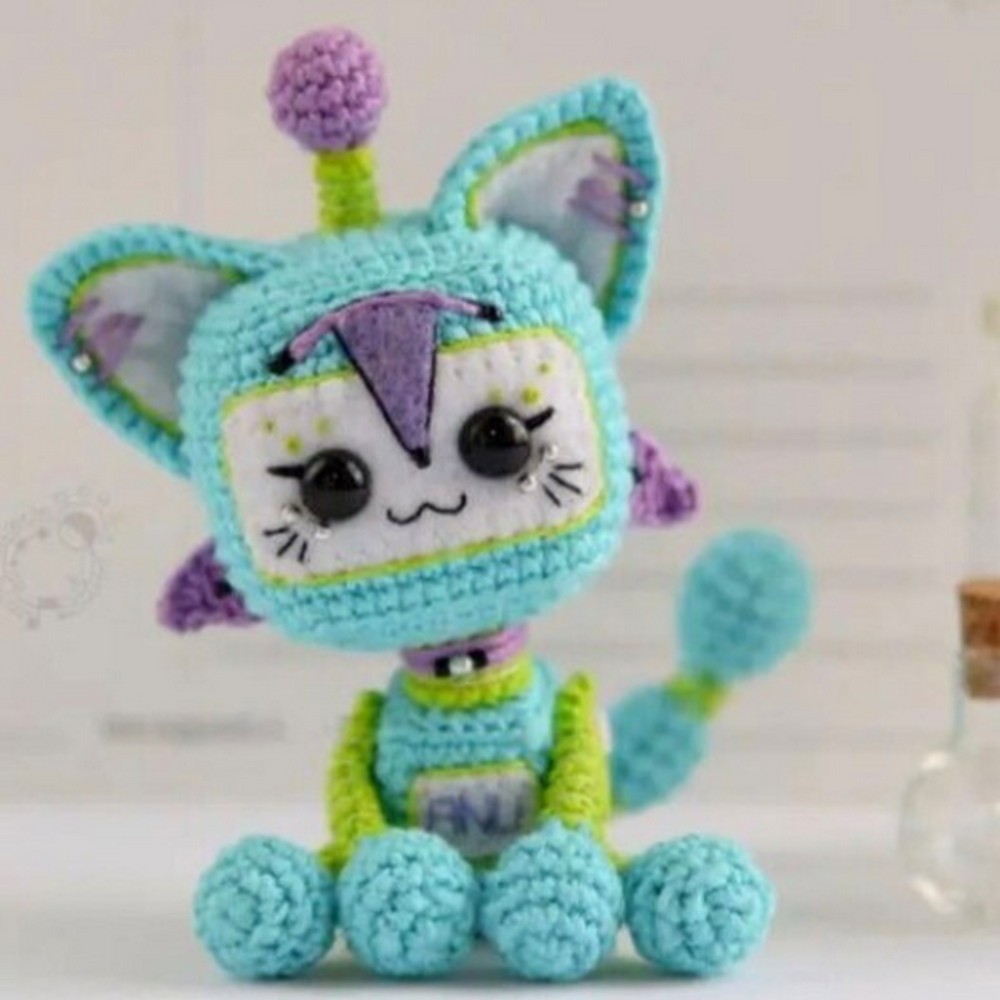
This Crochet Robot Cat Amigurumi Pattern is perfect for adding a unique and cuddly buddy to your collection. This easy-to-follow pattern is designed for crafters of all levels, featuring a delightful robot cat adorned in soft, eye-pleasing hues of light green and lilac. Its multi-colored parts come together to create an admirably cute appearance with a texture so soft, you won’t want to put it down.
Crochet Robot Cat Amigurumi Pattern
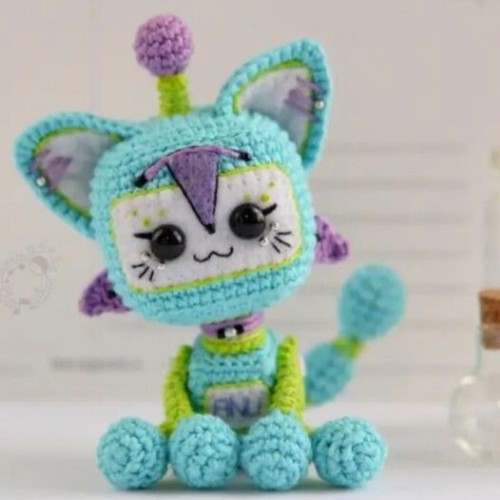
Not only is this project fun to make, but it also results in a charmingly elegant robot cat that’s sure to capture hearts. Whether you’re looking for a playful addition to your crochet lineup or a sweet gift, this pattern provides everything you need to bring this adorable creation to life.
Tools and materials:
- Yarn of two or more colors (I will use turquoise as the main color, light green and lilac as the additional colors)
- Fiberfill
- A pair of doll safety eyes (you can also use beads or buttons instead)
- Crochet hook, needle, scissors
- For the movable doll (optional): 4 buttons or beads and piece of wire
- Something for decoration (optional): felt, buttons, beads, charms, etc
Abbreviations:
- ch – chain
- sc-single crochet
- hdc – half double crochet
- dc – double crochet
- tr-treble crochet
- inc – increase (single crochet 2 in next stitch)
- dec – decrease (single crochet 2 together)
- inc2 – increase (single crochet 3 (!) in next stitch)
- dec2 – decrease (single crochet 3 (!) together)
- BLO – back loops only
- FLO – front loops only
Tail
If you want the doll to be movable you need to put wire inside the tail. The wire should be 2 times longer than the tail itself.
Begin with the yarn of the main color.
- R1 – 6 sc in magic ring (6)
- R2 – *inc* repeat 6 times (12)
- R3 – *3 sc, inc* repeat 3 times (15)
- R4-15 sc
- R5 – *3 sc, dec* repeat 3 times (12)
- R6-12 sc
Put the wire inside and stuff the detail. Continue crocheting around the wire.
- R7 – *dec* repeat 6 times (6)
Continue with the yarn of the additional color.
- R8-FLO-6 sc
- R9-6 sc
Don’t stuff. Continue with the yarn of the main color.
- R10 – FLO – *inc* repeat 6 times (12)
- R11-13-12 sc (36)
Stuff.
- R14 – *dec* repeat 6 times (6)
- Repeat R8-14, then repeat R8-9.
Fasten off leaving a long end for sewing. Don’t cut the wire!
Body
Use the yarn of the main color.
- R1 – 8 sc in magic ring (8)
- R2 – *inc2, 1 sc* repeat 4 times (16)
- R3 – *1 sc, inc2, 2 sc* repeat 4 times (24)
- R4-BLO – 24 sc
- R5-11-24 sc
If you made the tail with the wire, put it between R3 and R4. Stuff the detail and continue crocheting around the wire.
- R12 – BLO – *1 sc, dec2, 2 sc* repeat 4 times (16)
Continue with the yarn on the additional color.
- R13-FLO-16 sc
- R14-15-16 sc (32)
Fasten off leaving a long end for sewing.
Attach the tail to the body.
Head
Use the yarn of the main color.
- R1-8 sc in magic ring (8)
- R2 – *1 sc, inc2* repeat 4 times (16)
- R3 – *2 sc, inc2, 1 sc* repeat 4 times (24)
- R4 – *3 sc, inc2, 2 sc* repeat 4 times (32)
- R5 – *4 sc, inc2, 3 sc* repeat 4 times (40)
- R6 – *5 sc, inc2, 4 sc* repeat 4 times (48)
- R7-BLO – 48 sc
- R8-12-48 sc
If you use safety eyes you can make the holes for them while crocheting the next round. If you don’t
need this, just crochet the next round like the previous one.
- R13-20 sc, 2 ch (skip 2 stitches), 4 sc, 2 ch (skip 2 stitches), 20 sc (48)
- R14-18-48 sc
- R19 – BLO – *5 sc, dec2, 4 sc* repeat 4 times (40)
- R20 – *4 sc, dec2, 3 sc* repeat 4 times (32)
- R21 – *3 sc, dec2, 2 sc* repeat 4 times (24)
Stuff the detail.
- R22 – *2 sc, dec2, 1 sc* repeat 4 times (16)
- R23 – *1 sc, dec2* repeat 4 times (8)
Fasten off and hide the yarn tail inside the head.
Attach the body to the head. Embroider the face.
Antenna
Begin with the yarn of the additional color (or any other color if you use more than two colors).
- R1 – 6 sc in magic ring (6)
- R2 – *inc* repeat 6 times (12)
- R3-4-12 sc (24)
Stuff the detail.
- R5 – *dec* repeat 6 times (6)
Continue with the yarn of the additional color.
- R6-FLO-6 sc
- R7-8-6 sc (12)
Fasten off leaving a long end for sewing. Attach the antenna to the head.
Ears (make 2)
Use the yarn of the main color.
- R1 – 5 sc in magic ring, 1 ch, turn (5)
- R2 – inc, 1 sc, inc2, 1 sc, inc, 1 ch, turn (9)
- R3 – inc, 3 sc, inc2, 3 sc, inc, 1
- R4 – inc, 5 sc, inc2, 5 sc, inc, 1 ch, turn (13) ch, turn (17)
- R5 – inc, 7 sc, inc2, 7 sc, inc (21)
Fasten off leaving a long end for sewing.
Attach the ears to the head. You can decorate them with felt.
Legs (make 4)
Begin with the yarn of the main color.
- R1-6 sc in magic ring (6)
- R2 – *inc* repeat 6 times (12)
- R3 – *3 sc, inc* repeat 3 times (15)
- R4-15 sc
- R5 – *3 sc, dec* repeat 3 times (12) Stuff the detail.
- R6 – *dec* repeat 6 times (6)
Continue with the yarn of the additional color.
- R7-6 sc
- R8 – inc, 5 sc (7)
- R9-7 sc
- R10 inc, 6 sc (8)
- R11-8 sc
- R12 inc, 7 sc (9)
- R13-9 sc
- R14 – inc, 8 sc (10)
Fasten off leaving a long end for sewing.
If you don’t want the doll to be movable just attach the legs to the body. The robocat should sit.
To make the doll movable at first sew up the hole on the top of each leg.
Then attach the legs to the body using button joints.
Decorative details (make 2)
Use the yarn of the additional color (or any other color if you use more than two colors).
- Ch 5, start in the 2nd ch from hook:
- R1 – 1 sc, 1 hdc, 1 dc, 1 tr (4)
Fasten off leaving a long end for sewing. I attach these details to the head below the ears, but you can find any other place for them.
You can also decorate the doll according to your wishes. You can add a screen and buttons (it’s a robot after all), you can make the collar with a bell or charm.
Designer; Ann_the_amigurumer On Instagram