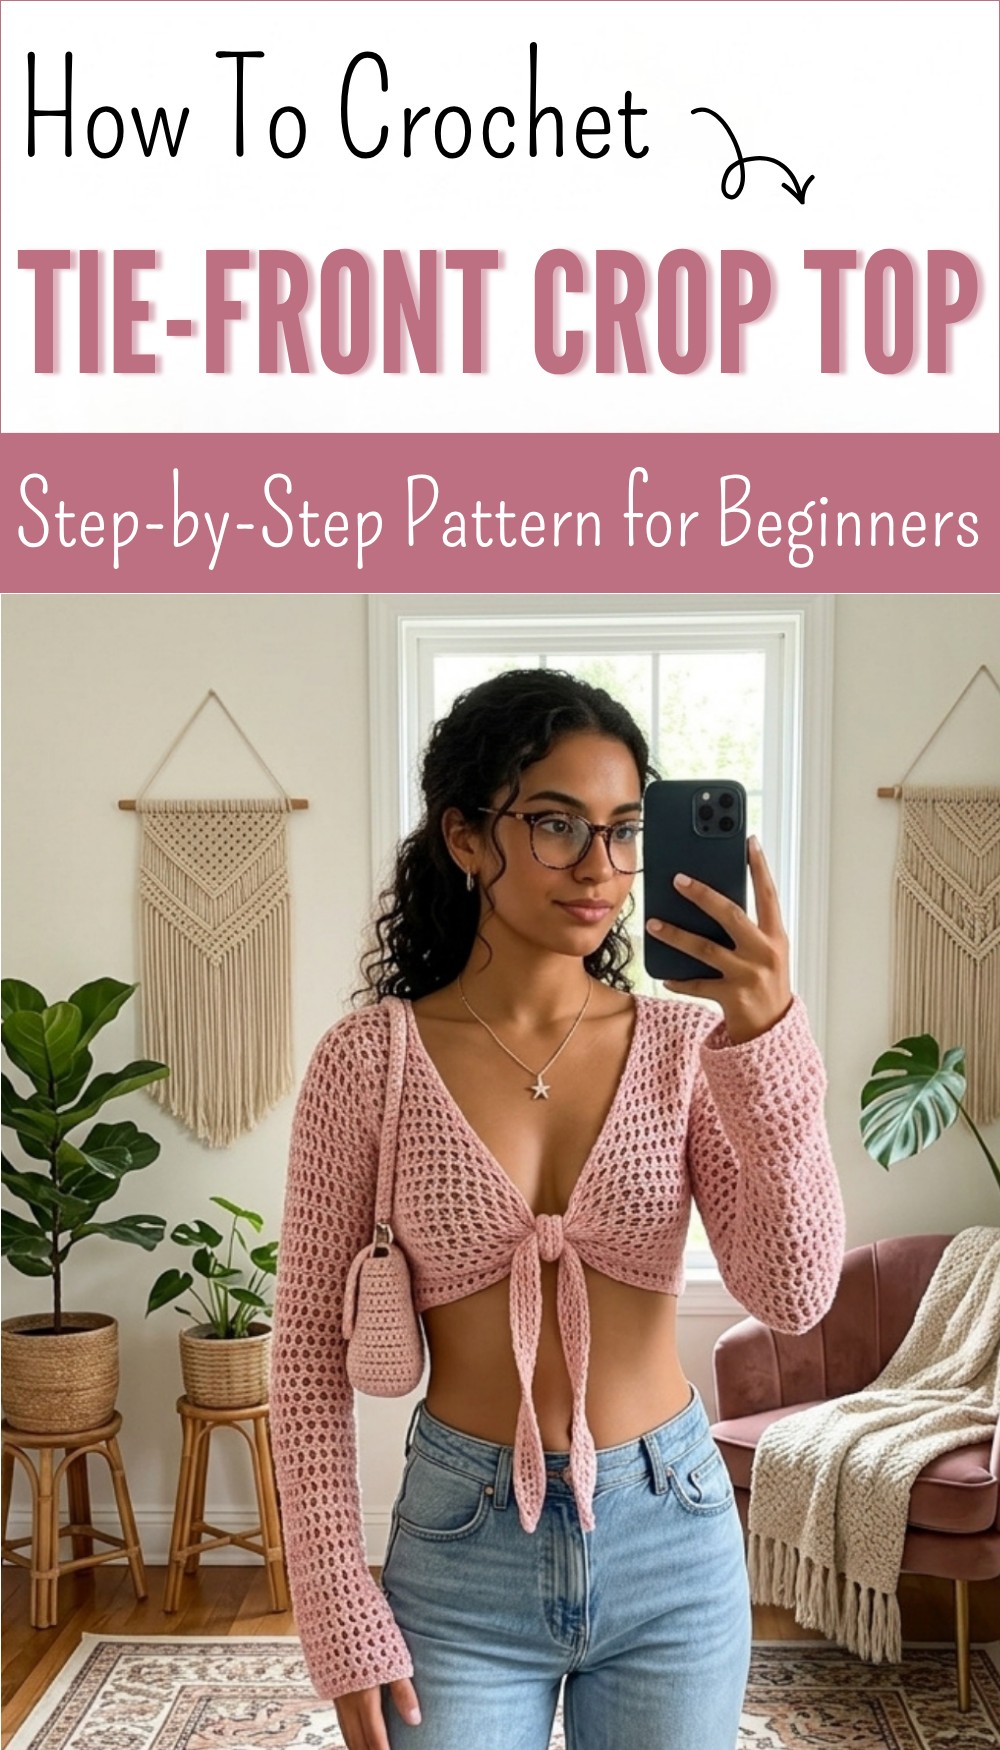
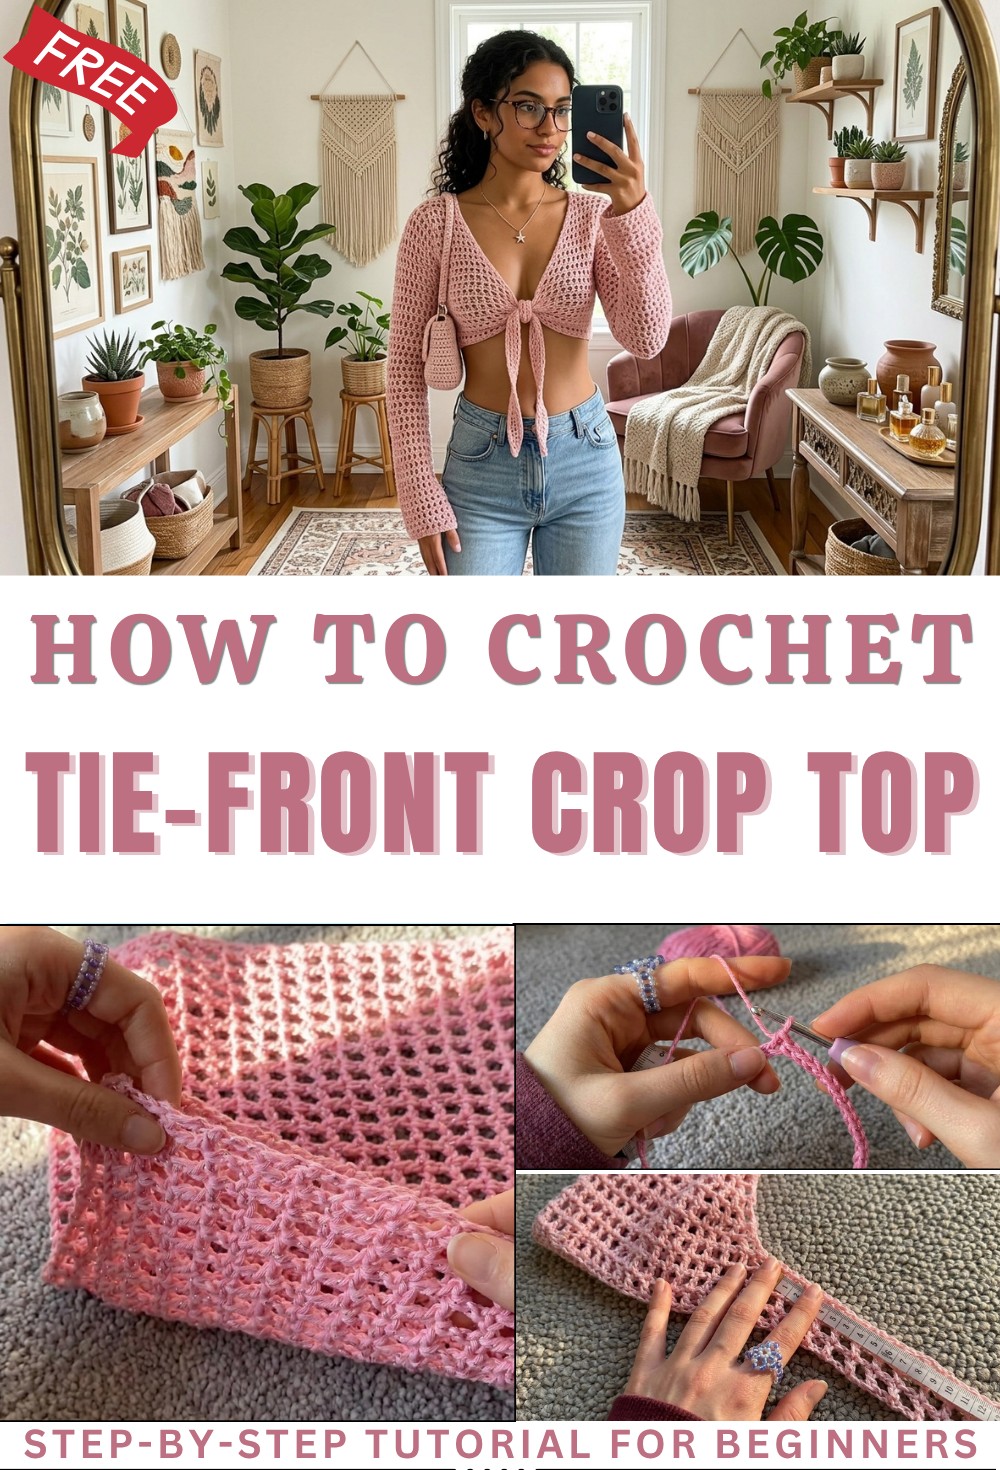
Free Crochet Tie-Front Crop Top Pattern for Warm Days
Snag your free crochet tie-front crop top pattern and enjoy a cute stylish look that brings comfort and breezy charm to any outfit every day.
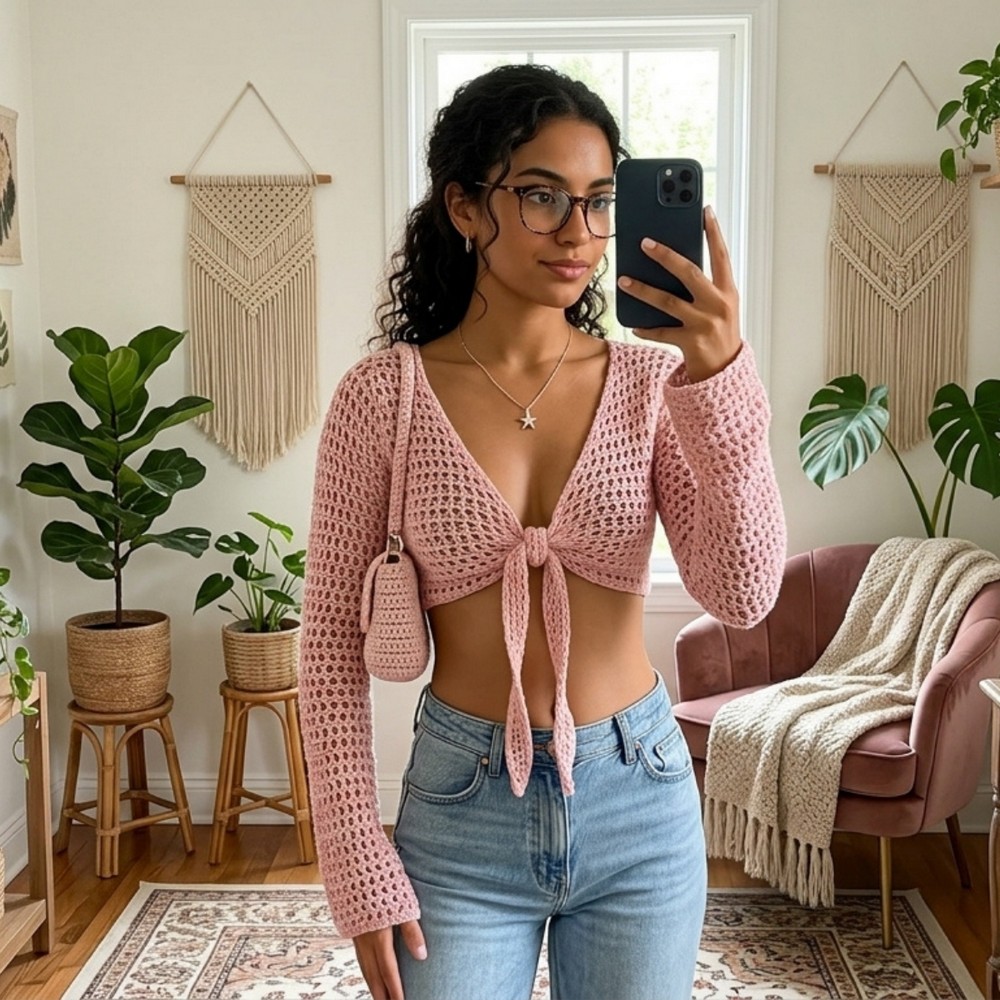
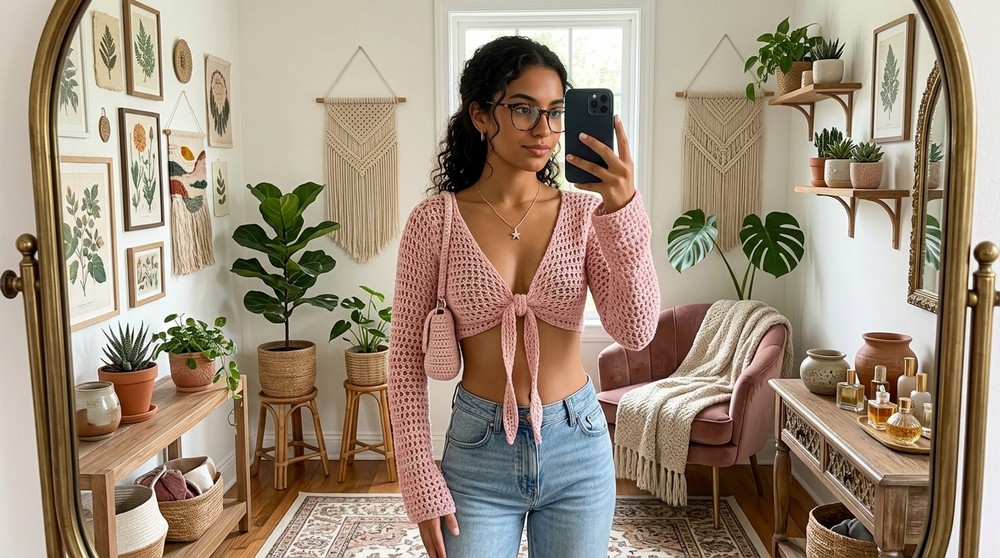
Bright colors and an easy front tie make this top a cheerful and confident choice for any day. Gentle crochet stitches form a cropped shape that flatters all sizes, bringing out a playful style you can wear with jeans, skirts, or shorts. Using the crochet tie-front crop top pattern gives you a way to personalize each top, adjusting the tie at the front for that perfect, comfortable fit.
Easy Crochet Tie-Front Crop Top Pattern—Free to Use
The lightweight fabric feels breezy on sunny afternoons and layers easily under jackets when the air turns cool. Simple lines and an open design highlight your favorite accessories and make each outfit feel new. With a look that’s both cute and practical, this top becomes a go-to favorite, bringing smiles and fun to any closet. Perfect for everyday wear or special days out, this piece is easy for anyone to enjoy and wear with confidence.
Free Crochet Tie-Front Crop Top Pattern
Materials
- Yarn: 4-ply Cotton Thread (approx. 200g for size M; adjust for your size)
- Crochet Hook: 4mm (G-6) hook
- Large Tapestry Needle: For sewing parts together and weaving in ends
- Scissors
- Stitch Markers: (Optional; to mark sleeve or body for easier sewing)
- Measuring Tape: (Highly recommended for precision)
Key Abbreviations
- ch = chain
- sl st = slip stitch
- dc = double crochet
- st(s) = stitch(es)
- rep = repeat
- RS/WS = right side/wrong side (for noting sides, optional)
Special Notes
- Pattern is made-to-measure for best fit: Always check measurements on your own body.
- Sleeves and body sections are worked as flat panels and sewn together.
- Yarn requirements and number of stitches are approximate—adjust as needed for your fit.
- Always ensure an even number of chains for sleeves and odd number for front/back sections to keep the mesh symmetry.
- Work is primarily in an open mesh: [dc, ch 1, skip 1] sequence, creating mesh squares.
Pattern Instructions
1. Make the Sleeves (Make 2)
Foundation:
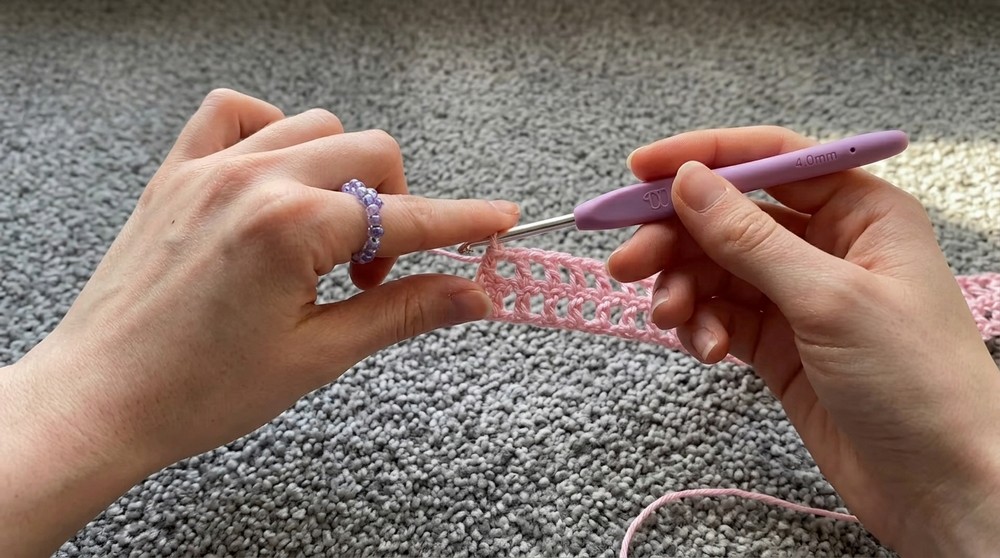
- With 4mm hook, chain a (even) number of stitches equivalent to your upper arm (bicep) measurement. Do not stretch; lay the chain flat along your arm.
- Example: Ch 46 for approx. 26 cm. This will vary according to your measurement.
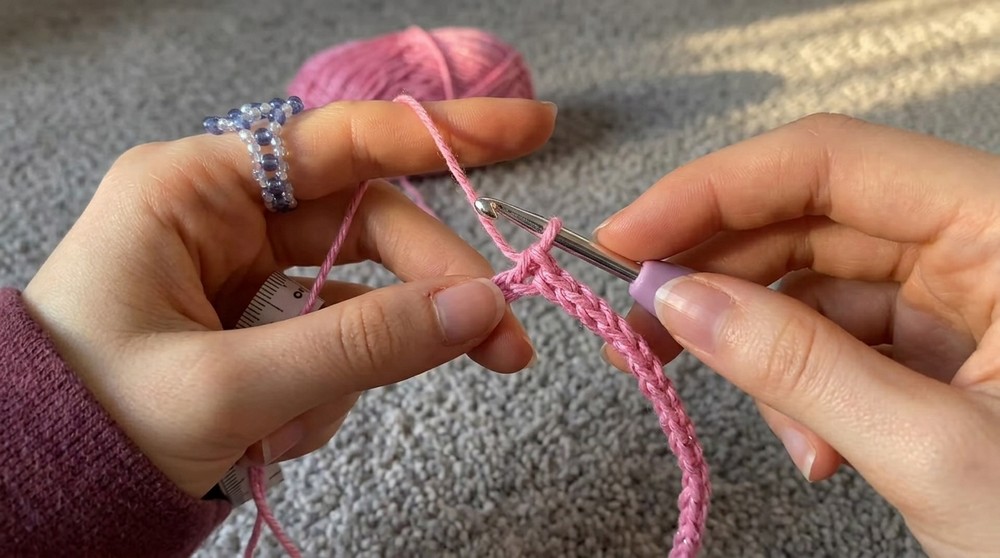
Form Sleeve Circle:
- Sl st to first ch, being careful not to twist the chain.
Row 1:
- Ch 4 (counts as 1 dc + ch 1).
- Skip 1 ch. Dc in next ch. Ch 1.
- Repeat: Skip 1 ch, dc in next ch, ch 1 to end.
- For the last segment, ignore the last chain and the starting sl st.
- Sl st into 3rd ch of the beginning ch-4 to close the round.
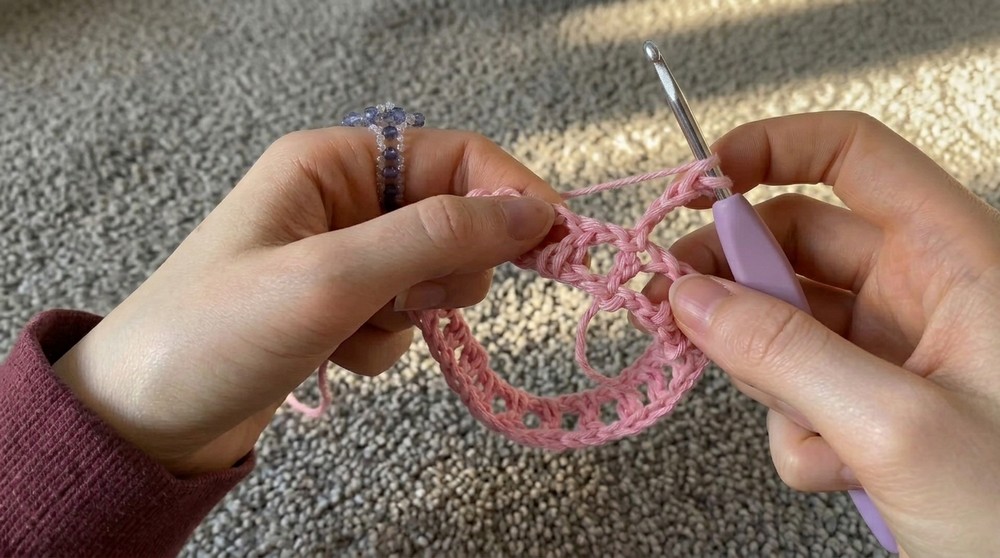
Row 2:
- Ch 4, turn.
- Dc in dc from previous row, ch 1; rep across.
- Work the last ch-1 and dc in the final dc, ignoring any extra ch or space.
- Sl st to 3rd ch of beginning ch-4.
Repeat Row 2
Until the sleeve measures your desired length from bicep to wrist or fingertip (Example: ~60cm).
To Finish:
- Sl st at the end of the final round, fasten off, leaving a long tail for sewing.
Repeat for second sleeve.
2. Front Panels (Make 2 Triangles)
Foundation:
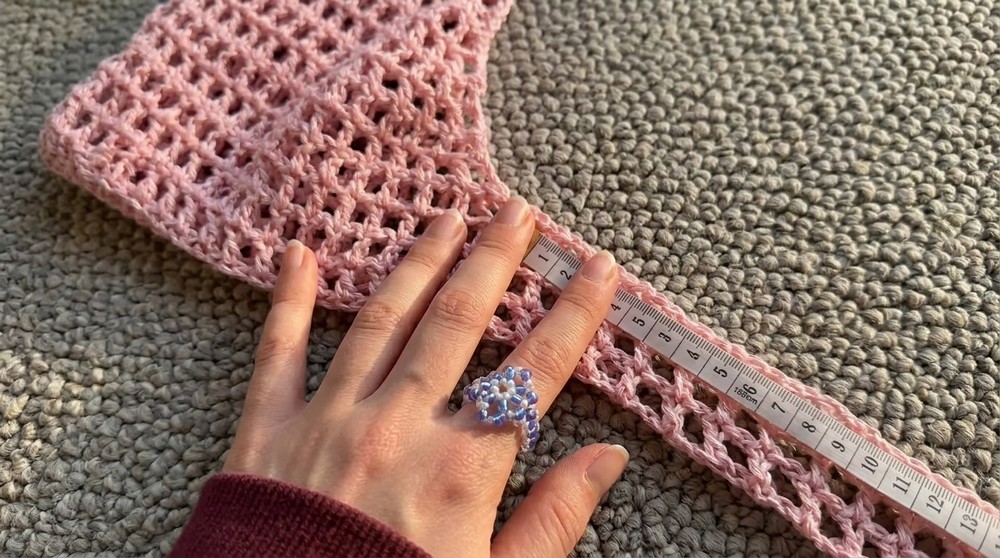
- Ch an (odd) number to reach from the middle of chest to below your armpit (measure against yourself).
- Example: Ch to ~22cm.
Row 1:
- Skip 4 ch. Dc in 5th ch from hook.
- Ch 1, skip 1 ch, dc in next ch. Ch 1, skip 1 ch, dc in next ch.
- Repeat to end; with odd number, you should finish with a dc.
Row 2 (Decrease Row):
- Ch 4, turn. Dc in last dc of previous row, ch 1, dc in next dc, ch 1, dc in next dc…
- At the end, when only 3 sts remain, skip the middle st and work the last dc in the 3rd ch of previous row.
- Ch 1, sl st into that 3rd ch to finish the row.
Row 3 (No Decrease):
- Ch 4, turn. Skip first dc, dc in next dc, ch 1, dc in next dc…
- Work last dc in turning ch (from previous row).
Row 4:
- Repeat Row 2 (with decrease at the end).
Continue alternating: One row without decrease, one row with end decrease until panel is around 10cm wide and 27cm long (or to your own measurements).
Straight Rows:
- When desired width is reached, work straight rows (no decreasing at end) until panel measures from below chest to shoulder (Example: ~33cm).
End:
- Finish off, leaving a tail for sewing.
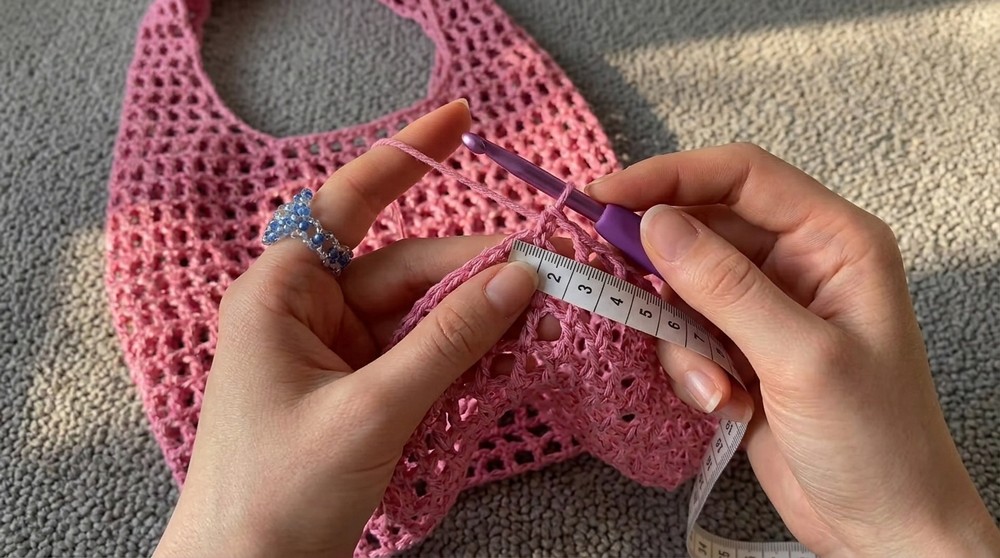
Tie Section:
- Attach yarn to the top/outer corner of the triangle.
- Ch 4, dc in next row edge space, ch 1, dc in next row edge, repeat for 3cm wide and 25cm long (try on for desired length).
- Fasten off, leave tail.
Repeat for other front panel.
3. Back Panel
Foundation:
- Ch an (odd) number to fit the width of your back (shoulder-to-shoulder, underarm to underarm).
- Example: Ch to ~40cm, or 69 ch.
Row 1:
- Skip 4 ch, dc in 5th ch from hook. Ch 1, skip 1 ch, dc in next ch, repeat across.
Rows 2–(desired length):
- Ch 4, turn. Dc, ch 1 in each dc across. Repeat until panel is about equal in row count to the front panels minus 2 rows (example: If each front had 23 rows, make 21 rows for back).
Shoulder Shaping:
- At each top corner of the back, work 2 rows of mesh (dc, ch 1…) over the number of “squares” to match the shoulder width of the front panels (e.g. 9 mesh blocks per side, if front triangles have 9).
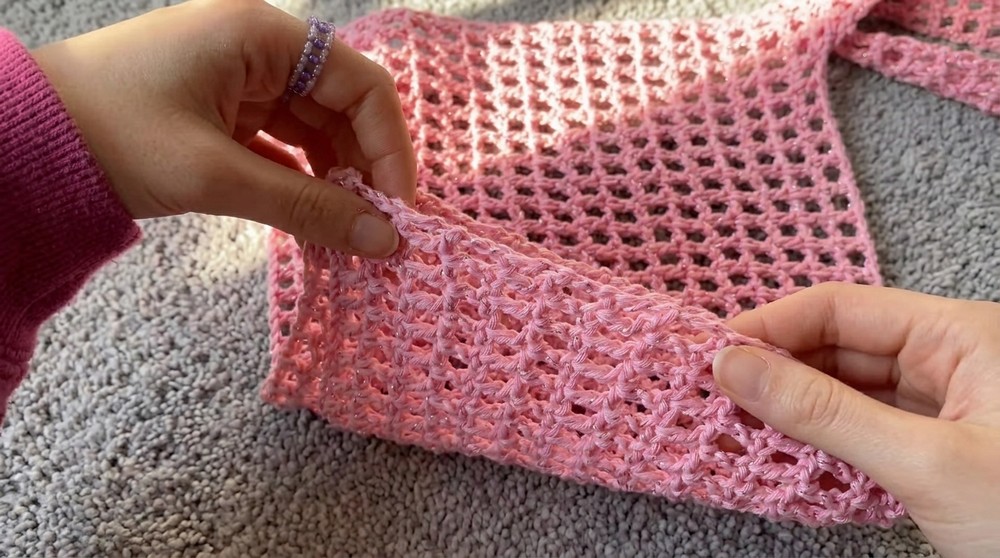
4. Assembly
- Shoulders:
- Use a tapestry needle and matching yarn.
- Sew front panels to each side of back panel at the 2 shoulder blocks (row ends).
- Sleeves:
- Fold sleeves in half and sew flat edges to arm openings.
- Sew up the sleeve seam and continue down the body (side seam, armpit to hem) in one go.
- Finishing:
- Weave in all loose ends. Trim excess.
Conclusion
With this clean, neat mesh pattern and simple shaping, you’ll have a stylish, breezy tie-front top with long sleeves. The design allows for customization to your exact body measurements, ensuring a flattering fit.
Pattern Corrections & Tips
- Correction: Focus on getting chain counts correct (even for sleeves; odd for body) to preserve the mesh pattern and easy joining.
- Tip: Try on panels as you go. If you need a more fitted sleeve, decrease mesh blocks at the wrist.
- Tip: For a neater finish, use invisible seaming or mattress stitch.
- Tip: Cotton yarn keeps the top light and comfortable, but you can substitute any smooth yarn.