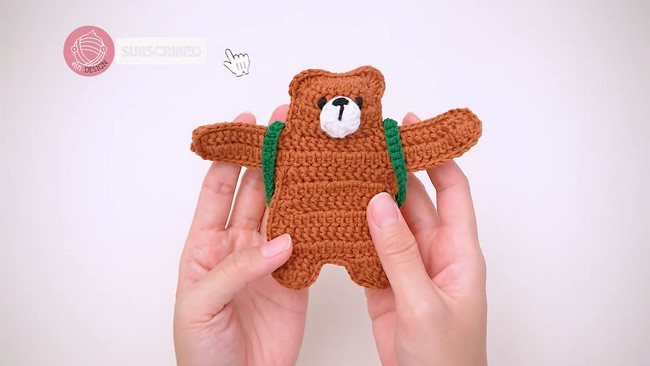
How to Crochet Travel Hug Bear EarPods Pouch for Beginners

Learn how to crochet an adorable hug bear EarPods pouch for your daily or occasional travels with a step-by-step tutorial from AnDesign_Craft. It will keep your EarPods safe while looking cute hanging on your bag. The design features a bear flat bear wearing a backpack that will act as your EarPods pouch.
Besides an EarPods pouch, this creative pouch can also act as a nice hanging decor for your home and can accommodate few things. The tutorial provided is detailed, making it a even for beginners. It will improve your flat work and shaping skills.
The complete video tutorial for crocheting this EarPods pouches will be available at the end of this post. For getting more insights about it, read more below.

Skills Used: Chain stitch, single and double crochets, and applying increases and decreases to shape the bear pouch and its backpack. The tutorial also introduces a special method to avoid gaps in double crochets, ensuring a neat and professional finish.
Additional skills include crocheting in the back bump loop for clean edges, joining pieces with single crochets, and sewing details like ears, eyes, and a nose.
Guide Span: 21 Minutes Only
Personalization Tips: Adding embellishments like bows and blushes can give this bear a unique character. You can also modify the backpack by adding a small zipper, adjusting its size, or decorating it with patches or appliqués. It is a Scot Boy bag whose colors should be retained in yellow and green.
Free Crochet Bear Earpod Pouch Pattern
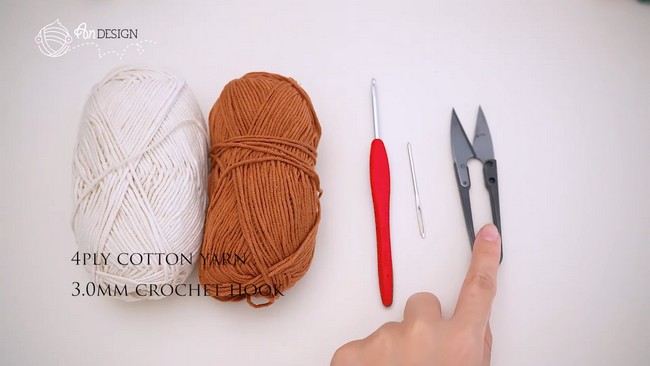
Materials
- Yarn: Boreply (or similar) cotton yarn in light brown (main), small amounts of black (features) and cream if desired
- Crochet Hook: 3mm
- Darning Needle
- Scissors
- Small Magnet (for secure closure, optional)
Abbreviations (US Terms)
- ch: chain
- sc: single crochet
- dc: double crochet
- inc: increase (2 dc in same st)
- dec: decrease (dc two together)
- st: stitch
- sl st: slip stitch
- MR: magic ring
Special Notes
- All instructions are in US crochet terms.
- Work tightly for best structure.
- The pouch is worked in pieces which are then assembled.
- The hand/ear/bag details are added as you go; small magnets can be inserted for secure closure.
- Black yarn is used to embroider eyes and nose details.
Pattern
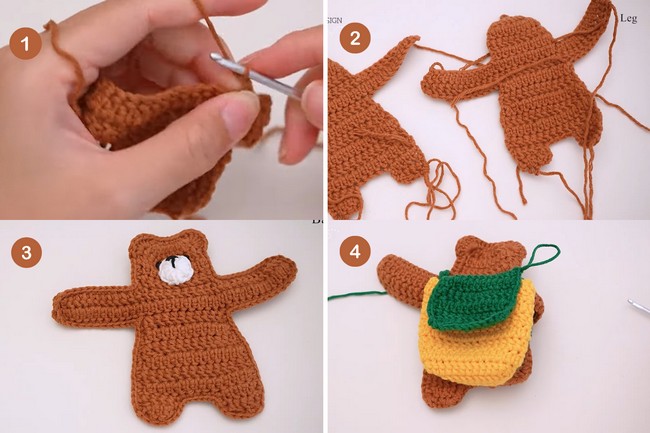
A. Bear Head (Make 2; Front & Back)
Foundation
- Ch 5.
Row 1:
- Flip chain and work in back bump loop.
- Ch 2 (does not count as st).
- Dc inc in each st across (See Special Technique 1 below for gapless dc).
- [Special Technique 1: For the first dc, work as normal. For subsequent increases, insert hook through the side loop of the previous dc, yarn over, pull through, then insert into back bump of next ch, yarn over, pull through (3 loops on hook), finish as normal dc.]
- At end: 10 dc
Rows 2 to 4:
- Ch 2, turn.
- Dc in each st across (insert into stitch as desired for neat edge, see tip).
- (10 sts per row)
Row 5 (Forming the Hands):
- At the row ends, Ch 12 on both sides to create the arms.
- Ch 2, turn.
- Dc in each st across, including chain arms. Work into back bumps on the chain for a smooth finish.
- (total 34 sts in this row)
- Row 6: Repeat Row 5 (dc in every st); cut yarn after row.
B. Body Section
- Join yarn to the 13th st of the previous row (i.e., first st of body section):
- Make a knot to secure.
- Ch 2, dc inc in first st, dc in the next 8 sts, dc inc in last st. (12 sts)
- Continue as per written pattern or maintain simple shaping for a rounded bear body (typically 12 sts per row for 3–4 rows).
C. Leg (Make 2 for each side)
- Join yarn at body base, ch 2
- Row 1: 5 dc, turn. (5 sts)
- Row 2: Ch 2, 5 dc, turn.
- Row 3: Ch 2, [dc dec, dc, dc dec] (3 sts)
- Fasten off. Repeat for second leg on each side of the body’s base.
D. Assembly
- Align both bear pieces (front & back).
- Single crochet around the entire edge, joining the two layers.
- When at the hand section, insert a magnet into each hand for closure.
- When at the top, leave opening for pouch.
E. Bear Ears (Make on front face)
- At desired spot: 6 dc in one stitch (creates a half-circle/ear).
- Sc in next stitch to anchor, repeat for second ear.
F. Nose
- With brown or cream yarn:
- MR, ch 2 (does not count). 12 dc in ring. Tighten and sl st to join.
- Sew nose to head, centered between ears (rows 2–3).
- Use black yarn to embroider oval nose and eyes.
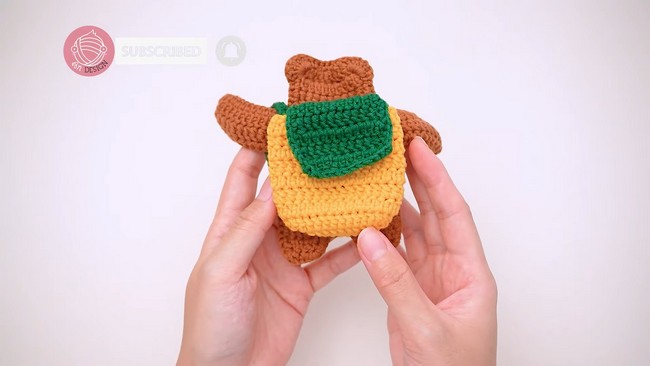
G. Bag/Pouch
Base
- Row 1: Ch 12
- Rows 1–2: Ch 2, dc in each st, turn. (Start every row with ch 2.)
Sides
- Round 1: Rotate base to work along edge, 5 dc along short side, 12 dc across front, 5 dc up other side (22 sts total).
- Continue working evenly in the round for 10 rows (or desired height).
- Sew this pouch to bear body using mattress stitch or whip stitch.
H. Bag Cover
- From row 5 of bear body: Attach yarn.
- Ch 1, 8 sc across to form cover/flap.
- Work several rows (6–7 or as needed) of sc for a flap.
- Single crochet around edge.
I. Strap
- Ch 20, ch 1 turn.
- Row 1: 20 sc.
- Fasten off, sew ends securely to bag sides.

Conclusion
You have now completed your charming Crochet Bear Earpod Pouch. Not only is it practical and sturdy but also adorable and customizable! Hang it on your bag, gift to friends, or use for your daily tech gear.
Pattern Corrections & Tips
Corrections:
- Ensure stitch counts remain consistent for a symmetrical result (double check after increases and when joining pieces).
- Work row ends neatly by inserting into both ch loops or as preferred for a flat edge.
Tips:
- For tight, gapless stitches, use the side-bump insertion for double crochet as described.
- Insert and anchor the magnet securely in the hand section while joining for reliable closure.
- Use a yarn needle for embroidery details and to securely sew pieces together.
- Adjust pouch/bag size by adding rows or stitches as needed for your earpod case.