Crochet Baby Blanket Free Pattern for Precious Gifts
Keep little ones cozy with this free crochet baby blanket pattern that offers warmth adds soft comfort and suits nursery gifts & daily use.
A gentle piece begins to form with soft layers that feel calm and full of comfort for little ones. The Crochet Baby Blanket pattern helps shape a cozy blanket that looks smooth, warm, and pleasing to the eyes. Its soft texture and simple design make it perfect for wrapping babies, placing in cribs, or using during rest time to give a peaceful feeling. The blanket can also be a thoughtful gift for newborns, bringing care and love in a handmade form.
Crochet Baby Blanket Free Pattern for Newborns
The pattern is easy to understand so anyone can complete it without stress or confusion. The finished blanket looks neat and beautiful with a soothing appearance that gives a sense of warmth and safety. It offers comfort, beauty, and gentle protection, turning simple material into a soft baby cover that adds love, calmness, and a tender touch to everyday care for little ones.
Soft Shell Baby Blanket with Decorative Border
Materials
- Yarn: Double Knit (DK) / Light Worsted Weight (Category 3) – Approximately 500g total
- Blanket: 4 x 100g balls (main color)
- Border: 1 x 100g ball (+ approx. 30g extra if desired for more elaborate borders or color-changing)
- Yardage: Each 100g ≈ 330 meters
- Hook: US G/6 (4.0 mm) crochet hook (or size recommended on yarn label)
- Notions:
- Stitch markers or contrasting yarn for counting
- Measuring tape
- Yarn needle (for weaving in ends)
- Scissors
- Optional: Ribbon (if weaving into border)
Abbreviations (US Terminology)
| Abbreviation | Meaning |
|---|---|
| ch | chain |
| sc | single crochet |
| dc | double crochet |
| fpdc | front post double crochet |
| sl st | slip stitch |
| rep | repeat |
| st(s) | stitch(es) |
| sp | space |
| MC | main color |
Special Stitches:
- Modern Double Crochet: This refers to a dc made by a specific pull-through technique as described in the steps (see details below).
- Puff Stitch: Long puff stitch used in the final border (see Border Round 8 for instructions).
Notes
- Size: Approx. 40″ x 43″ (102 cm x 109 cm), very stretchy.
- Multiple: Blanket base chain is a multiple of 6 + 4 (e.g., 150 + 4 = 154 chains).
- Blanket is worked in rows “side-to-side” (long edge forms the width).
- Only two rows are repeated for the main body.
- Border is worked in the round around the finished rectangle.
- All stitches use US crochet terminology.
Blanket Instructions
Step 1: Foundation Chain
- Ch 154 (for approx. 35″ width without border; adjust in multiples of 6 + 4 for size).
- Mark every 10 or 20 chains to ease counting.
Step 2: Row 1 (Foundation Row – Full Shells)
- Skip 1 ch, sc in 2nd ch from hook.
- Sc in next ch.
- [Shell]: Skip 2 ch, in next ch work 7 modern dc (see “Modern DC” below for technique).
- Skip 2 ch, sc in next ch.
- Rep from [Shell] to end: skip 2 ch, 7 modern dc in next ch, skip 2 ch, sc in next ch, repeat.
- When 1 ch remains at end, sc in the last ch.
Modern Double Crochet Technique:
- Yarn over, insert into ch/sp, yarn over, pull up loop (3 loops on hook).
- Yarn over, pull through first loop only (3 loops remain).
- Yarn over and pull through the next two loops (2 loops remain).
- Yarn over and pull through both remaining loops (dc complete).
At row end: You should have 2 sc at beginning and end, and 25 shells (each of 7 dc).
Step 3: Row 2 (Half-shell Start)
- Ch 3 loosely, turn.
- Work 4 modern dc into next sc [both loops] → this creates a half shell.
- Shells: For each shell, skip 3 dc, sc (back loop only) in 4th dc (the shell’s center).
- In each subsequent sc, work 7 modern dc (back loop only).
- Continue alternating: [sc in 4th dc (back loop only), 7 modern dc in next sc (back loop only)] to the end, until 2 sc remain.
- In final sc, work 4 modern dc [both loops] to finish the last half shell.
- In last ch, 1 modern dc (for border support).
Step 4: Row 3 (Full Shell Start)
- Ch 1, turn. Sc in first st, sc in next st (both loops).
- Shells: Skip 3 dc, sc (back loop only) in 4th dc of half-shell.
- In each subsequent sc, 7 modern dc (back loop only).
- Repeat: [sc in 4th dc of shell (back loop only), 7 modern dc in next sc] across.
- End with 2 sc (both loops).
Step 5: Repeat Pattern
- Repeat Rows 2 and 3 alternately until blanket measures approx. 40″/102cm tall, or you have 56 rows (each long edge should have 28 shells).
Preliminary Row for Border Support
Before starting the border, work a foundation edge in single crochet:
- Ch 1, turn. Sc in every st across (both loops).
- At row end, do not fasten off.
Border Instructions
Border Round 1: Preparing the Foundation
- Ch 3, turn.
- (Right Side Facing) Work 1 dc in each sc and 2 dc in each ch-2 sp along the first long edge (approx. 153 dc per side; spacing may need small adjustment for your tension).
- In each corner, ch 1, work 4 sc evenly.
- Down the short sides, sc evenly across edge stitches (approx. 147 sc per short edge; adjust for stitch count to keep corners square).
- Repeat to complete the round; sl st to starting ch to join.
Border Round 2: Single Crochet
- Ch 1.
- Sc in each dc/sc around, adding 2 sc in each corner to maintain shape.
- Mark the corners if needed for the next rounds.
Border Round 3: Chain Loop Foundation
- Sl st to corner, ch 4.
- Chain Loop Pattern:
- Skip 2 sc, sc in next sc. Ch 4, skip 2 sc, sc. Repeat across each side.
- At corner, work: [Ch 4, sc in corner] repeat if needed. Ensure each side has an even number of loops; adjust by skipping fewer/extra stitches if needed.
- Join with sl st to beginning chain.
Border Round 4 and 5: Expanding Chain Loops
- For each round, ch 4, sc in each loop from previous round.
- Work evenly around all sides, including corners.
- After Round 5, join with sl st to starting point.
Border Round 6: V-Stitch Row
- Ch 2.
- V-stitch in each loop:
- In each loop: [dc, ch 2, dc], ch 2, sc in next loop, ch 2, in next loop [dc, ch 2, dc].
- Repeat across.
- Corners: In corner loop, work 2 V-stitches separated by ch 2 (i.e., [dc, ch 2, dc, ch 2, dc, ch 2, dc]).
- After each V-stitch, ch 2, sc in next loop.
- Join to start with sl st.
Border Round 7: Petal & Puff Detail
- In each V-stitch:
- Work sc around the post of beginning dc.
- In next ch-2 sp, 2 dc, ch 2, 2 dc, then fpdc around the next dc.
- Skip any sc, move to next V-stitch.
- Corners: In each corner (from 4 dc/2 V-stitch clusters), work 3 dc, ch 2, 3 dc between front post dcs.
- Join round.
Border Round 8: Flower and Puff Petals
- In each ch-2 space (center of V):
- Sc, [ch 3, sc in same space] x 3 (makes 3-petal flower).
- Next, sc in top of next 3 dc.
- Next, puff stitch: Yarn over, pull up loop 2x in same stitch, YO, pull through all loops for elongated puff.
- Corner Petals: In each corner, work 3 flowers within the expanded corner stitches, as shown in the sequence.
- Work around entire blanket; join with sl st.
Conclusion
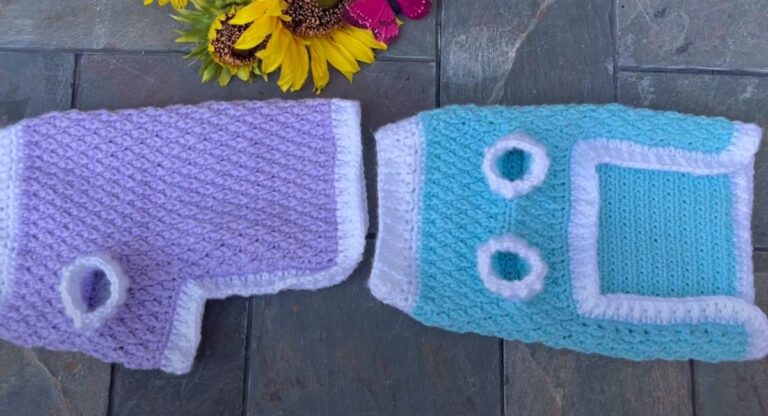
This soft, richly textured baby blanket showcases deep shells and a scalloped, floral border. The two-row body repeat is soothing and suitable for even advanced beginners. The border, while detailed, yields a spectacular finish.
Pattern Correction
- The original “modern double crochet” appears to be a variation involving a pull-through on first loop, then standard dc finish; instructions are included for clarity.
- Stitch and loop counts may vary slightly according to your tension; always check sizing and make small adjustments on foundation or border if needed.
- Ensure the blanket shape is even by slightly “shaking” or lightly blocking before measuring or attaching the border.
Tips
- Mark every 10th chain when working the long foundation chain—this helps ensure accuracy.
- When working in rows, always count shells and turning chains to avoid shifting your pattern.
- Use a stitch marker at the beginning of border rounds to help easily identify the starting point.
- If desired, change the color for the final border round to match nursery themes.