How to Crochet Beautiful Peony Flower for Spring
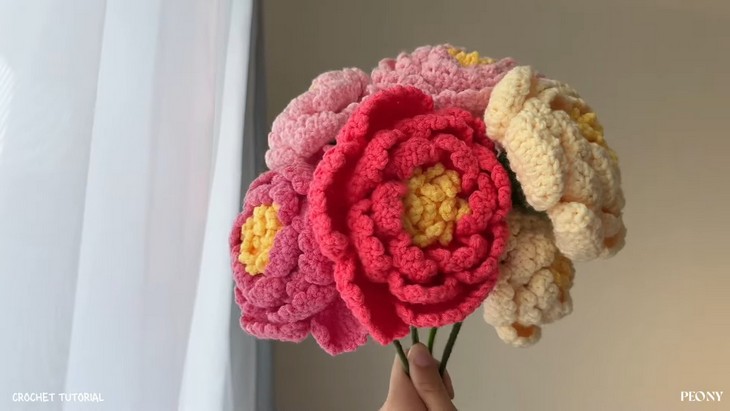
Learn how to crochet a realistic peony flower with layered petals, a textured center, and a stem perfect for beginners. This flower can be easily resized by changing the yarn and hook size. The tutorial is perfect for patient beginners to intermediate crocheters. Crochet many flowers and form a lovely wedding bouquet for your friend. Let’s get started!

Project Features: This crochet flower features 3 layers of petals, each layer increasing in size and row count
Skills Used: This peony project uses key crochet skills like magic ring, single crochet, double crochet, and slip stitch, with special focus on front- and back-loop-only techniques for shaping. You’ll also learn increasing and decreasing, working in rounds, and layered petal construction.

Picot edging is added to curl the petals naturally. The tutorial involves attaching yarn in hidden loops and stuffing the base for a full shape. It’s a rewarding project for those comfortable with basic crochet.

Free Crocheted Peony Flower Pattern
Materials
- Yarn: 4-ply milk cotton (or similar DK/light worsted weight yarn) in 3 colors:
- Main petal color (pink, peach, or your choice)
- Flower center (yellow)
- Leaves and calyx (green)
- Crochet Hook: 2.5 mm (Tulip brand recommended, but any of similar size is acceptable)
- Stitch Markers (optional, but highly recommended for beginners)
- Darning Needle (for sewing in ends)
- Flower Wire: Thin wire for leaves, a thicker 40 cm floral stem for the flower (about 2 mm thick)
- Polyfill or Yarn Scraps: For stuffing the center
- Hot Glue Gun (optional, for securing parts)
- Scissors
Key Abbreviations and Special Stitches
- ch: chain
- sc: single crochet
- hdc: half double crochet
- dc: double crochet
- sl st: slip stitch
- inc: increase (2 sts in same st)
- dec: decrease (single crochet two together)
- st(s): stitch(es)
- FL: front loop only
- BL: back loop only
- picot: Ch 2, insert hook in indicated stitch(es), yarn over and pull through all loops on hook (forms a small point)
- Magic Ring: Adjustable ring
Special Notes
- Pattern is written in US Crochet Terminology
- Adjust flower size by changing yarn weight and hook size.
- Use stitch markers to keep track of rounds and back/front loops.
- The pattern is constructed in several parts: Center, Petal Layers (3), Leaves (3), Assembly.
Pattern

Center of the Flower
With Yellow Yarn
Round 1:
- Make a magic ring.
- 8 sc into ring.
- Close tightly and join with sl st. (8 sts)
- Tip: Mark first st with stitch marker
Round 2: (Making Loops for Later Petal Attachments)
Repeat 8 times:
- Ch 8,
- FL sl st in next st (use only front loop),
- sl st in next FL.
(Jump to next st, always using FL and keeping BL unworked for later petal attachment.)
End with sl st to base of first petal loop.
Round 3 (Working in Back Loops):
- Move to BLs saved from Round 1 (use stitch marker to find first BL).
- Ch 1, in each BL around: 2 sc in each BL (8 inc). (16 sts)
- Join with sl st.
Round 4 (Repeat Layer Creation):
- Ch 8, FL sl st in next st (skip next st, sl st in FL of the second st).
- Repeat around: Ch 8, FL sl st in next st, skip next, FL sl st in second.
- Complete 8 petal loops.
- Join with sl st.
Round 5 (Back Loops of Previous Round):
- Ch 1.
- Repeat around (alternating):
- 1 sc in BL of next st,
- 2 sc in BL of next st (inc),
- Repeat to end (24 sts).
- End with sl st.
Round 6–8 (Green Yarn, Base for Leaves):
- Attach green yarn to next BL.
- Ch 1, sc in each BL around. (24 sts)
- Repeat for three rounds, joining with sl st each round.
- At end of Round 8, fasten off.
Flower Center Shaping & Stuffing
Round 9 (with Green Yarn continued):
- Ch 1; [sc, sc, dec] around (decreases for a total of 18 sts).
- Join with sl st.
Round 10:
- Sc in each st around (18 sts).
- Join with sl st.
Round 11:
- Repeat [sc, dec] around (12 sts in total).
- Join with sl st.
Round 12:
- 6 decreases to close (6 sts).
- Join with sl st, fasten off.
- Stuff firmly with yarn scraps or polyfill before final closing.
- Use darning needle to weave in and draw final closure tight.
Petal Layers
Each layer is worked onto reserved loops from earlier rounds.
Petal Layer 1 (with Main Petal Color Yarn)
Attach Yarn:
- Attach in any BL from Round 2 loops.
Repeat 6 times for 6 Petals:
- Ch 1, 4 sc across BLs to form petal base.
- Ch 1 and turn, [“Fake” dc] in first st (sc in st below + sc in left loop above to mimic dc height), then 3 dc in next 3 sts. (4 dc total)
- Ch 1 and turn, [“Fake” dc], (dc, dc inc) x2, dc.
- Ch 2, sc in middle base, ch 2, sl st at petal base.
Edging:
- Along each petal: sc, sc, [ch 3, sc in same st], skip, sc, ch 3, sc in same st, skip, repeat to tip, sc at end.
(Helps curl petal.)
Petal Layer 2
Foundation:
- Ch 3 at back. Attach yarn to third unworked sc behind Layer 1 petals of previous round.
- Ch 1 at join, 24 sc evenly around in BLs. Sl st.
- For each petal: Fake dc (as above), 2 dc, dc inc; Ch 1 and turn, [Fake dc], dc inc, dc, dc inc, dc; Ch 1 and turn, [Fake dc], dc, dc inc, dc, dc, dc inc, dc.
- Descend side of petal: [ch 2, sc in next loop], repeat to base, sl st at bottom.
- Edge with sc and [ch 3, sc] in every other st for ruffle.
Repeat above for all 6 petals.
Petal Layer 3
(Worked into last remaining BLs on green “belt”)
- Join with ch 3 to begin in third loop behind Petal Layer 2.
- Ch 1, [“Fake” dc, 23 dc] around. Sl st to close.
- Petals formed over next 18–20 sts as for previous layers, with increases as in Layer 2 but slightly larger. End each petal with a ruffled edge as before.
Leaves (Make 3: Left, Right, Middle)
Each leaf is crocheted over wire for shaping.
Left Leaf
- Ch 12.
- Insert wire along chain, ch 1 (13 total).
- Sc in 2nd ch from hook, 9 hdc, sc in each of next 2 ch.
- Ch 2, picot (insert hook through top and bottom ch, sl st).
- Along bottom side: sc, 4 hdc, ch 2, picot, 5 hdc, sc at end.
- Sl st and fasten off, wrap yarn around wire as stem.
Right Leaf
- Same as Left Leaf, mirrored: Sc, 5 hdc, ch 2, picot, 4 hdc, 2 sc, ch 2, picot, sc along other side, 9 hdc, sc at end.
- Fasten off and wrap yarn down wire stem.
Middle Leaf
- Ch 15, insert wire, ch 1 (16 total).
- Sc in 2nd ch, 12 hdc, 2 sc.
- Ch 2, picot, sc in top, work along other edge as before, then shape into leaf.
- At bottom, ch 4, turn, sl st across to create side serration.
- Finish by wrapping yarn down wire.
Assembly
Flower & Stem

- Shape floral stem tip into a spiral disc (helps anchor inside flower).
- Insert stem upwards into flower center before closing base.
- Use green yarn to sew and wrap tightly at flower base to secure stem; go up and down once for additional strength.
- Continue wrapping yarn down stem for 6–7 cm, then attach leaves by twisting or hot-gluing together while yarn-wrapping continues.
- Finish stem with glue at bottom and snip off excess yarn.
Finishing Touches
- Fluff and overlap petals to resemble a natural peony.
- Shape and bend leaves as desired.
- Secure any loose yarn ends and trim excess.
- Optional: Slightly steam-block petals to help them hold shape.
Conclusion
This detailed peony flower pattern replicates real peony blossoms with three lush layers of petals and gracefully shaped leaves. Carefully stuffing and shaping each part will ensure a beautiful, lasting result.
Pattern Corrections & Tips
- Always check stitch counts at the end of each round; petal sections must match the number of loops created on the flower base.
- For a more natural look, vary the yarn thickness/hook for petal layers (make outer petals just slightly larger).
- When working petals and leaves, be consistent with your turning and fake double crochet method for even rows.
- Stuff the center before final closures for best shape.
- If attaching multiple flowers for an arrangement, stagger their leaf directions and petal overlaps for realism.

Video Guide
https://youtu.be/9XdvawIBZdM