How to Crochet Bucket Hat for Baby Shower

Learn how to crochet an adorable cow-print bucket hat from scratch following a step-by-step tutorial for beginners and experts. The tutorial also explains how to crochet and attach uneven spots to enhance the design. Lightweight yet sun-blocking, the hat combines practicality and charm, making it a perfect accessory for everyday wear. The tutorial is beginner-friendly and engaging!
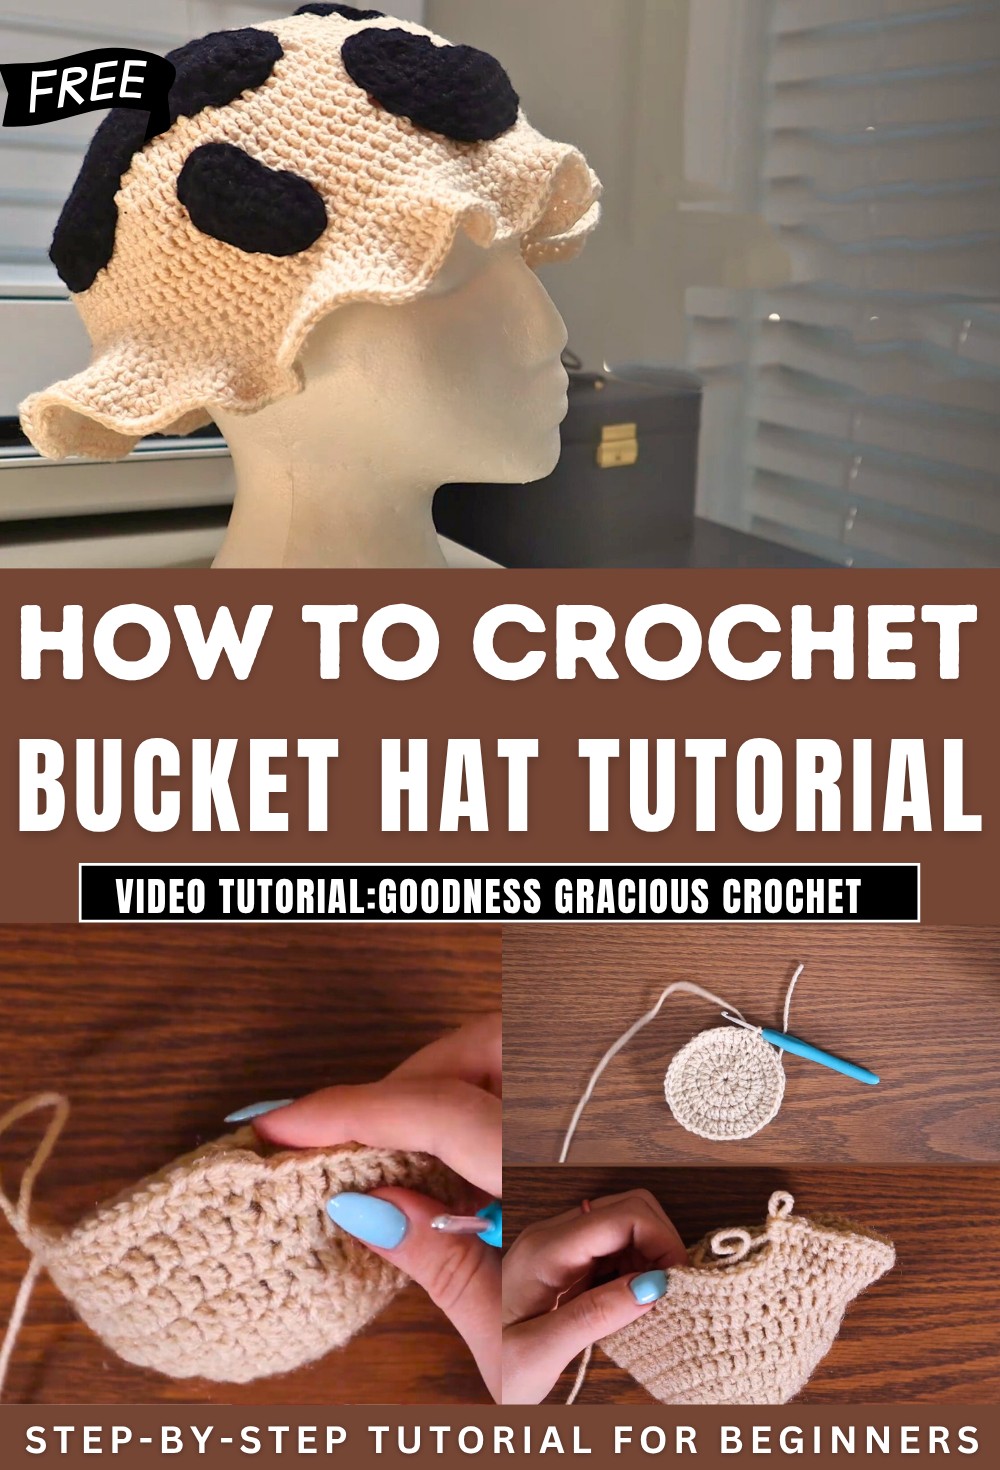
The video begins with Grace showcasing her handmade bucket hat inspired by a cow print design. She highlights the hat’s lightweight nature, noting it blocks sunlight effectively and remains cute and stylish. Grace admits the hat is unfinished, with some black dots missing, but shares a full 360-degree view of the progress so far. She invites viewers to follow along with her process as she demonstrates how to create the design step by step.
Free Cow-Print Bucket Hat Crochet Pattern
Materials List
- Yarn:
- Worsted weight #4 cotton or acrylic yarn in two colors:
- Main color (white or cream)
- Contrast/accent color (black or dark brown for spots)
- Worsted weight #4 cotton or acrylic yarn in two colors:
- Hook: 5.0 mm crochet hook (adjust size for fit and preferred drape)
- Tapestry Needle: For sewing in ends and attaching spots
- Scissors
- Stitch Markers (optional)
Abbreviations (US Terms)
- ch: Chain
- sl st: Slip stitch
- dc: Double crochet
- sc: Single crochet
- hdc: Half double crochet
- st(s): Stitch(es)
- inc: Increase (work 2 sts in same st)
Special Notes
- The hat is worked in joined rounds, top down.
- The sides and brim are added after the crown is completed.
- Adjust size by adding or omitting increase rounds on crown.
- Spots are made separately and sewn on, using varied stitches for an organic shape.
Pattern
Crown (Top of Hat)
With main color:
- Magic Ring, ch 1 (does not count as a st).
- Rnd 1: Work 10 dc in the ring, pull tail to close tightly. Sl st to first dc to join. (10 sts)
- Rnd 2: Ch 2 (does not count as st), 2 dc in each st around. Sl st to first dc to join. (20 sts)
- Rnd 3: Ch 2, [2 dc in first st (inc), 1 dc in next st] – repeat around. Sl st to first dc to join. (30 sts)
- Rnd 4: Ch 2, [2 dc in first st, 1 dc in each of next 2 sts] – repeat around. (40 sts)
- Rnd 5: Ch 2, [2 dc in first st, 1 dc in each of next 3 sts] – repeat around. (50 sts)
- Rnd 6: Ch 2, [2 dc in first st, 1 dc in each of next 4 sts] – repeat around. (60 sts)
- Continue increasing in this manner, adding 10 sts per round, with 1 more single dc between increases each round, until the crown covers the top of your head (~8–10 rounds for a standard adult).

Body (Sides of Hat)
- Ch 2, dc in each st around. Sl st to join.
- Repeat this round (no increases) for 3–4 inches or until desired depth is achieved (usually 6–8 more rounds).

Brim
- Start brim with hdc:
- Rnd 1: [hdc in next 4 sts, 2 hdc in next st], repeat around. (Increases every 5th st)
- Rnd 2: [hdc in next 3 sts, 2 hdc in next st], repeat around. (Increase every 4th st)
- Continue brim increases:
- Next rounds: You may alternate 6 hdc, inc, 7 hdc, inc, etc., to keep brim ruffled/outward as desired.
- For a frillier brim, maintain more frequent increases (as in the video: every 4th or 5th st).
- Optional ruffle edge:
- Work 3 hdc in one st at regular intervals in the last row.
- Fasten off and weave in ends.

Spots (Cow Print)
Make several using the accent color (black or dark brown). Spots should be irregular for a natural look!
Circle spots:
- Magic ring, ch 1.
- Work 10 dc or sc in the ring. Sl st to join.
- Fasten off, leave tail for sewing.

Organic/lopsided spots:
- Ch any number (6–10 for size variation).
- Work hdc or dc in first 3–4 chains. In next chains, mix in a few dc for lopsided growth.
- In the last ch, work 3 hdc to turn and work down the opposite side.
- Continue with random combination of sc, hdc, dc to create a more natural, uneven edge.
- Join with a sl st, fasten off, leave tail for sewing.
To vary spot shapes, randomly place increases, switch between sc/hdc/dc, and work multiple stitches into a single ch at corners.
Assembly
- Block hat for shape if desired.
- Arrange spots over hat randomly; pin for placement.
- Use tapestry needle and long tails to sew spots to the hat with a whip stitch or running stitch.
- Weave in all ends securely.

Pattern Correction & Tips
- Gauge: Check the fit after the increased crown rounds. Add or skip increase rounds as needed for head size.
- Brim: For a stiffer brim, block or use a round of slip stitches at the edge.
- Spots: Mix spot size and stitch type (sc for smaller, tighter spots, dc/hdc for larger, floppier spots).
- Ruffle Edge: For extra ruffle, increase stitch count more aggressively in the last brim round.
- Variation: Use colored yarn for spots for a funky look!
Conclusion
You have created a whimsical and stylish cow-print bucket hat. This hat is lightweight, fun, offers sun protection, and is a perfect project for beginners and confident crocheters alike. Adjust the hat size, brim, and spot arrangement as needed for full personalization.