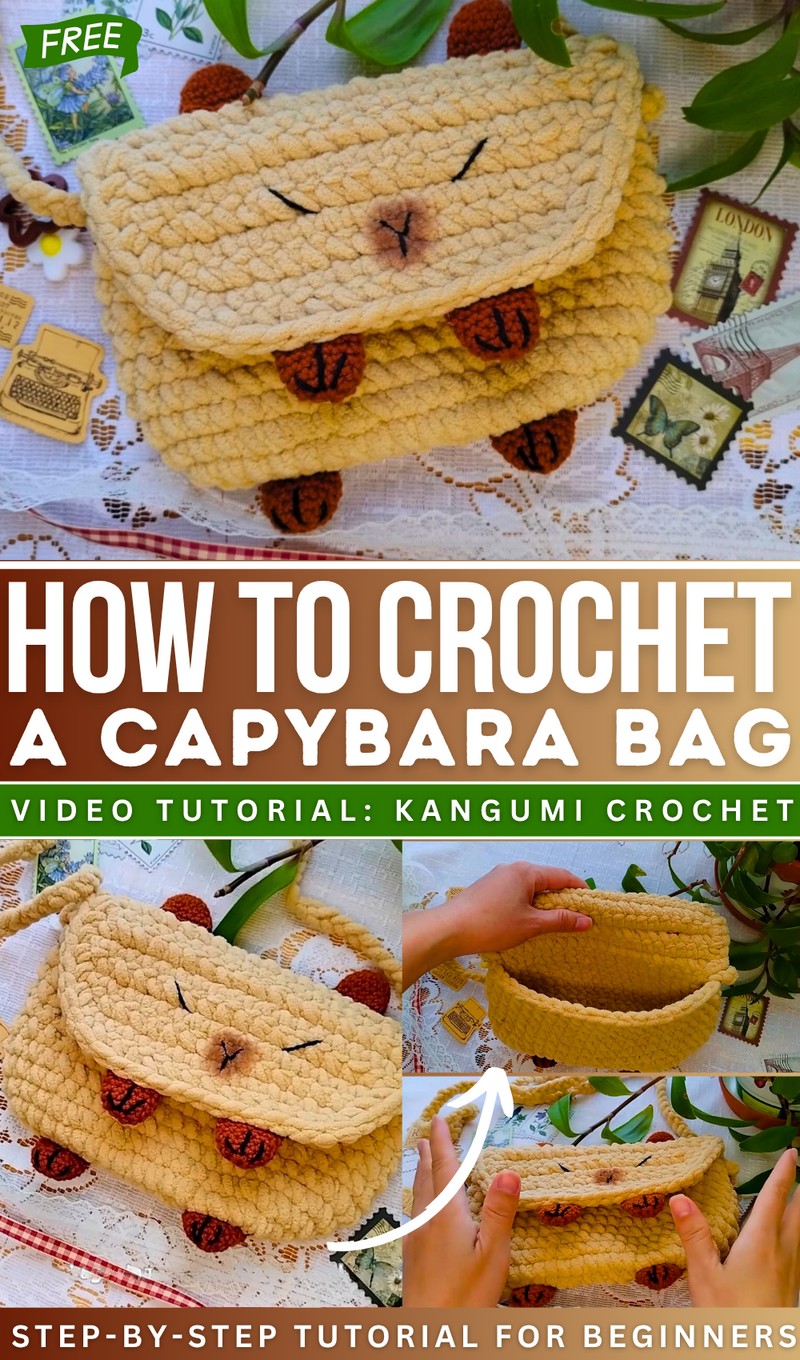
How to Crochet Capybara Bag – Full Tutorial from Start to Finish

Learn how to crochet a super soft and cute capybara bag using chenille yarn in just 20 minutes. You don’t need to worry if it is your first crochet project, as the tutorial is slow and designed for beginners. You can also adapt this design for many other animals, so try it for sure. Let’s get started!
Skills Needed: The project involves crocheting the base of the bag, adding a strap, and making the capybara’s features like its tiny hands, feet, and ears. The crochet tutorial for a capybara bag uses several basic stitches: chain stitch (ch), single crochet (sc), Slip stitch (sl st), half double crochet (hdc), and double crochet (dc).

The capybara’s personality shines through with little details like tiny hands, feet, and ears. The face is embroidered with love, adding charm to the final look. Optional touches like patterns or makeup powder for added flair let you make it truly unique. Crochet cute details like hands, feet, and ears using cotton yarn and the smaller hook. Use a magic ring for small, round shapes and embroider decorations (e.g., shirt patterns) for extra charm.
Crochet Capybara Bag Pattern
Materials List
- Chenille Yarn: Light brown, for bag body and cap
- Cotton Yarn: Dark brown, for hands, feet, and ears
- Hooks:
- 8 mm (for chenille yarn)
- 3.5 mm (for cotton yarn)
- Scissors
- Yarn needle
- Stitch markers (recommended)
- Black cotton yarn or embroidery thread (for face details)
- Pins (for marking face placement)
- Optional: Brown makeup powder or blush (for nose), silicone glue for reinforcement

Key Abbreviations
| Abbreviation | Meaning |
|---|---|
| ch | chain |
| st(s) | stitch(es) |
| sc | single crochet |
| inc | increase (2 sc in the same stitch) |
| dec | decrease (sc2tog; single crochet 2 together) |
| sl st | slip stitch |
| MR | magic ring (magic circle) |
| RS/WS | right/ wrong side |
Special Notes
- Work in continuous rounds unless otherwise indicated.
- Use a stitch marker to mark the start of each round.
- Stuffing is not needed, as this is a bag.
- The bag is assembled first, then the strap and facial features are added last.
- For a neater finish, always crochet with even tension.
Pattern

Bag Base & Body
(Yarn: Chenille, 8 mm hook)
(For demonstration purposes, use clear yarn for Rounds 1-11 if you wish.)
Bag Base (Oval)
- Ch 15.
- Round 1:
- In 2nd ch from hook: 3 sc in the same st (for rounded end).
- Sc in next 12 ch.
- In last ch: 6 sc (turn the work, now working on the opposite side of foundation chain).
- Sc in next 12 ch.
- In final stitch (the starting chain): 3 sc (completing the oval).
- Sl st to first sc to join. (Total: 36 sts).
- Round 2:
- Ch 1.
- Increase in stitches 1, 3, 17, 19, 21, and 35:
- Inc (2 sc in one st) on indicated sts; sc in others.
- Use stitch markers for these increases.
- Sl st to join. (Total: 42 sts).
- Rounds 3–11:
- Ch 1, sc in each st around (42).
- Sl st to join each round.
Strap
(Chenille, 8 mm hook)
- Ch 120 (or adjust to desired length).
- Test the chain, adjust length as needed.
- Attach each end to the sides of the bag opening with sturdy stitching (or sl st).
Bag Flap/Cap
(Chenille, 8 mm hook)
- Attach yarn to one edge of bag.
- Row 1:
- Ch 1, sc in next 19 sts. (Attach securely to bag edge.)
- Rows 2–6:
- Ch 1, turn, sc in 19.
- Row 7:
- Ch 1, turn, sc in 18 (start in 2nd st, decrease by 1 at the start).
- Rows 8–11:
- Repeat, decreasing one st at the start of each row, until you have 14 sts in Row 11.
- Fasten off, weave in tail.
Edging:
Work 1 round of sc evenly along the edge of the flap (cap), using light brown chenille yarn, to neaten and stabilize the flap.
Hands, Feet, and Ears (Make 6: 2 each for hands, feet, and ears)
(Cotton yarn, 3.5 mm hook)
- Round 1: MR, 6 sc (6).
- Round 2: 6 inc (12).
- Round 3: (sc, inc) x6 (18).
- Round 4–5: Sc in each st (18).
- Round 6: (sc, dec) x6 (12)
- Round 7: Sc in each st (12)
- Flatten the piece, fold in half and sc across 6 sts to close.
- Fasten off, leave tail for sewing.
- Repeat to make 6 pieces.
Attach two for hands on the upper part of the bag, two for feet at bottom corners, two for ears at top edges. Sew on gently and evenly.
Face Embroidery
(Black cotton yarn or embroidery thread, embroidery needle)
- Use pins to mark desired positions of eyes and nose.
- Embroider small oval/round or sleepy eyes, and a tiny “Y”-shaped or inverted-triangle nose between them.
(Optional: Use a touch of brown makeup powder or blush on the nose for a cute highlight.)
Finishing
- Hide and secure all yarn ends inside the bag.
- Optionally reinforce straps or attachments with a dab of invisible fabric glue for extra security.

Pattern Correction
- Bag base stitch count: If your stitch count is off after the first oval round, count stitches and increase/decrease at corners to achieve the total given.
- Strap: Adjust the number of chains for the desired length.
- For the flap/cap, ensure you decrease evenly and match the curve to the bag’s top for best closure.
Tips
- Use stitch markers at corner increases and decreases to avoid confusion.
- Try not to pull chenille yarn too tightly, as it can thin out.
- Stretch your hands frequently—working with large hooks and thick yarn can be tiring.
- Personalize: Embroider cheeks, add a tiny crown, or adornments for your capybara.
Conclusion
Congratulations, your capybara bag is finished! You now have a squishy, huggable, and practical project bag or accessory, ready for adventure. Carry it with pride—your handmade creations are full of love and charm.
Video Guide
https://youtu.be/JRJXSLf_LO4