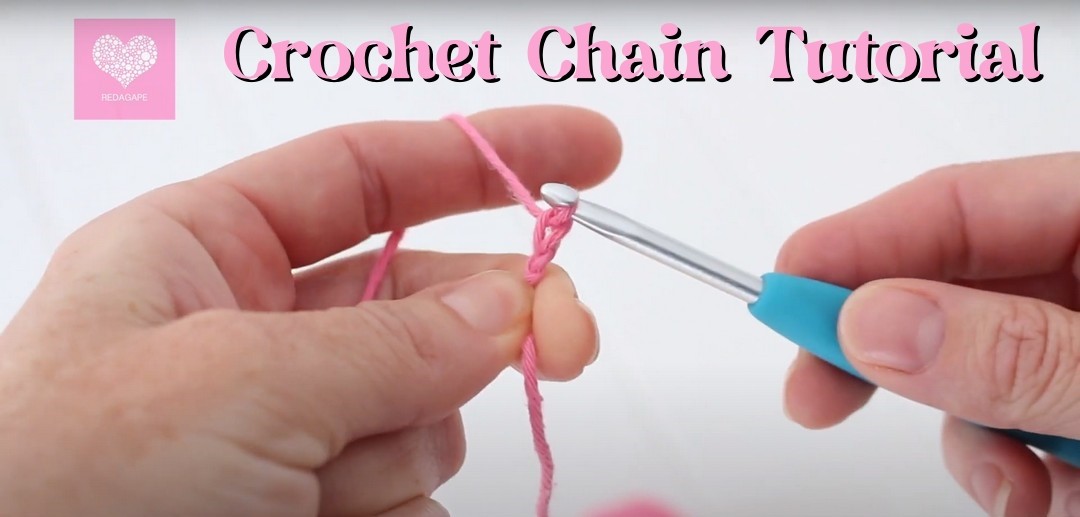
How To Chain Stitch (ch) For Crochet – 1 Minute Beginner Tutorial
‘Besides being a foundational stitch for most crochet projects, chain stitch is useful for many other important tasks.’ If you heard this and want to learn how to make a chain stitch for crochet, this easy tutorial will help you.
After learning to attach the yarn with a hook, beginners always make their first stitch as a chain. It is easy, shows results quickly, and looks good too. I will provide detailed instructions, tips for holding yarn and hook, pictures, and more about chain stitching.
What Is a Crochet Chain Stitch & How To Use It?
As the name suggests, a crochet chain is a stitch that looks like an interlocking loop. It is the simplest of all crochet stitches. Many crochet projects, whether round or flat, demand its row or ring as a foundation or starter. Here are some other uses of chain stitch:
- The chain can bring the new row or round to the required height. It is called the turning chain.
- If you have seen the gaps or spaces in the crochet fabric, it will be due to the chain spaces. You can use it in granny squares where double or half-double crochet, lacy designs, and more are alternated with it.
- You can also use it to make a beautiful border finish.
- Chain Join can be used for joining motifs or any pieces together but not a good method.
- Chains are often used to create buttonholes in garments or other items that require closures.
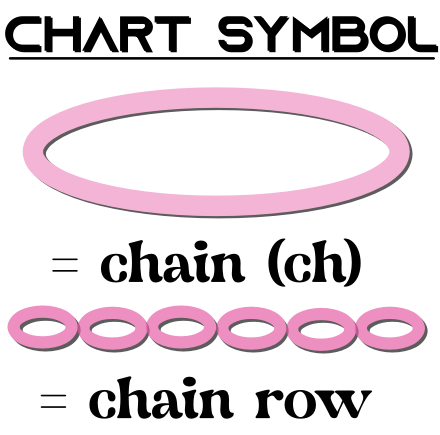
Chart Symbol & Abbreviation:
In charts, the chain stitch is represented by an oval and a row with a series of these ovals. Repeating the complete “chain” is not good in the pattern, so it is represented by “ch” when written.
How Much Turning Chains Are Needed For Other Stitches?
When you start a row, turning chains help add the required height and stitches.
- Single Crochet: Use 1 Turning Chain
- Half-double: Use 2 Turning chains.
- Double Crochet: Use 3 Turning chains
- Treble: Use 4 Turning chains
- And so on….. with one increased chain every time.
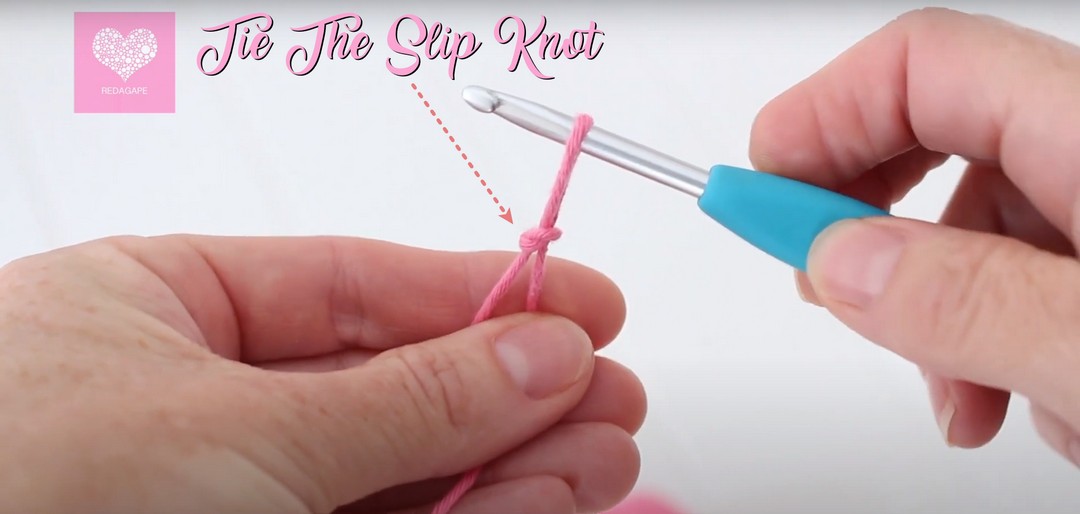
What is Needed Before Working In The Chain Stitch Crochet?
Before working on the chain stitch, have a crochet hook, practice yarn, and then tie the slip knot (a knot that connects the yarn with the hook to work!). For this,
- Pull a length of yarn from the ball about 8 inches and hold the tail end and ball end with your fingertips.
- Cross the hands clockwise to form a loop.
- Pinch the overlapping point and hold to move the tail yarn to the back of the loop.
- Take a crochet hook, grab the loop, and pass-through this.
- When the loop is on the shaft of the crochet hook, pull the hook up until the loop becomes smaller enough to tie completely. You made the slip knot.
How To Do A Crochet Chain Stitch?
It’s time to go for the step-by-step guide on chain stitching. I am right-handed and made the tutorial similarly, but you can follow the instructions invertedly where I shall tell orientations. Below are the steps to follow:
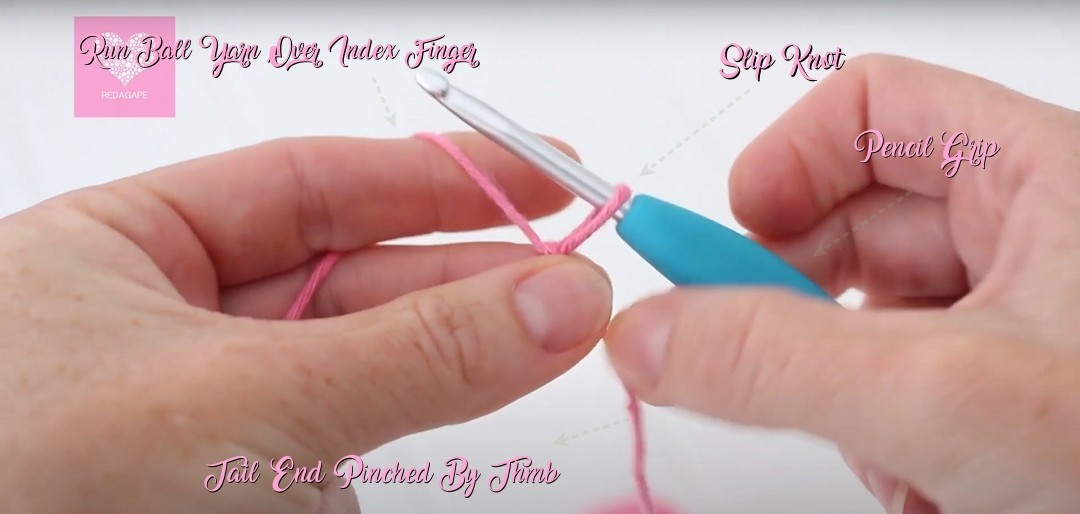
Step 1: Hold Yarn And Hook
Holding the yarn and the hook correctly is necessary to maintain the tension while working. It’s pretty self-explanatory, however, there are two types of hook holding: Knife grip and pencil grip. I personally use the second type, but choose which you are comfortable with.
After holding the hook with the right hand, hold the tail yarn near the tie point by thumb and middle finger. Furthermore, the ball yarn (that extends and connects to the ball!) should run over your index finger and then pass between the index and middle finger. Then, it should go near the palm and wrap around the little finger by passing between the ring and the little finger. I also use This most famous one, but you can choose other ways to hold the yarn.
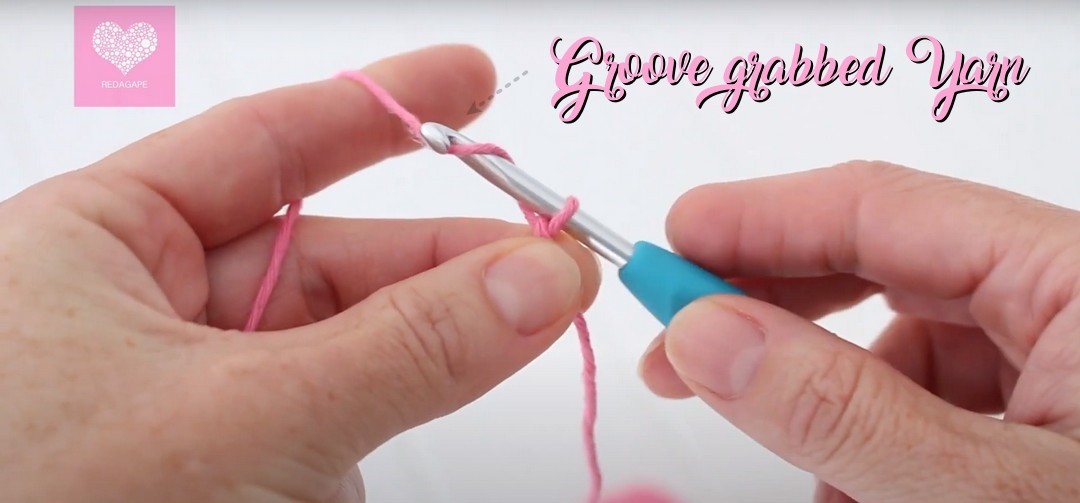
Step 2: Yarn Over
Yarn over is wrapping the yarn around the hook shaft and then grabbing it by its groove (the hook!). You will do this by bringing the hook on the left side of the working yarn, keeping the lower portion here to block the movement of yarn, and only moving the groove (upper part of the hook!) around (moving down and then up!) to bring it to the right side. Then, grab the working yarn by the groove. It will complete the Yarn Over.
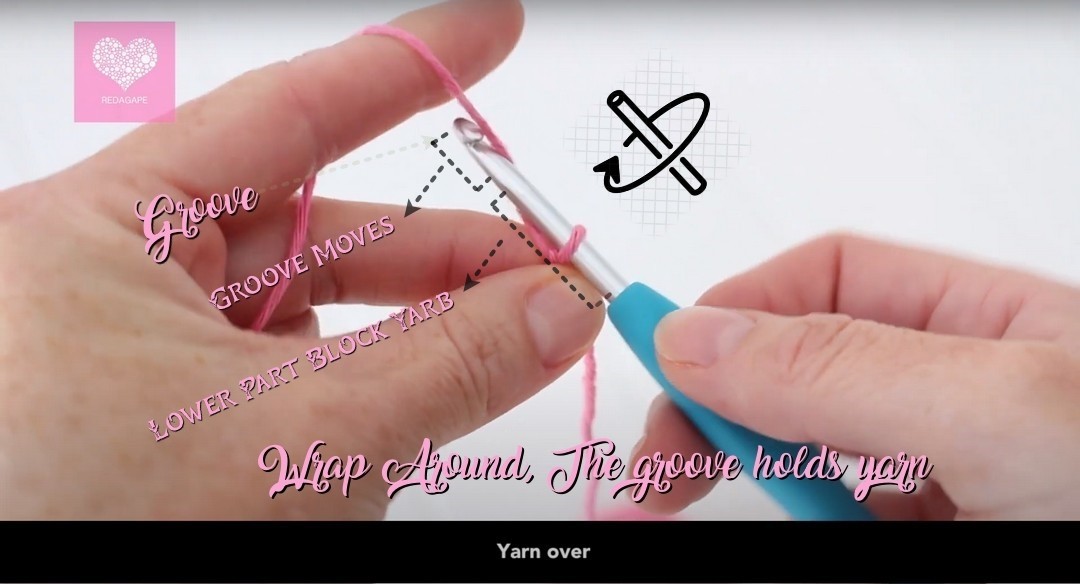
Step 3: Grab Yarn
After the groove has come to the left, grab the working yarn by the curved part of the groove. This would help for the next step.
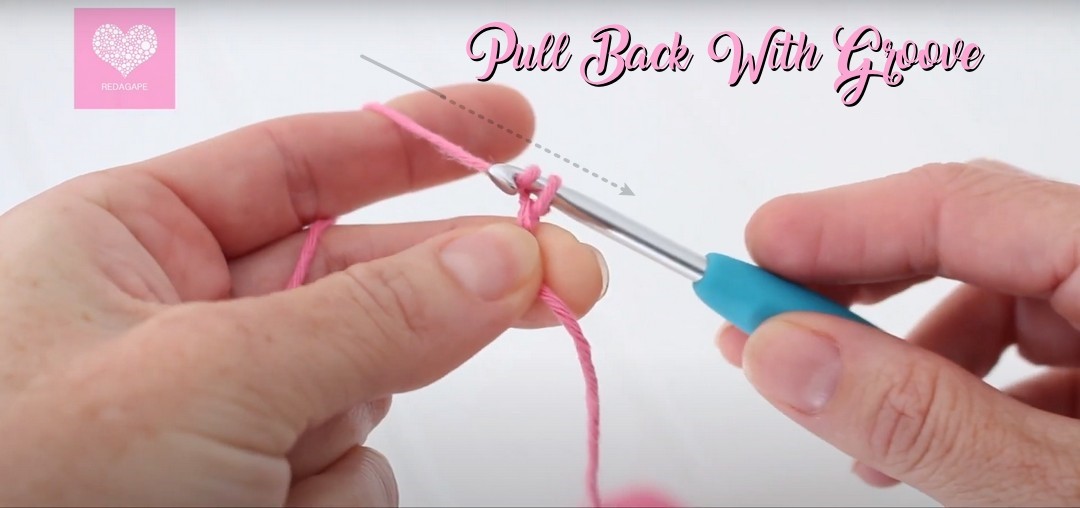
Step 4: Pull The Grabbed Yarn
Keep the tension, and you pull the hook back while grabbing the yarn. As you go, you will notice actually you are pulling a loop.
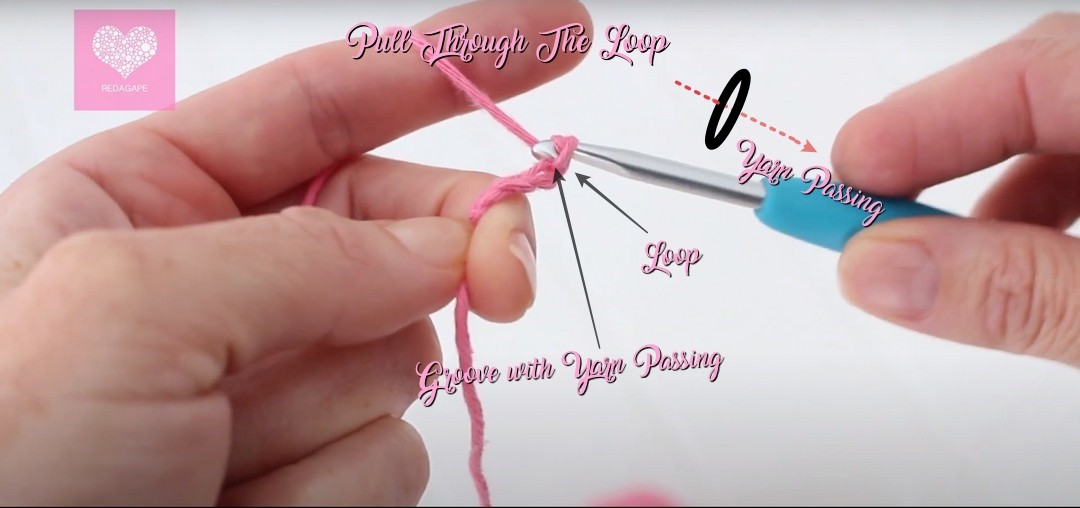
Step 5: Pull Through
You have a knot or loop on the crochet hook. Pass through this loop while pulling the hook back until the shaft is completely removed, and another loop is added after it.
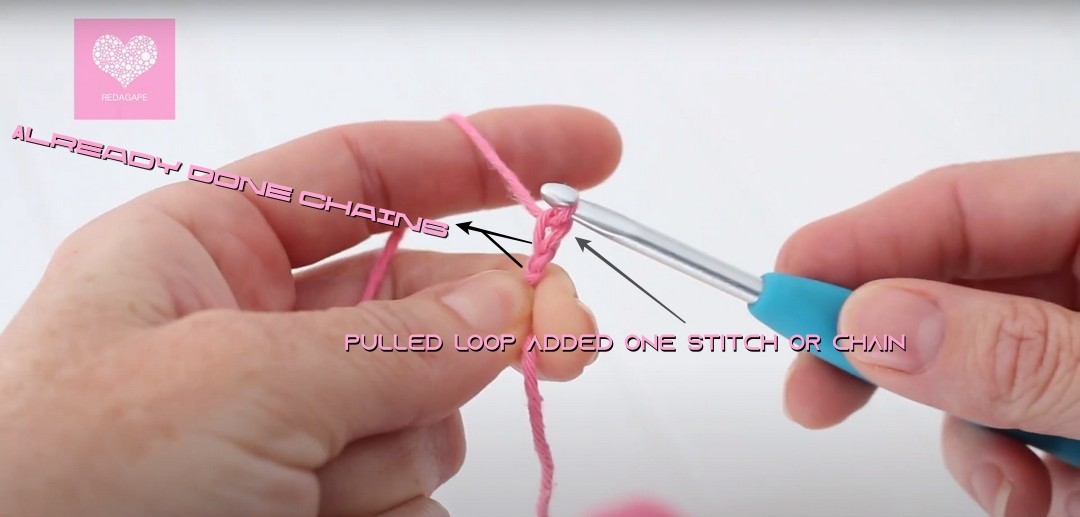
Step 5: See the Chain
You will watch a chain added under the hook shaft. You can repeat those steps again and again to make a complete row.
Make More Chains To Complete The Row
In this way, keep making more and more chains; when a row is completed, turn the work to start a new row and add turning chains if needed.
Faqs
Does Slip Knot Count As Chain?
No, a slip knot that resembles chain stitch ‘V’ is not counted as a stitch. You may start counting after it when following a pattern.
Why My Chain Is Loose?
Your crochet chain is loose because you have not provided enough tension to the yarn. Neither more tension is good nor less.
How To Make a Chain?
Make a slip knot, yarn over, and pull through the loop on the hook.
Final Thoughts
Crocheting needs the right tension, good lighting conditions, and the recommended hook size for the crochet yarn. You must keep practicing the crochet chain, and they will start looking like any professional. I hope you loved and learned something new from this chain stitch tutorial.